
Creative Outdoor Well Cover Ideas to Inspire
There is nothing quite as frustrating as stepping back to admire a newly manicured lawn or a carefully curated garden, only to have your eye immediately drawn to a protruding white PVC pipe or a rusty steel cap. Well heads, septic covers, and utility pipes are necessary for modern living, but they are notorious curb appeal killers. As a designer, I constantly deal with the “eyesore factor” in landscape planning. The goal is never just to hide these elements, but to integrate them so seamlessly that they disappear into the overall design.
The challenge lies in balancing aesthetics with functionality. You cannot simply bury these components; they require regular maintenance and emergency access. If you build something too heavy or permanent over a well head, you are creating a nightmare for your future self when a pump fails in the middle of winter. The solution must be lightweight, ventilated, and visually consistent with your home’s exterior architecture.
In this guide, I will walk you through my favorite methods for disguising these utility features. We will look at options ranging from quick retail fixes to custom-built architectural solutions. If you are looking for visual inspiration, please note that a curated Picture Gallery is at the end of the blog post.
1. The Natural Approach: Realistic Faux Rocks
For many homeowners, the “mock rock” is the go-to solution, but it has a bad reputation because many of them look like shiny, plastic lumps. The key to pulling this off is investing in high-fidelity mock rocks that mimic the texture and grit of natural stone. In my projects, I look for covers made from “RealRock” or textured polyethylene that has a matte finish.
When selecting a faux rock, size matters more than you think. A common mistake is buying a rock based on the diameter of the pipe alone. You must account for the height and the bulky electrical conduit that usually runs up the side of the well casing. Always measure the height of your pipe and add at least two inches of clearance. For the width, measure the widest point (usually at the base where the bolts are) and add four inches to ensure the rock sits flush on the ground.
To make the rock look intentional rather than accidental, you must anchor it into the landscape. Do not just plop it in the middle of the grass. Create a small garden bed around it. Surround the base of the faux rock with real river rocks or mulch. This blurs the line between the plastic edge and the soil, making the “rock” feel like a natural outcropping.
Designer’s Note:
Wind is the enemy of hollow rocks. I once had a client lose their well cover during a storm because it wasn’t staked down. Most high-quality covers come with flanges or stakes. Use them. If yours didn’t, drill small holes near the base and use heavy-duty tent stakes to secure it to the ground.
2. Softscaping: Using Plants as Screens
As a landscape designer, my preferred method for hiding utility pipes is “softscaping.” This involves using plant material to create a living screen. This approach is superior because it adds texture and movement to the garden, completely distracting the eye from the static hardware.
Ornamental grasses are the best tool for this job. Varieties like Maiden Grass (Miscanthus) or Fountain Grass (Pennisetum) grow tall and dense, providing excellent coverage. They also sway in the wind, which breaks up the rigid vertical line of a well pipe. When planting, draw a circle around the well head with a radius of at least three feet. Do not plant anything inside this circle.
Shrubs are another option, but you must be careful with root systems. Avoid water-seeking trees like willows or maples near water lines. Instead, opt for shallow-rooted shrubs like Boxwoods or Hydrangeas. If you use shrubs, plant them in a “U” shape around the back and sides of the well head, leaving the front accessible for service.
Pro Rule of Thumb:
Always anticipate the mature size of the plant. A one-gallon pot looks small now, but in three years, it could engulf your well head. I recommend spacing plants so that their mature canopy just barely touches the pipe, rather than crowding it. This prevents foliage from trapping moisture against the metal or plastic, which attracts insects and rodents.
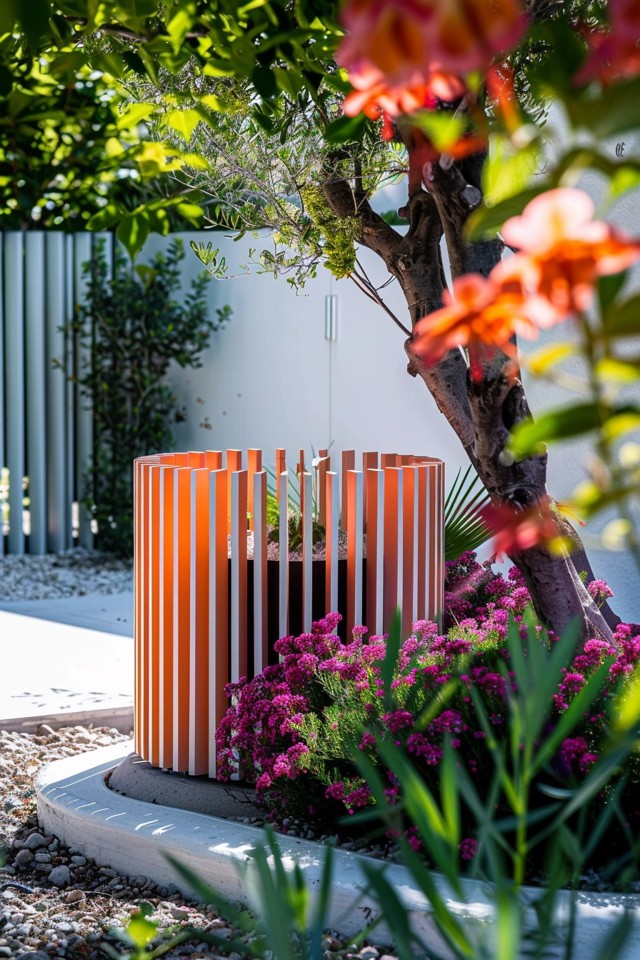
3. The Architectural Box: Custom Woodwork
If your home leans toward a modern or farmhouse aesthetic, a faux rock might look out of place. In these cases, I design custom wooden covers. These are essentially bottomless boxes that slip over the pipe. The beauty of a wooden cover is that it can be painted or stained to match your home’s siding, deck, or fence, making it feel like an extension of the architecture.
A slatted design is generally best. By using horizontal slats with small gaps between them, you allow for necessary airflow. Well pumps generate heat, and in the summer, a fully sealed box can cause the motor to overheat. I typically use cedar or pressure-treated lumber for these builds because of their rot resistance.
If you are building this yourself, consider the weight. You want it substantial enough to withstand wind, but light enough that one person can lift it off. If the structure gets too heavy, I install handles on the sides or design one side on hinges (like a cabinet door) so the meter or gauge can be checked without lifting the entire unit.
Common Mistakes & Fixes:
Mistake: Placing wood directly on the soil.
Fix: Wood wicks up moisture and rots. Set your wooden box on a bed of gravel or place it on four concrete paver blocks at the corners. This keeps the timber off the damp ground and extends the life of the structure by years.
4. Functional Disguise: Planters and Pedestals
In smaller yards or patio areas, you often do not have the space for a large landscape bed. Here, the strategy shifts to “hiding in plain sight” using functional decor. A popular method is using a hollow-bottomed planter.
You can build a large wooden planter box and install a false bottom about halfway down. The top half holds your potting soil and flowers, while the bottom half creates a cavity that hides the well pipe. This is a brilliant solution because it adds color and height to the garden.
Another option is a birdbath pedestal. Many ceramic or concrete birdbaths have hollow bases. If the dimensions align, you can slide the pedestal over the pipe and place the basin on top. This turns an ugly utility feature into a focal point for wildlife. Just ensure the birdbath is stable; you may need to level the ground with sand first.
Safety Warning:
If you use a planter, ensure it is not too heavy to move. A planter filled with wet soil can weigh over 100 pounds. I recommend using a lightweight resin planter or keeping the soil volume low by using foam fillers in the base of the planting compartment.
5. The Whimsical Approach: Wishing Wells and lighthouses
While some designers consider wishing wells cliché, they remain a beloved choice for cottage-style homes and rustic landscapes. If you choose this route, the key is material quality. Avoid the cheap, brightly colored plywood kits sold at big-box stores. They tend to peel and warp within two seasons.
Look for wishing wells made from solid cedar or redwood. These woods weather to a beautiful gray patina that blends well with a natural landscape. The structure should be robust. I prefer designs where the “bucket” hanging from the well is actually a functional planter, allowing you to add trailing vines like ivy or petunias.
Lighthouses are another common cover, particularly in coastal regions. Similar to the wishing well, the difference between “tacky” and “charming” is the quality of construction. A distinct advantage of the lighthouse design is its height; it easily accommodates taller pressure tanks or irregular pipes that low-profile rocks cannot cover.
Maintenance Tip:
Whatever structure you choose, it becomes a home for wasps and spiders. I advise my clients to spray the interior of the cover with a pest repellent twice a year—once in spring and once in autumn. This ensures that when the well technician arrives, they aren’t greeted by a swarm of angry insects.
Designer’s Note: The “Accessibility First” Rule
I cannot stress this enough: never prioritize aesthetics over access. I once worked on a renovation where the previous owner had built a heavy stone retaining wall literally on top of the septic cleanout. When the system backed up, we had to bring in an excavator to destroy the wall before the plumber could even start working.
When you are planning your cover, imagine it is 2:00 AM, it is freezing outside, and you have no water. Can you get to the well head in under a minute with a flashlight in your hand? If the answer is no, your design is too complicated. Avoid screws that require power tools to remove. Avoid heavy masonry that requires two people to lift. Simple, lift-off designs are always the professional choice.
What I’d Do in a Real Project: A Mini Checklist
If I were consulting on your property today, this is the exact thought process I would follow to solve your well cover issue:
- Measure First: I would measure the width, height, and diagonal depth of the equipment. I would add 3 inches to every dimension for clearance.
- Check the Sightlines: I would stand at the kitchen window and the main patio. What is the primary angle of view? The cover needs to look good from the house, not just from the street.
- Select the Material:
- Is it near the foundation? I would use a wooden box painted to match the siding.
- Is it out in the lawn? I would use a high-quality faux rock with a mulch bed.
- Is it in a flower bed? I would use tall ornamental grasses.
- Plan for Winter: If you live in a cold climate, I would insulate the cover. I often line the inside of wooden boxes with rigid foam insulation board to provide an extra layer of protection against freezing pipes.
- Install a Marker: If you rely on snow removal services, place a tall reflective marker near the well cover. You do not want a snowplow knocking over your custom carpentry.
Common Mistakes + Fixes
Mistake: Using Climbing Vines on the Pipe
It is tempting to let ivy or clematis grow directly on the pipe to hide it.
Fix: Vines trap moisture and can actually work their way into fittings, causing leaks. Always use a trellis or a cover; never let plants attach directly to utility equipment.
Mistake: Blocking Ventilation
Covering a pump motor with a tight plastic bucket or sealed tarp.
Fix: Motors need to breathe. If you use a solid cover, drill ventilation holes near the top and bottom (covered with mesh screen) to create a chimney effect for airflow.
Mistake: Losing Location
In heavy snow or overgrowth, losing the exact location of a septic lid.
Fix: “Triangulate” the position. Measure the distance from two permanent corners of your house to the cover and write these measurements down. Keep this in your home maintenance file.
Frequently Asked Questions
Can I legally cover my well head?
Generally, yes. Most building codes allow you to cover the well head as long as it remains accessible for maintenance and the cover does not interfere with the operation of the equipment. However, you should never bury a well head that is intended to be above ground. This can lead to groundwater contamination.
How do I stop my faux rock from blowing away?
Security is vital. Most faux rocks have a flange at the bottom. Use 10-inch landscape spikes or rebar bent into a U-shape. Drive these through the flange into the soil. If your area has high winds, consider burying the bottom inch of the rock in soil or gravel to prevent wind from getting under the lip.
What is the best plant to hide a well pipe year-round?
In zones where winter means bare branches, evergreen shrubs are your best friend. Boxwood, Yew, or Dwarf Spruce provide year-round coverage. Just remember to plant them far enough away (2-3 feet) so they don’t crowd the hardware as they grow.
Is it safe to put a wishing well over a septic tank lid?
Yes, provided the wishing well is movable. The main concern with septic lids is weight. Do not place heavy masonry structures over the tank or the leach field, as this can compact the soil and damage the pipes. A wooden wishing well is light enough to be safe.
Conclusion
Hiding a well head or utility pipe is one of those small home improvement projects that delivers a massive return on investment regarding curb appeal. It removes a jarring visual distraction and allows the eye to travel smoothly across your landscape.
Whether you choose the rugged look of a faux boulder, the organic feel of ornamental grasses, or the clean lines of a custom wooden box, the principles remain the same: keep it accessible, keep it ventilated, and keep it consistent with your home’s style. Don’t let a white PVC pipe dictate the look of your yard. With a little creativity and the right materials, you can turn a necessary eyesore into a beautiful garden feature.
Picture Gallery


