
Creative Painted Stepping Stones Ideas for Gardens
Garden pathways are often treated as purely functional elements, merely a way to get from the patio to the back gate without getting your shoes muddy. However, as a designer, I view the ground plane as a massive, underutilized canvas that can tie your exterior design together. Painted stepping stones offer a unique opportunity to inject personality, color, and wayfinding cues into your landscape without the massive expense of hardscaping.
When done correctly, these art pieces do more than just look pretty; they guide the eye and control the flow of foot traffic through your outdoor sanctuary. For plenty of visual inspiration to spark your creativity, be sure to check out the Picture Gallery at the end of this blog post. Whether you are renting and need a temporary upgrade or are looking for a weekend project to enhance your curb appeal, this guide covers the structural and aesthetic rules for success.
In this post, we will move beyond simple crafts and look at this through a design lens. We will cover material selection, durability techniques that withstand UV rays and rain, and proper installation spacing for a comfortable stride. Let’s turn those plain concrete pavers into bespoke garden features.
Choosing the Right Substrate and Materials
The success of your stepping stone project begins before you even open a can of paint. The material you choose dictates the longevity of the design and the safety of the path. In my client projects, I almost exclusively use pre-cast concrete pavers or smooth river stones.
Concrete Pavers
Pre-cast concrete pavers are the most reliable option for painted designs. They offer a relatively flat surface which makes detailed painting easier, and they are porous enough to accept primer readily.
- Size: Look for rounds or squares that are at least 12 inches in diameter. Anything smaller than 12 inches is difficult for an adult to balance on comfortably.
- Texture: Avoid “exposed aggregate” pavers (the ones with bumpy pebbles on top). Look for “smooth finish” concrete, which feels like a sidewalk.
Natural River Rock
For a more organic, cottage-style garden, large river rocks are beautiful. However, they are rarely perfectly flat.
- Stability: You must choose stones with a flat bottom, or they will rock and become ankle-twisting hazards.
- Shape: Oval or kidney-bean shapes blend best with natural landscaping beds.
The Paint Selection
Do not use standard indoor craft acrylics unless you plan to seal them excessively. I recommend “patio paint” or outdoor-rated acrylics. These formulas are designed to expand and contract with temperature changes, preventing the cracking and peeling that plagues amateur projects.
Preparation: The Secret to Longevity
If you ask any professional painter what the most important step is, they will tell you it is preparation. Concrete and stone are dirty, alkaline surfaces. If you paint directly onto a store-bought paver, the dust will cause your design to flake off within a month.
Cleaning the Canvas
Scrub your stones vigorously with a stiff wire brush and a mixture of water and dish soap. This removes the “release agents” often found on concrete pavers from the manufacturing molds. Rinse them thoroughly and—this is crucial—let them dry for at least 24 to 48 hours. Concrete holds moisture deep inside; if you paint over damp stone, you trap moisture, which will eventually push the paint off from the inside out.
The Priming Rule
Never skip primer. Use a high-quality exterior masonry primer. This creates a chemical bond with the stone and provides a neutral white background that makes your colors pop. Without a white base coat, your bright yellows and reds will look muddy against the gray concrete.
Design Concepts: From Whimsical to Architectural
Now that your canvas is prepped, we have to decide on a visual direction. In interior design, we ensure the rug matches the curtains; in landscape design, your stepping stones should complement your home’s architectural style and your plant palette.
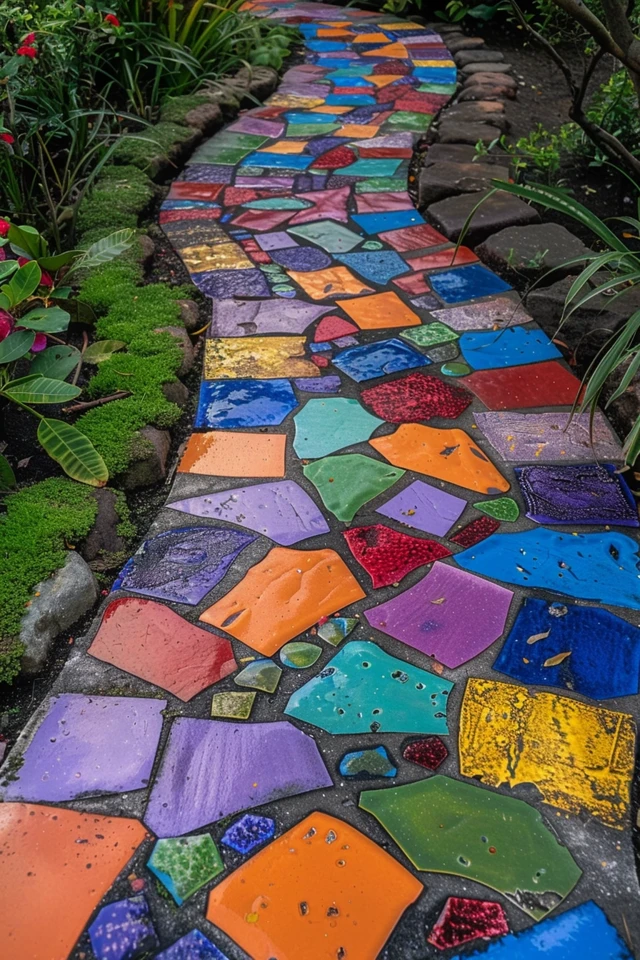
The Faux Mosaic Look
Real mosaic stones are stunning but labor-intensive and sharp if you walk barefoot. You can mimic this look with paint.
- Base coat the stone in a dark grout color (charcoal or deep gray).
- Paint irregular geometric shapes in bright colors, leaving small “grout lines” between them.
- This style hides dirt incredibly well and fits perfectly in Mediterranean or Spanish-style gardens.
Botanical Silhouettes
For a sophisticated, high-end look, use nature as your stencil.
- Paint the stone a solid base color (perhaps a color pulled from your exterior shutters).
- Place a real fern frond or large leaf flat on the stone.
- Spray paint or sponge a contrasting color over it.
- Peel away the leaf to reveal a crisp, organic silhouette. This creates a cohesive look that blends seamlessly with your greenery.
Mandala and Radial Designs
Radial symmetry is very pleasing to the eye and works well on round pavers. Using dotting tools to create expanding circles of color can be meditative to create and mesmerizing to look at. However, keep scale in mind. Tiny intricate dots may get lost visually when viewed from a standing height of five or six feet. Aim for larger, bolder patterns that read well from a distance.
Designer’s Note: A Lesson Learned
Early in my career, I designed a pathway for a client using high-gloss, heavily sealed painted stones. The first time the sprinklers went off, the stones turned into ice rinks. The client slipped and nearly fell.
The Fix: Never use a high-gloss finish without adding texture. Now, I always mix a pinch of clear silica sand or non-slip additive into the final sealer coat. It is invisible to the eye but provides necessary traction for wet shoes.
Execution and Layout Techniques
Once your stones are painted and dried, installation is where the “design” aspect truly comes into play. A pile of pretty stones is clutter; a laid path is architecture. The placement of your stones dictates how people move through your space.
The Stride Rule
A common mistake is placing stones too far apart, forcing guests to hop like they are playing a game, or too close together, which leads to shuffling.
- Measurement: The ideal spacing for an average adult stride is 24 inches from the center of one stone to the center of the next.
- Mock-up: Before digging, lay the stones on the grass and walk the path naturally. Adjust until it feels effortless.
Visual Flow
Avoid straight lines unless you have a very modern, rigid garden structure. Gentle “S” curves create a sense of mystery and make small gardens feel larger by obscuring the destination. Use the stones to lead the eye toward a focal point, like a fountain, a bench, or a particularly beautiful blooming shrub.
Installation and Maintenance
You cannot simply throw the stones on top of the grass. They will wobble, break, and eventually ruin your lawnmower blades. Proper installation is about sinking the stones to the correct grade.
Digging In
Place the stone where you want it and cut around the perimeter with a spade. Lift the stone and dig out the sod. You want to dig a hole that is the depth of the stone plus one inch.
The Sand Base
Fill that extra inch of depth with sand or stone dust. This allows you to level the stone perfectly so it doesn’t rock. It also improves drainage so the stone doesn’t sit in a puddle of mud, which protects your paint job from rising dampness.
Mower Height
The top of the stone should be flush with, or slightly below, the soil level (not the grass height). This allows you to run a lawnmower right over the path without chipping the stone or dulling the blade.
Common Mistakes + Fixes
Even seasoned DIYers can run into trouble with exterior projects. Here are the most frequent issues I see and how to correct them.
Mistake: Peeling or Bubbling Paint
Why it happens: Usually caused by moisture trapped inside the stone before sealing, or painting on a hot stone in direct sunlight (which dries the paint too fast).
The Fix: Strip the loose paint, sand the edges, and repaint. Ensure the stone is bone dry and paint in the shade.
Mistake: Fading Colors
Why it happens: UV rays are brutal on red and yellow pigments.
The Fix: Use a UV-resistant clear coat. Re-apply this topcoat every spring to act as a sunscreen for your art.
Mistake: Stones Sinking or Tilting
Why it happens: Placing stones directly on soft topsoil without a base.
The Fix: Lift the stone, add crushed limestone or sand underneath, dampen the sand, and tamp it down before replacing the stone.
What I’d Do in a Real Project
If I were managing this for a client’s backyard renovation, here is the exact workflow I would follow to ensure professional results:
- Select a Palette: I would limit the paint colors to three hues that already exist in the patio furniture or exterior trim to ensure cohesion.
- Buy Extra Stones: I always buy 10% more pavers than needed to test paint colors and sealers before committing to the full batch.
- Use Marine Varnish: For the topcoat, I prefer marine spar varnish (used on boats). It offers superior water and sun protection compared to standard craft sealers.
- Create a Destination: I would ensure the path actually leads somewhere specific, even if it is just a small clearing with a single chair. A path to nowhere feels unfinished.
Final Checklist
Before you call the project done, run through this quick list to ensure safety and durability.
- Stability Check: Step on the edge of every stone. If it tilts, pack more sand underneath.
- Texture Check: Spray the stones with a hose and run your hand over them. If they are slippery, they need a new topcoat with grit added.
- Spacing Check: Walk the path while carrying a tray or a drink. If you have to look down to place your feet, the spacing needs adjustment.
- Drainage Check: Ensure water isn’t pooling on top of the stones after rain.
FAQs
Can I paint plastic stepping stones?
I generally advise against it. Plastic flexes when walked on, which causes paint to crack almost immediately. Stick to concrete or stone for painted projects.
How often do I need to reseal the stones?
For high-traffic areas or climates with harsh winters, you should apply a fresh coat of sealer once a year, preferably in the spring. This takes about 15 minutes and will double the lifespan of your art.
What is the best way to store them in winter?
If you live in an area with heavy freeze-thaw cycles, leaving customized stones in the ground can cause cracking. If they are precious to you, pry them up and stack them in the garage or shed during the snowy months.
Can kids help with this project?
Absolutely. Just ensure an adult handles the cleaning (chemicals) and the final sealing (fumes). Let the kids handle the acrylic painting part. It is a fantastic way to let them contribute to the family garden.
Conclusion
Painted stepping stones are one of the most accessible high-impact projects you can undertake for your garden. They require no heavy machinery, minimal budget, and offer a massive return on visual interest. By following the rules of proper preparation, scale, and spacing, you elevate a simple craft into a legitimate landscape design feature.
Remember that a garden is a living, evolving space. These stones add a layer of permanence and structure that contrasts beautifully with the changing seasons of your plants. Take your time with the layout, prioritize safety with non-slip finishes, and enjoy the process of creating a path that is uniquely yours.
Picture Gallery


