
Creative Painting Concrete Driveway Ideas
The driveway is often the most overlooked element of a home’s exterior, yet it takes up a massive amount of visual real estate. When I drive up to a client’s home for a consultation, a cracked or stained grey slab immediately lowers the perceived value of the property, regardless of how beautiful the landscaping is. Transforming this space doesn’t always require an expensive tear-out; often, the right paint or stain application can completely revitalize the entrance.
I recently worked with a client who hated her standard builder-grade driveway but didn’t have the budget for pavers. We used a simple geometric paint design using two shades of grey and a charcoal border, and neighbors actually stopped to ask when she had the stone installed. It is entirely possible to achieve high-end looks with paint if you understand the material constraints and design rules.
For those looking for visual inspiration to spark your own project, make sure to check out the curated Picture Gallery at the end of the blog post.
1. Analyzing the Condition and Feasibility of Your Concrete
Before we even look at color charts, we have to play the role of a structural inspector. As a designer, I never approve a paint finish on concrete that hasn’t been thoroughly vetted for moisture and integrity. If you paint over a compromised surface, the product will flake off within six months, guaranteed.
Start by checking for moisture issues, which is the number one enemy of driveway paint. Tape a 2-foot square of clear plastic sheeting to the driveway and leave it for 24 hours. If you see condensation under the plastic or the concrete looks dark and damp when you peel it off, your concrete holds too much ground moisture to accept standard paint; you will need a specialized breathable stain instead.
Next, assess the texture of the concrete. Concrete that is steel-troweled and extremely smooth is actually difficult to paint because the material has no “tooth” for the paint to grab onto. Conversely, older, pitted concrete will soak up gallons of expensive product.
Designer’s Note: The “New Pour” Rule
A common mistake homeowners make is trying to paint a new driveway too soon. Concrete needs at least 30 to 60 days to fully cure and off-gas moisture. If you paint too early, the alkalinity of the curing concrete will burn through the paint adhesion, causing bubbling. In my projects, I always wait a full 90 days on new pours just to be safe.
Preparation Checklist
- Pressure Wash: You need a machine with at least 3,000 PSI to remove embedded tire grime and mold.
- Degreasing: Oil stains are bond-breakers; scrub them with a specialized concrete degreaser and a stiff bristle brush.
- Etching: If the concrete feels smooth like glass, use an acid etcher to open the pores (it should feel like 120-grit sandpaper afterwards).
- Crack Filling: Use a paintable masonry crack filler for anything wider than a hairline, or the paint will highlight the flaw rather than hide it.
2. Design Concepts: Beyond the Solid Coat
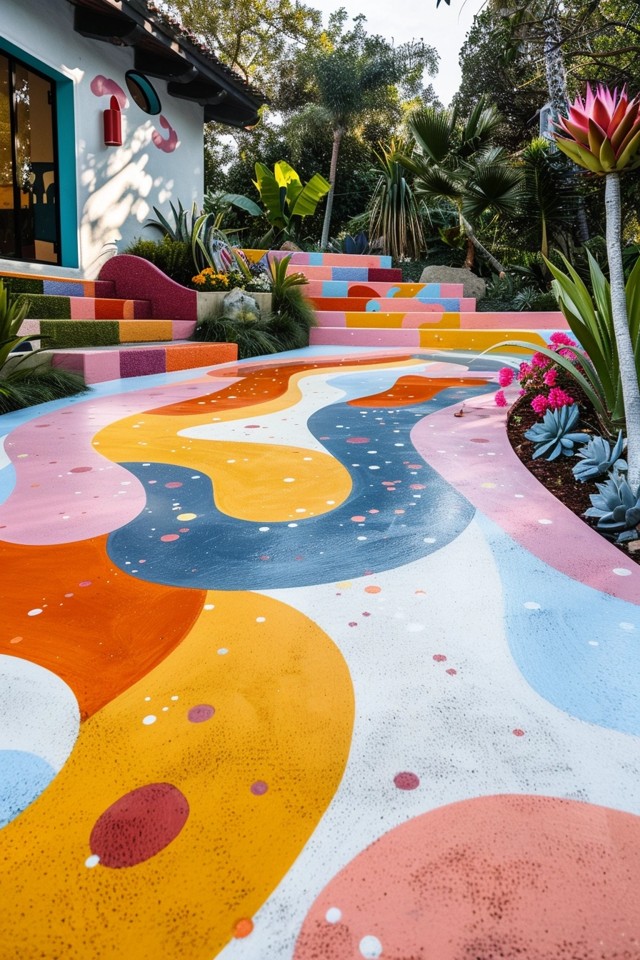
Painting a driveway a single solid color is rarely the best design choice. Large monolithic blocks of color can look flat and often resemble a parking lot rather than a residential entrance. To get a high-end look, we need to introduce pattern, border, or texture.
The Faux “Rug” Runner
This is one of my favorite techniques for creating a welcoming entry. Instead of painting the entire driveway, paint a decorative “runner” down the center or specifically leading up to the front path.
You can frame this runner with a solid border color that matches your house trim. Inside the border, use a stencil pattern—like a trellis or Moroccan tile design—to mimic the look of an outdoor rug. This breaks up the vast expanse of concrete and guides the eye toward the front door.
The Diamond/Harlequin Pattern
This classic pattern elongates the look of the driveway and feels very estate-like. By using 1/4-inch tape to mask off large diamonds (think 24 to 36 inches wide), you can create the illusion of high-end tile.
I usually recommend low-contrast colors for this. If you use high contrast (like black and white), it can look like a diner floor. Instead, try a warm beige and a slightly darker taupe. The subtle shift adds texture without overwhelming the landscape.
Faux Paver and Stone Effects
You can use narrow tape (1/4 inch or 1/8 inch) to simulate grout lines. Lay out a grid or a running bond pattern (like brickwork) and paint over it with a textured concrete paint.
When you peel the tape, the unpainted grey concrete underneath looks like grout. To make this look realistic, I often sponge-paint two or three similar shades over the “bricks” before peeling the tape. This color variation mimics natural stone much better than a solid flat color.
Common Mistakes + Fixes
Mistake: Using patterns that are too small.
Fix: Driveways are viewed from a distance (the street). Small 6-inch stencils will look like visual noise or dirt. Scale up your patterns to at least 18 or 24 inches so they read clearly from the curb.
3. Selecting the Right Materials for Durability and Safety
The product you choose determines how long the finish lasts and, more importantly, how safe it is. Interior floor paints are absolutely not suitable for driveways; they cannot withstand hot tire pickup or UV exposure.
Acrylic Concrete Paint vs. Stain
Acrylic concrete paint sits on top of the surface. It offers the widest range of colors and provides a uniform, opaque finish that hides patches and stains well. However, it is susceptible to peeling if moisture gets trapped underneath.
Concrete stain (acid or water-based) penetrates into the pores of the concrete. It doesn’t peel, but it is translucent. It will not hide cracks or old oil stains. I prefer stains for driveways that are in good condition because they look more natural and require less maintenance.
The “Hot Tire” Factor
When you drive a car that has been running on the highway, the tires are hot. When you park on a painted surface, the heat can soften the paint, and the tires can pull it right off the concrete when they cool and contract.
You must look for products specifically labeled for “hot tire resistance.” Usually, these are high-performance epoxies or specialized acrylic latex formulas. Standard porch and patio paint will fail under vehicle traffic.
Slip Resistance is Non-Negotiable
Painted concrete becomes incredibly slippery when wet. As a designer liable for the safety of a space, I never apply a topcoat without a slip-resistant additive.
You can buy packets of fine silica sand or aluminum oxide specifically meant to be mixed into the final coat of paint or sealer. It doesn’t change the look, but it gives the surface a subtle grit that prevents falls during rain or snow.
What I’d do in a real project:
- If the concrete is old and patched: I use a high-quality, opaque acrylic masonry paint with a matte finish to hide imperfections.
- If the concrete is pristine: I use a semi-transparent water-based stain to enhance the natural variations.
- Topcoat: I always apply a clear, solvent-based sealer with UV protection and a traction additive over the paint for longevity.
4. Color Theory for Exterior Hardscapes
Choosing the wrong color is the most expensive mistake you can make because fixing it requires stripping the entire driveway. The driveway should support the house, not compete with it.
The 60-30-10 Rule for Exteriors
Just like interiors, exteriors follow a balance. Your house siding is the 60%, the roof and driveway combined are the 30%, and your door/shutters are the 10%. Your driveway color needs to tie into the 30% category.
Look at your roof shingles. Are they warm (brown/tan) or cool (grey/black)? Your driveway paint should stay in the same temperature family. A warm beige driveway will clash horribly with a cool slate-grey roof.
LRV (Light Reflectance Value) Considerations
In interior design, we talk about LRV regarding how light or dark a room feels. Outdoors, LRV affects heat.
A dark black or charcoal driveway looks modern and sleek, but it absorbs a massive amount of heat. In southern climates, this can raise the ambient temperature around your entry and burn bare feet or pet paws. Conversely, a stark white driveway can be blindingly bright in full sun.
I usually aim for mid-tones—colors with an LRV between 20 and 50. These hide dirt and tire marks well while managing heat absorption. Good choices are “greige,” terracotta, slate blue, or sandstone.
5. Execution: Steps for a Professional Finish
The difference between a DIY look and a pro finish is usually the patience exercised during the taping and drying phases. Do not rush this process.
Weather Watch
You need a window of 3 to 4 dry days. The temperature should be between 50°F and 90°F. If it’s too hot, the paint dries too fast and leaves lap marks. If it’s too cold or humid, it won’t cure properly.
Masking and Taping
Use high-adhesion tape for concrete surfaces (often green or orange), not standard blue painter’s tape. Press the edges of the tape down firmly with a putty knife.
Pro Tip for Crisp Lines: After you lay down your tape for a pattern, lightly brush a small amount of the base coat color over the tape edge first. This seals the tape. If any paint bleeds under, it matches the base coat. Once that dries, paint your accent color. This guarantees razor-sharp lines.
Application Techniques
Cut in the edges (the perimeter) with a 4-inch brush first. Then, use a roller with a 3/8-inch or 1/2-inch nap depending on the roughness of the concrete.
Work in small sections, roughly 4×4 feet. Keep a “wet edge” at all times to avoid lap marks. If you stop for lunch in the middle of the driveway, you will see that line forever.
Drying Time vs. Curing Time
The can might say “dry to touch in 2 hours,” but that does not mean “drive on it.” Foot traffic usually needs 24 hours. Vehicle traffic usually needs 5 to 7 days.
If you drive on it too soon, the weight and friction of the tires will peel the curing paint. Park on the street for a full week. It is inconvenient, but necessary.
6. Maintenance and Long-Term Care
Even the best industrial paint job requires maintenance. A painted driveway is a wear surface. You are driving 4,000-pound machines over it daily.
Avoid using harsh chemical de-icers in the winter, as they can chemically attack the paint binder. Use sand or kitty litter for traction instead of salt.
Clean the driveway gently. A garden hose and mild detergent are usually enough. Avoid aggressive pressure washing on painted surfaces, as high pressure can lift the paint edges.
I recommend applying a fresh coat of clear sealer every two years. This acts as a sacrificial layer; the tires wear down the sealer rather than wearing down your paint design.
7. Final Checklist: What I’d Do on Your Project
If I were managing your driveway transformation, here is exactly how I would proceed:
- Test: Perform the plastic sheet moisture test 48 hours before buying paint.
- Clean: Degrease oil spots and pressure wash thoroughly. Let dry for 24 hours.
- Repair: Fill cracks with a textured masonry filler that matches the concrete grit.
- Prime: Apply a bonding primer specifically designed for concrete.
- Design: Measure and tape off a border 18 inches from the edge for a finished look.
- Paint: Apply two thin coats of masonry paint rather than one thick coat.
- Safety: Mix a non-slip additive into the second coat.
- Wait: Block off the driveway with caution tape to prevent delivery drivers from ruining it. Wait 7 full days before parking.
8. FAQs
Can I paint over a driveway that has already been sealed?
Generally, no. Paint cannot bond to sealer. You must strip the old sealer using a chemical stripper or by mechanical grinding before painting. Pour water on the driveway; if it beads up, it is sealed and cannot be painted yet.
How long will a painted concrete driveway last?
With proper prep and a quality 2-coat application, you can expect 3 to 5 years before it needs a touch-up or a fresh topcoat of sealer. Stains can last longer but may fade in UV light.
Does painting the driveway hide cracks?
Paint will hide hairline cracks (spiderwebs), but it will not hide structural cracks. In fact, paint often highlights the texture of a wide crack. You must fill and sand cracks flush before painting for a seamless look.
Is it cheaper to paint or use pavers?
Painting is significantly cheaper. A paver driveway can cost \$15 to \$30 per square foot installed. Painting a driveway typically costs \$2 to \$5 per square foot, even with high-end materials.
9. Conclusion
Treating your driveway with the same design consideration as your interior floors can dramatically change the character of your home. It creates a cohesive journey from the street to your front door, signaling that the home is well-cared for and curated.
Whether you choose a simple stained border or an intricate geometric faux-rug, the success of the project relies 90% on preparation and 10% on the painting itself. Take the time to clean, dry, and prime properly. When done correctly, a painted driveway is one of the highest ROI projects you can do for your home’s curb appeal.
10. Picture Gallery


