
Creative Side Table Painting Ideas Unveiled
Introduction
Side tables are often the unsung heroes of a living room layout. They hold our coffee mugs, display our favorite table lamps, and bridge the gap between functionality and style, yet they are frequently the most overlooked pieces of furniture when it comes to a refresh. I recently worked on a project where the client had a structurally sound but visually dated oak end table that was dragging down the entire aesthetic of their modern coastal sunroom.
Instead of tossing it into a landfill, we decided to give it a custom paint job. The transformation was immediate, shifting the focus of the room and saving the client several hundred dollars on a new purchase. For visual inspiration on these techniques, check out the Picture Gallery at the end of the blog post.
Painting furniture requires more than just a brush and a can of leftover wall paint. To get a finish that looks professional and withstands the wear and tear of daily life, you need to understand specific materials and application methods. In this guide, I will walk you through the exact steps and creative concepts I use to transform tired tables into statement pieces.
Subheading 1: The Foundation of a Flawless Finish
The difference between a DIY project that looks homemade and one that looks high-end is almost always in the preparation. As a designer, I cannot stress this enough: you cannot paint over dirt, grease, or furniture wax.
If your side table is a vintage find or a family heirloom, it likely has years of Pledge or furniture polish built up on the surface. This silicone-based residue will cause your new paint to “fisheye” or peel off in sheets later.
The Cleaning Protocol
Start by cleaning the entire piece with a TSP (Trisodium Phosphate) substitute or a heavy-duty degreaser. Dish soap is rarely strong enough to cut through old wax. Wear gloves and wipe it down until your rag comes away clean.
The Sanding Hierarchy
Sanding scares people, but you do not need to strip the piece to bare wood unless you plan on staining it. You just need “tooth” for the primer to grab onto.
- 100-120 Grit: Use this for the initial scuff sanding. It roughens up glossy finishes like lacquer or polyurethane.
- 220 Grit: This is your smoothing grit. Use this after priming and between coats of paint to knock down ridges.
Designer’s Note: The Laminate Issue
I often see clients try to paint cheap IKEA-style laminate tables without special prep. Standard paint will slide right off laminate. If your table is not real wood, you must use a bonding primer specifically labeled for “slick surfaces” or “difficult substrates.” Do not skip this step, or the paint will scratch off with a fingernail.
Subheading 2: Choosing the Right Paint Chemistry
Not all paints are created equal, and the paint you put on your walls is generally not durable enough for a horizontal surface like a table. A side table takes abuse from coasters, keys, and heavy books.
Alkyd Enamel (The Pro Choice)
For a finish that mimics a factory spray job, I almost exclusively use water-borne alkyd enamel. It applies like a latex paint (easy soap and water cleanup) but cures hard like an oil-based paint. It has self-leveling properties, meaning brush strokes disappear as it dries.
Chalk Style Paint
This is popular for a reason: it requires very little prep and dries fast. However, it has a very matte, rustic texture. If you want a modern, sleek look, skip the chalk paint. It is best suited for farmhouse or shabby chic interiors.
Mineral Paint
This is a newer favorite in the design community. It has a built-in topcoat, which saves you a step. It provides a waterproof finish that is excellent for drink tables.
Common Mistakes + Fixes
- Mistake: Using standard latex wall paint (eggshell or satin) on furniture.
- Why it fails: It remains “soft” and rubbery, leading to “blocking” (when objects stick to the surface).
- The Fix: If you must use wall paint, you have to seal it with two coats of high-quality polyacrylic topcoat.
Subheading 3: Creative Techniques for Impact
Once your prep is done, you can move beyond a solid color block. Here are three specific techniques I use to add visual interest to a room without overwhelming it.
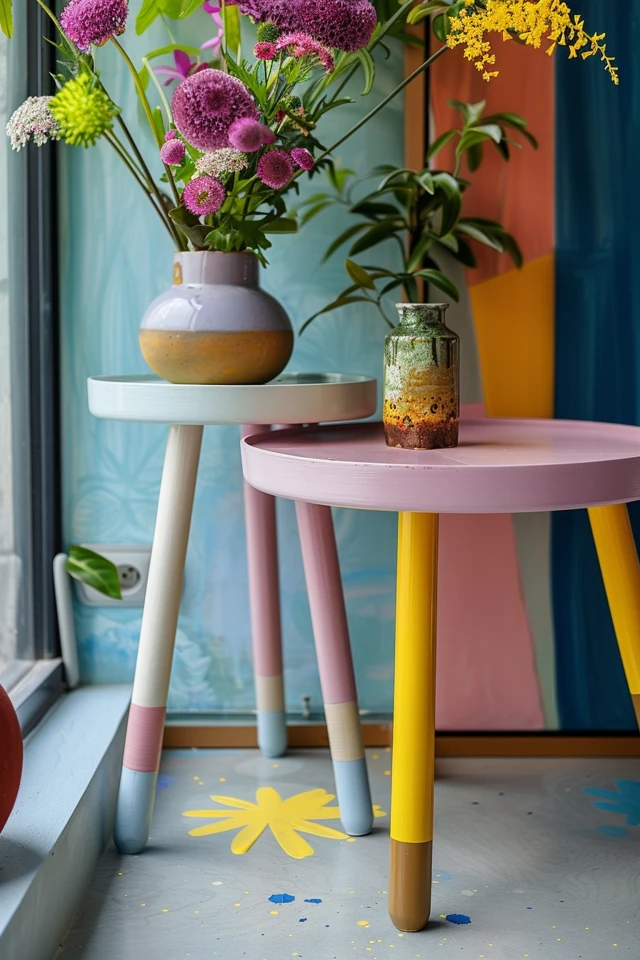
1. The Dipped Leg Effect
This is fantastic for mid-century modern tapered legs. It creates lightness and adds a custom detail that looks expensive.
How to do it:
Measure exactly 6 to 8 inches up from the floor on each leg. Use a laser level or a measuring tape to mark the spot. Wrap high-quality painter’s tape (burnish the edges down hard with a credit card) around the leg. Paint the bottom portion a different color—usually gold, matte black, or a bold accent color—or leave it bare wood while painting the top body.
2. The Faux Stone/Ceramic Look
Textured furniture is a massive trend right now. We often see side tables that look like plaster or travertine selling for thousands of dollars.
How to do it:
Mix baking soda into your paint. The ratio is roughly 1 part baking soda to 4 parts paint, but you can adjust for thickness. Brush it on in cross-hatch distinct strokes. As it dries, it creates a stone-like texture. This works best on cylindrical or drum-style tables.
3. Two-Tone Interior
If your side table has a drawer or an open shelf, painting the exterior a neutral color and the interior a vibrant hue creates a delightful surprise.
My go-to combo: A deep charcoal or navy exterior with a warm walnut wood interior, or a creamy white exterior with a surprise robin’s egg blue inside the drawer. It adds depth without clashing with the rest of the room’s palette.
Subheading 4: Styling, Scale, and Placement
A beautifully painted table will still look wrong if the scale is off. As an interior designer, I see side table sizing mistakes constantly.
The Height Rule
Your side table should be within two inches of your sofa arm height.
- Too low: It is uncomfortable to reach for a drink.
- Too high: It feels like a barricade and looks awkward visually.
If you find a vintage table you love to paint, but it is too short, consider replacing the legs. You can buy furniture legs online that screw into standard mounting plates to add the necessary height.
Color Theory in Context
Don’t try to match your painted table exactly to your rug or curtains. It will look flat. Instead, look for a complementary relationship.
If your room is heavy on cool tones (greys and blues), paint the table a warm tone (terracotta, cream, or warm wood) to create balance. If your space is small, painting the table the same color as the wall can help it visually disappear, making the room feel larger.
Surface Styling
Once painted and cured, follow the “Rule of Three” for styling the top:
1. Vertical: A table lamp or tall vase.
2. Horizontal: A stack of two or three hardcover books.
3. Sculptural: A small bowl, decorative object, or plant.
Subheading 5: Durability and Maintenance
You have put in the work; now you need it to last. The finish you choose depends heavily on your household lifestyle.
Topcoat Options
- Polyacrylic (Water-based): This is the industry standard for light-colored paint. It dries clear and won’t yellow over time. It is durable enough for moderate use.
- Polyurethane (Oil-based): This is tougher but has a slight amber tint. Only use this over dark colors or natural wood. It creates a bulletproof finish.
- Furniture Wax: This provides a beautiful, hand-rubbed luster but offers very little protection against heat or water rings. I avoid wax on high-traffic side tables.
Cure Time vs. Dry Time
This is the number one reason DIY paint jobs fail. Paint feels dry to the touch in an hour, but it takes 21 to 30 days to fully “cure” (harden chemically).
If you put a heavy lamp or a hot coffee mug on a table three days after painting it, you will likely leave a permanent indentation. Treat the table gently for the first month.
Designer’s Note: Glass Tops
For maximum protection, especially in rentals or homes with kids, I often have a piece of custom tempered glass cut to fit the top of the painted table. It protects your hard work from spills and scratches completely and adds a nice light-reflecting element.
Final Checklist: The Designer’s Workflow
If I were painting a side table for a client today, this is exactly the order of operations I would follow.
Phase 1: Prep
- Remove all hardware (knobs, pulls, hinges).
- Clean with TSP substitute.
- Fill deep scratches or gouges with wood filler; let dry.
- Scuff sand the entire piece with 120-grit paper.
- Wipe away all dust with a tack cloth.
Phase 2: Prime
- Apply a coat of high-adhesion primer (especially for laminate or dark woods).
- Let dry according to the can instructions.
- Lightly sand with 220-grit paper to smooth out “nibs.”
- Wipe dust again.
Phase 3: Paint
- Apply the first coat of high-quality furniture enamel. Avoid over-brushing.
- Let dry overnight (or at least 4-6 hours).
- Lightly sand with ultra-fine grit (320 or 400) for a glass-smooth finish.
- Apply the second coat.
Phase 4: Protect
- If using paint without a built-in topcoat, wait 24 hours.
- Apply two to three thin coats of polyacrylic.
- Wait 3 weeks before placing heavy objects on top.
FAQs
Can I paint metal side tables?
Yes, but you need a specific primer. Look for a “self-etching” primer spray. This acid-based primer bites into the metal so the paint doesn’t flake off. Once primed, you can use standard spray paint or enamel.
How do I fix paint drips?
If you catch a drip while it’s wet, brush it out. If it has dried, do not try to paint over it. Slice the drip off carefully with a fresh razor blade, sand that specific spot smooth, and then repaint the area.
Is spray paint a good option?
Spray paint is excellent for intricate tables with spindles or wicker where a brush can’t reach. However, it is harder to control indoors. You must use short, sweeping bursts to avoid drips. High-quality spray lacquer produces a stunning finish but requires good ventilation.
Do I really need to sand between coats?
Yes. It takes less than two minutes and makes the difference between a gritty, amateur feel and a professional, smooth touch. You aren’t trying to remove paint, just the tiny dust particles that settle into the wet finish.
Conclusion
Transforming a side table with paint is one of the highest-reward projects you can tackle in a weekend. It allows you to experiment with trends—like bold colors or matte textures—without committing to painting an entire wall or buying a new sofa.
Remember that the goal is not just to change the color, but to ensure the piece integrates physically and stylistically into your room. Pay attention to the height relative to your seating, the durability of your topcoat, and the preparation of the surface.
By following these professional protocols, you create a piece of furniture that feels intentional and custom, rather than just a quick DIY fix. Take your time with the prep work, respect the cure times, and your new side table will serve you well for years to come.
Picture Gallery


