
Creative Tile Window Sill Ideas to Inspire You
Window sills are often the most underutilized real estate in a home. We tend to think of them merely as the bottom frame of a window, collecting dust or perhaps holding a lonely succulent. However, treating a window sill as a design feature rather than a structural necessity can completely change the character of a room.
I remember walking into a client’s historic row house years ago where the previous owner had tiled every deep sill with hand-painted Delft tiles. It instantly added charm, durability, and a focal point that curtains alone could never achieve. That project taught me that a tiled sill isn’t just practical; it is an opportunity to introduce texture and color in a small, low-risk dose.
Whether you are dealing with water damage from plants on a wood sill or simply want to elevate your window treatments, tiling is a fantastic solution. For those of you looking for visual examples, I have curated a Picture Gallery at the end of the blog post with diverse styles to spark your creativity.
Why Tile is the Superior Choice for Sills
When designing a home, we often default to wood for window trim and sills. While wood is traditional, it is highly susceptible to moisture damage. Condensation from glass, forgotten open windows during rainstorms, or overwatered plants can ruin a wood finish in a single season.
Tile offers a robust alternative that is essentially waterproof when installed correctly. It resists scratching, fading, and staining much better than painted wood or MDF. This makes it ideal for high-traffic areas or homes with pets who like to perch by the window.
From a design perspective, tile allows you to link other elements of the room together. For example, you can extend a kitchen backsplash up into the window sill for a seamless look. It creates a visual continuity that makes small spaces feel larger and more custom.
Choosing the Right Material for Your Lifestyle
Not all tiles are created equal, especially for a horizontal surface like a window sill. The material you choose dictates the longevity of the installation.
Natural Stone (Marble and Granite)
Solid slabs of marble or granite are the gold standard for elegance. They offer a clean look with no grout lines on the flat surface, which makes cleaning incredibly easy. However, remember that natural stone is porous.
If you place a terracotta pot directly on unsealed marble, the water can seep through and leave a permanent ring. I always recommend honing the stone and applying a high-quality impregnating sealer annually.
Porcelain and Ceramic
These are the workhorses of the design world. Glazed ceramic is non-porous and comes in endless colors and patterns. It is generally more affordable than stone and easier to cut for DIY enthusiasts.
Mosaic Tiles
Mosaic sheets (like penny rounds or hexagon tiles) add incredible texture. They are perfect for deeper sills where you want to make a statement. The downside is the grout. More grout lines mean more scrubbing, so keep this in mind if the window is in a dusty area or near a stovetop.
Designer’s Note: The “Scale” Rule
In my years of designing, the biggest mistake I see with tiled sills is ignoring scale. If you have a narrow sill (less than 4 inches deep), do not use large 12×24 inch tiles cut down to size. It looks clunky and awkward.
For narrow sills, stick to smaller mosaics or a solid slab cut to fit. For deep bay window sills, you have more freedom to use larger formats or intricate patterns without the design looking cut off.
Styling Strategies: Pattern and Layout
The way you lay the tile is just as important as the tile itself. A simple subway tile can look completely different depending on the pattern.
The Classic Running Bond
This is the brick-lay pattern most people know. It works exceptionally well in farmhouse or traditional kitchens. If you are extending a backsplash, ensure the grout lines on the sill line up with the wall for a cohesive look.
Herringbone
Using a herringbone pattern on a deep window sill is a sophisticated touch. It draws the eye outward toward the view. This requires more precise cutting, so order at least 20% extra material for waste.
Solid Slab Effect
If you hate grout, look for “large format” porcelain tiles that mimic stone. You can often cut a single strip to cover the entire length of the sill. This gives you the luxury look of a marble slab at a fraction of the cost and weight.
Solving the Edge Problem
The most technical challenge with tiling a window sill is the exposed edge. Unlike a floor or a wall that meets a corner, the front of a window sill is visible. You cannot leave the raw clay edge of a tile exposed.
Bullnose Tiles
Many ceramic collections offer a matching “bullnose” piece, which has one rounded, finished edge. This is the most traditional solution. It softens the line and is safe for homes with children since there are no sharp corners.
Metal Profiles (Schluter Strips)
For a modern, industrial, or minimalist look, I use metal edging profiles. These are L-shaped metal strips (usually aluminum, brass, or stainless steel) that you install under the edge of the tile. They create a crisp, clean line and hide the unglazed edge of the tile.
The Mitered Edge
This is a high-end detail usually reserved for stone or thick porcelain. The installer cuts the horizontal tile and the vertical apron piece at 45-degree angles. When joined, they form a perfect 90-degree corner with no visible seam. This requires a professional with a wet saw and high skill level.
Room-Specific Recommendations
The Kitchen
In the kitchen, the window sill often serves as a shelf for herbs or cleaning supplies. Hygiene is priority number one here.
- Choose a glazed finish that wipes down easily.
- Avoid porous stones like limestone unless you are diligent about sealing.
- Consider a slight pitch (slope) if it’s right behind the sink to prevent water pooling.
The Bathroom
Bathroom sills see the most moisture and humidity. If the window is inside the shower enclosure, proper waterproofing underneath the tile is non-negotiable.
- Use epoxy grout in bathrooms; it resists mold and mildew far better than standard sanded grout.
- Ensure the sill slopes toward the drain, not the window frame, to avoid water collection.
The Living Room
Here, the sill is often a display surface. You can afford to be more decorative and less concerned with water resistance.
- Matte finishes reduce glare from the sun.
- Textured tiles or encaustic cement tiles add warmth and character to living spaces.
Connecting to the Outdoors: Landscape Design Flow
If you have a large picture window or a pass-through window to a patio, consider coordinating your interior sill with your exterior hardscape. This blurs the line between inside and out.
If you have slate pavers on your patio, using a slate or slate-look porcelain on the interior sill creates a visual bridge. This is particularly effective in mid-century modern homes where the connection to nature is a core design principle.
For exterior window sills (the outside ledge), you must use frost-proof tile. Porcelain is impervious to water and won’t crack in freezing temperatures, whereas some ceramic tiles will absorb water and shatter when it freezes.
Common Mistakes + Fixes
Mistake: Ignoring the Window Operation
I have seen DIYers stack tile too high, blocking the window from opening or closing properly.
Fix: Always measure the clearance of the window sash before buying tile. Account for the thickness of the thin-set mortar plus the tile thickness.
Mistake: Using Wall Grout for Sills
People often use unsanded wall grout because the joints are small. However, sills are horizontal surfaces that gather dust and gravity-fed spills.
Fix: Use a high-performance grout designed for floors or high-traffic areas. Darker grout colors are more forgiving on sills than bright white.
Mistake: The “Lip” is Too Short
A sill needs to overhang the wall slightly to prevent drips from running down the drywall or wallpaper.
Fix: Ensure you have at least a 1/2 inch to 3/4 inch overhang (or “horn”) extending beyond the apron trim or wall surface.
Installation Tips for the DIYer
1. Surface Preparation is Key
You cannot tile directly over a rotting wood sill. If the wood is damaged, remove it and replace it with cement board or a fresh, sealed piece of marine-grade plywood. The surface must be flat, clean, and rigid.
2. The Dry Lay
Before mixing any adhesive, lay out your cut tiles on the sill. Check your gaps. Center your pattern so you don’t end up with a tiny sliver of tile on one end.
3. Adhesives Matter
For a small window sill, you don’t need to mix a giant bag of thin-set. Premixed mastic can work for dry areas, but for bathrooms or kitchens, always use a polymer-modified thin-set mortar.
4. Taping for Protection
Use painter’s tape to protect the window frame and the glass. Mortar and grout can scratch vinyl and aluminum window frames easily.
Rental-Friendly Options
If you are renting, you likely cannot rip out the existing sill. However, you still have options to cover up an ugly painted ledge.
Peel-and-Stick Tile
High-quality vinyl peel-and-stick tiles have come a long way. They are easy to cut with a utility knife and can be applied directly over a clean, painted surface. Just ensure the surface is free of grease.
The “Floating” Slab
You can have a piece of stone or finished wood cut to the exact dimensions of the sill and simply place it on top. Use a few dabs of removable mounting putty (museum wax) to keep it stable. When you move, you take the slab with you.
What I’d Do in a Real Project: A Mini-Checklist
If I were consulting on your home renovation today, here is the exact thought process I would run through for your window sills:
- Check the depth: Is it deep enough for a plant (6+ inches) or just for looks?
- Assess the light: Does direct sun hit this spot? If so, avoid dyed stones that might fade; stick to porcelain or UV-stable natural stone.
- Select the edge: I almost always specify a metal Schluter edge in “Matte Nickel” for a modern look, or a polished pencil liner for traditional homes.
- Coordinate with the floor: I usually try to match the sill tone to the floor tone to ground the space, unless the sill is an extension of a backsplash.
- Grout selection: I pick a grout color that matches the dirt. A medium gray or taupe hides dust much better than white.
Final Checklist for Your Project
Before you head to the tile showroom or hardware store, ensure you have these boxes checked:
1. Clearance confirmed: The window can open and lock without hitting the new tile height.
2. Waterproofing plan: You know what is under the tile (cement board vs. wood) and have a plan to seal it.
3. Edge finish decided: You have purchased the bullnose or metal trim pieces.
4. Tools ready: You have a tile cutter (or wet saw), notched trowel, spacers, and a rubber float.
5. Maintenance committed: You are willing to seal natural stone if that is what you choose.
FAQs
Can I tile over an existing wood window sill?
Yes, but you need to prepare it properly. Sand the paint to roughen the surface, or ideally, screw a layer of 1/4-inch cement backer board over the wood. This prevents the wood’s natural expansion and contraction from cracking your grout lines.
What is the best tile for a window sill with plants?
Porcelain or glazed ceramic is best. They are waterproof and won’t stain if a pot leaks. Natural stone like marble will etch (develop dull spots) from the acidity in soil and water unless perfectly sealed.
How much overhang should a window sill have?
Aesthetically and functionally, an overhang of about 3/4 of an inch to 1 inch is standard. This prevents liquids from dripping directly onto the wall below and gives the installation a finished, intentional look.
Do I need to slope the window sill?
For interior living spaces, a slope isn’t strictly necessary but is good practice. For bathrooms, showers, and kitchen windows behind sinks, a slight slope (about 1/8 inch per foot) away from the window is crucial to prevent water damage.
Conclusion
Tiling a window sill is one of those small details that signals a high-quality, custom home. It solves practical problems like water damage and wear while offering a unique canvas for your personal style. Whether you choose a sleek marble slab for a minimalist vibe or colorful mosaics for a bohemian touch, the result is always a more finished and durable space.
Don’t be afraid to experiment with patterns or materials you might be hesitant to use on a larger floor or wall. The window sill is a low-risk area with a high visual reward. Take your measurements, pick a material that suits your lifestyle, and transform that dusty ledge into a design feature.
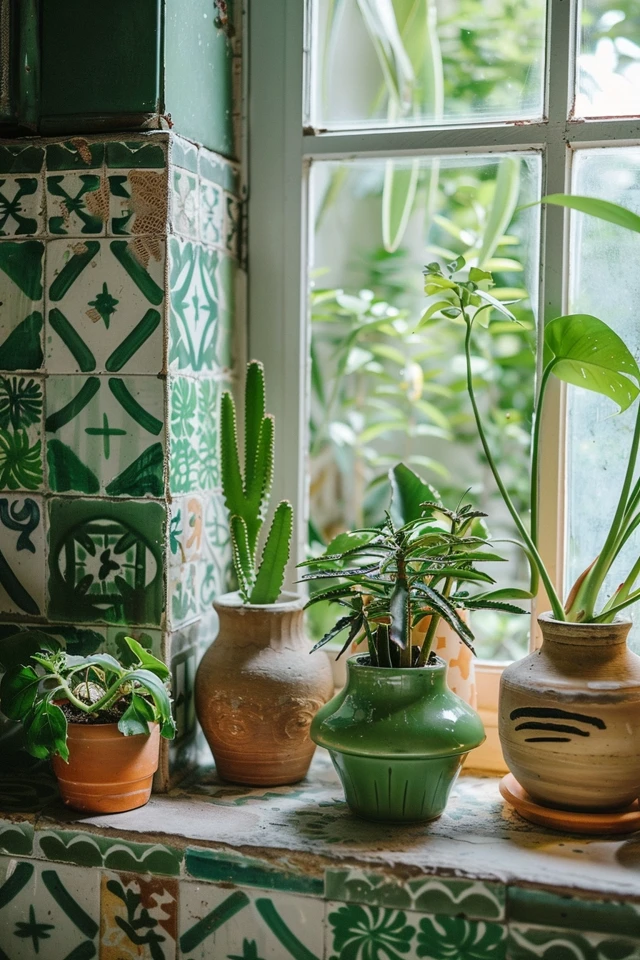
Picture Gallery


