Title: Creative Wall Cube Shelves Ideas for Your Home
Introduction
I still remember the first studio apartment I ever designed for a client on a shoestring budget. She had one massive, stark white wall and absolutely no floor space for a bookcase or console table. We turned to wall cube shelves, not just for storage, but to create an architectural moment that defined the entire room.
Cube shelves are the unsung heroes of interior design. They bridge the gap between functional storage and art installation. Whether you arrange them in a rigid grid or an organic cloud formation, they offer a flexibility that standard shelving units simply cannot match. They work in rentals, they work in luxury homes, and they are surprisingly easy to install if you follow the right steps.
For more inspiration and visual examples of these layouts, be sure to check out our full Picture Gallery at the end of this blog post.
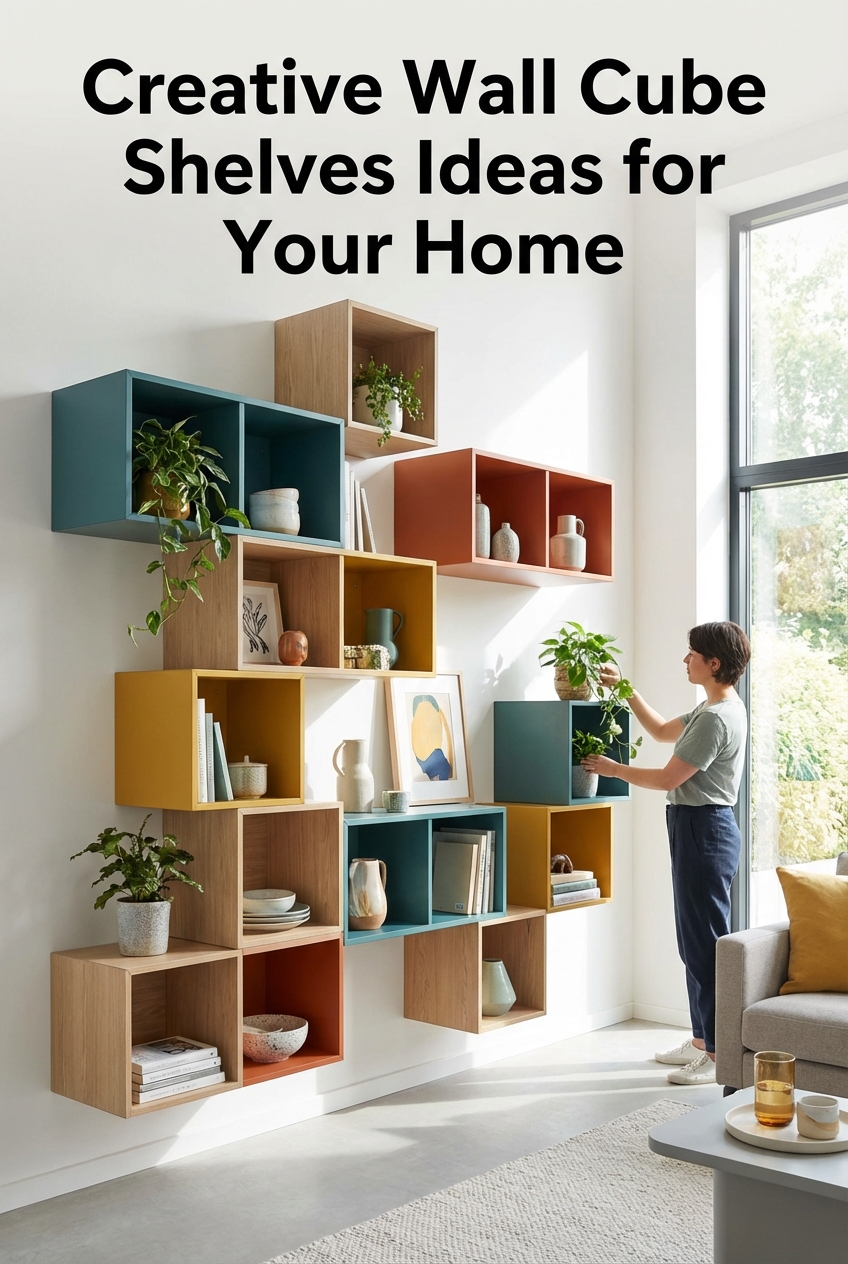
1. Mastering Layouts and Compositions
The most intimidating part of using cube shelves is staring at that blank wall and deciding where the first screw goes. The arrangement you choose changes the entire vibe of the room.
The Geometric Grid
A symmetrical grid is the safest and most classic choice. This layout works best in formal spaces, like a home office or a dining room, where you want to project order and calm.
To get this right, spacing is critical. I recommend keeping the gap between cubes consistent, usually between 2 to 3 inches. Any wider, and the installation starts to look disconnected. Any tighter, and it looks like a solid block of furniture rather than wall decor.
The Asymmetrical Scatter
This is my go-to for living rooms and playrooms. It feels dynamic and modern. The trick here is to avoid total chaos by maintaining a “visual center.”
Imagine a diagonal line stretching across your wall. Place your cubes loosely along this axis. This guides the eye upward, making ceilings feel higher.
The Honeycomb Effect
If you are using hexagonal cubes, you can nest them directly against each other. This creates a sculptural, mural-like effect.
This works exceptionally well on small accent walls. I often use this in entryways to hold keys and mail without encroaching on the walkway.
Designer’s Note: The “Rule of Three”
Real-World Lesson: A common mistake I see is hanging cubes in even numbers. The human brain finds odd numbers more visually pleasing and natural.
The Fix: Always purchase cubes in sets of three, five, or seven. If you have an even number of cubes, group two together to act as one visual unit, or buy one more to balance the composition.
2. Room-Specific Applications and Constraints
Not every room handles open shelving the same way. The moisture in a bathroom requires different materials than the dry heat of a living room. Here is how I approach specific zones in a home.
The Living Room: The Gallery Wall Alternative
In the living room, cube shelves act as 3D frames. Instead of hanging flat art, you are framing objects.
I love using deep cubes (at least 8 to 10 inches) here. This depth allows you to layer objects. Place a larger print at the back of the cube and a small sculptural item in front of it. This creates depth and shadow play.
Pro Tip: Do not center the installation on the wall. Center it relative to the furniture below it, like the sofa or media console.
The Kitchen: Open Storage
Kitchens are high-utility zones. Cubes here need to be accessible and durable. Avoid MDF (medium-density fiberboard) if the shelves are near the stove or sink, as steam will cause them to swell over time.
Use metal or sealed solid wood cubes. I often install a horizontal row of cubes about 18 inches above the counter. This is perfect for storing coffee mugs, spice jars, or small potted herbs.
The Bathroom: Vertical Storage
Floor space is precious in bathrooms. I often utilize the empty vertical space above the toilet—commonly called the “over-the-john” area.
Stack three cubes vertically here. Use them for rolled towels, extra toilet paper, or apothecary jars with cotton balls. This keeps clutter off the vanity counter.
The Nursery or Kids’ Room
Safety is the number one priority here. If the cubes are within a child’s reach, they must be anchored into studs, not just drywall.
I like to place cubes low to the ground for toy bins. This empowers toddlers to access their own toys and helps teach cleanup habits. For nurseries, hang them high above the changing table to keep lotions and wipes out of baby’s reach but within yours.
3. Material Selection and Finish Coordination
The material of your shelves dictates the style of the room. It also dictates how much weight you can safely apply.
Wood Tones and Textures
Natural wood brings warmth to a space. If you have hardwood floors, try to match the undertone of the wood, even if you don’t match the exact shade.
For example, if your floors are warm oak, look for walnut or oak shelves. Avoid cool-toned grey woods, as they will clash.
Painted vs. Laminate
High-gloss white laminate is very modern and blends seamlessly into white walls. This creates a “floating” look where the objects inside seem to hover.
However, laminate can look cheap if the edges are peeling. For a high-end look on a budget, buy unfinished wood cubes and paint them the exact same color as your wall. This creates a built-in, custom architectural look.
Metal Wire Cubes
These offer an industrial or bohemian vibe. They are visually lightweight, meaning they don’t make a small room feel crowded.
The downside is that wire bottoms are uneven. You cannot easily stand up picture frames or thin books without them slipping through the gaps. You may need to cut acrylic liners for the bottoms.
4. Installation: The Technical Guide
This is where most DIY projects fail. A crooked shelf ruins the entire aesthetic. Here is the process I use for every installation.
Gathering the Right Tools
- Laser Level: Do not rely on a bubble level alone for a grid layout. A laser level that projects a line across the wall is worth the investment.
- Stud Finder: Essential for heavy loads (books).
- Drill and Bits: Various sizes for pilot holes.
- Painter’s Tape: For mocking up the layout.
The Mock-Up Phase
Never drill until you have seen the layout. I use blue painter’s tape to outline the cubes on the wall.
Leave the tape up for 24 hours. Walk by it at different times of day. Does it feel too high? Too crowded? Adjust the tape now, before you put holes in the drywall.
Anchoring Correctly
If you hit a stud, use 2.5-inch wood screws. If you are going into hollow drywall, plastic plugs are rarely enough for shelves.
I only use toggle bolts or self-drilling metal toggles (like E-Z Ancors) for drywall. These can hold 50+ pounds and won’t rip out if a cat decides to jump on the shelf.
5. Advanced Styling and Lighting
Once the cubes are up, the fun begins. Styling is about balance. You want the shelves to look curated, not cluttered.
The “Z” Formation
When styling multiple cubes, do not put heavy items in every single box. Use a “Z” pattern.
Place a visual “heavy” object (like a stack of books) in the top left. Place another heavy object in the middle right. Place the final heavy object in the bottom left. This forces the eye to travel across the entire installation.
Lighting the Cubes
Lighting turns shelves into a focal point. Since hardwiring is difficult for existing walls, I use rechargeable LED puck lights.
Mount them to the “ceiling” of each cube. Look for lights with a warm white temperature (2700K or 3000K). Avoid cool blue daylight tones (5000K), as they make homes look like hospitals.
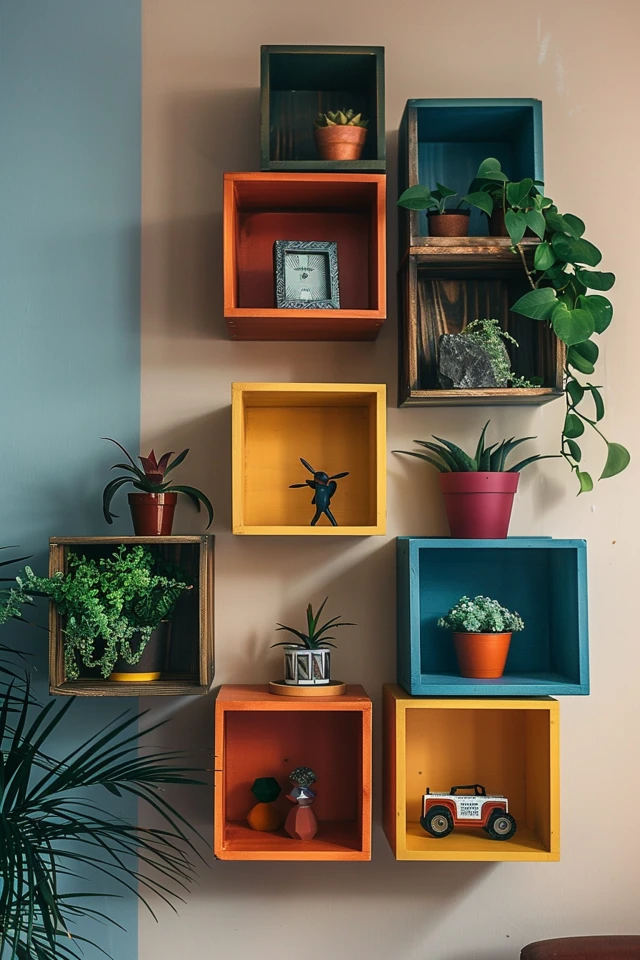
Playing with Color
A creative trick I love is painting the inside back panel of the cube a different color.
If you have a white room and white shelves, paint the inside back panel a soft sage green or navy blue. It adds a pop of color without requiring you to paint the whole room.
6. Common Mistakes and How to Fix Them
I have fixed many botched shelf jobs. Here are the most frequent errors and how to avoid them.
Mistake 1: Hanging Them Too High
People tend to hang art and shelves too high. If the center of the arrangement is closer to the ceiling than the furniture below it, it feels disconnected.
The Fix: The center of your composition should be at eye level, roughly 57 to 60 inches from the floor. If hanging above a sofa, leave 8 to 10 inches of clearance above the sofa back.
Mistake 2: Ignoring Scale
Small 4-inch cubes look ridiculous on a large 12-foot wall. They look like postage stamps.
The Fix: Your wall decor should span roughly two-thirds the width of the furniture below it. If your sofa is 80 inches wide, your shelf arrangement should be roughly 50 to 55 inches wide.
Mistake 3: Overstuffing
Cubes are small. If you fill them to the brim, they look like messy storage bins.
The Fix: Follow the 50% rule. Keep 50% of the shelf volume empty (negative space). This lets the objects breathe.
Final Checklist: What I’d Do in a Real Project
If I were coming to your home tomorrow to install these, here is exactly how I would execute the project:
- Step 1: Measure the wall and the furniture below it. Calculate the available space.
- Step 2: Purchase cubes that are at least 8 inches deep (for decor) or 10-12 inches deep (for books).
- Step 3: Clear the floor and lay out the cubes on a rug to experiment with the pattern.
- Step 4: Transfer the pattern to the wall using painter’s tape.
- Step 5: Use a stud finder to mark safety points.
- Step 6: Install the center cube first, then measure outwards for the others.
- Step 7: Wipe down the shelves to remove drywall dust before styling.
- Step 8: Style with a mix of books, plants, and organic shapes.
FAQs
Can I put cube shelves in a rental apartment?
Yes, but be careful with weight. If you cannot drill holes, you can use heavy-duty Command strips, but only for very lightweight cubes carrying paper items or foam decor. I generally do not recommend adhesive for shelves carrying breakables. Spackle is cheap; it is usually better to drill small holes and patch them when you move out.
How do I clean inside the cubes?
Dust accumulates in the corners. Use a microfiber cloth or a vacuum with a soft brush attachment. Avoid wet sprays on MDF or laminate, as moisture can seep into the seams and cause peeling.
What is the best way to hide cords on cube shelves?
If you have a speaker or lamp in a cube, drill a hole through the back panel of the cube. Run the cord down behind the furniture or cover it with a paintable cord cover (raceway) that matches your wall color.
Can I mix different colors of cubes?
Absolutely. Mixing wood grain with solid white or black is a very popular look. Just keep the shapes consistent to maintain a cohesive thread throughout the design.
Conclusion
Wall cube shelves are one of the most versatile tools in a designer’s kit. They solve storage problems while providing a canvas for your personality. Whether you are organizing a chaotic entryway or displaying travel souvenirs in the living room, the key is planning.
Don’t rush the layout. Take the time to tape it out, verify your levels, and curate what goes inside. When done correctly, this simple addition can elevate your home more effectively than expensive art or new furniture.
Picture Gallery