
Creative Ways to Conceal Your Electrical Panel Box
Introduction
There is nothing quite as frustrating as finishing a beautiful renovation only to realize a gray metal rectangle is staring back at you from the wall. Electrical panel boxes are vital for the functionality of our homes, but builders rarely place them with aesthetics in mind. They often land in the middle of a hallway, a prominent spot in the entryway, or right where you wanted to hang a statement piece of art.
As an interior designer, I view these necessary eyesores as opportunities for creative problem-solving rather than layout-ruining disasters. The goal is never to permanently seal them away, as safety codes require quick and easy access in case of an emergency. The challenge lies in masking them in a way that feels intentional to the room’s design while maintaining full functionality.
If you are looking for visual inspiration, jump straight to the Picture Gallery at the end of this post. Otherwise, stick with me as we walk through the specific measurements, safety codes, and styling tricks I use to make these boxes disappear.
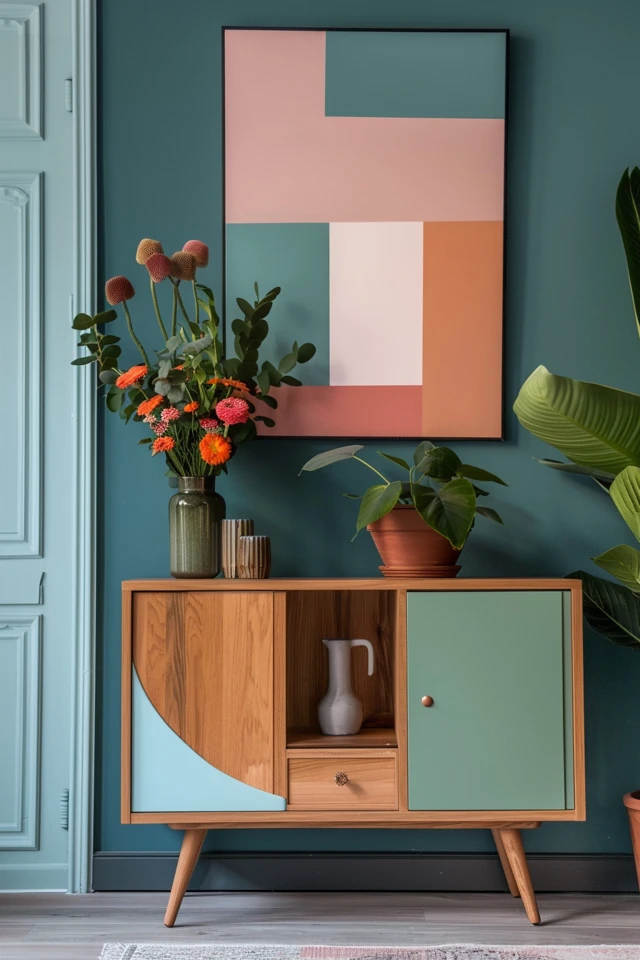
1. The Hinged Art Method
The most straightforward way to cover a panel box is with artwork, but simply hanging a picture on a nail isn’t quite right for this application. You need to ensure the panel is accessible without having to take the art off the wall entirely during a power outage. This is where the hinged canvas technique comes into play.
I recommend using a gallery-wrapped canvas rather than a heavy glass-fronted frame for this specific solution. Canvases are lightweight, which puts less stress on the hinges, and they have depth (usually 1.5 to 2 inches) which clears the lip of the metal panel box easily. You can purchase simple piano hinges or cabinet hinges from a hardware store to attach the frame to the wall on one side.
Designer’s Note: Scale and Clearance
In my projects, the biggest mistake I see is homeowners choosing art that is the exact size of the panel box. This creates a visual “patch” that looks suspicious. You want the art to be at least 3 to 4 inches wider and taller than the box on all sides. If your panel is 14 inches wide, your art should be at least 22 inches wide. This allows the concealment to feel like a deliberate design choice rather than a cover-up.
Implementation Steps
- Measure the protrusion of your panel box door; usually, it sits about 0.25 to 0.5 inches off the wall.
- Select a canvas or deep shadow box frame with a depth of at least 1 inch to clear the hardware.
- Attach two small cabinet hinges to the left or right side of the frame (whichever side has more wall clearance).
- Install a magnetic catch on the opposite side to keep the art flush against the wall.
2. The Custom Cabinetry Camouflage
If you are dealing with a panel box in a high-traffic area like a mudroom or a kitchen, a standalone picture frame might feel out of place. In these instances, incorporating the panel into a larger wall of cabinetry or millwork is the most seamless solution. This is a common approach when we design entryway “drop zones” or utility walls.
The trick here is to build a shallow cabinet specifically for the panel, or to create a false back inside a deeper cabinet. If the panel is in a hallway, I often design a full-height utility cupboard where the panel lives in the upper section. The key is ensuring the cabinet door opens a full 90 degrees or more so an electrician can work comfortably.
Common Mistakes + Fixes
Mistake: Blocking ventilation or accessibility.
Fix: Never seal the gaps around the panel box with caulk or spray foam inside the cabinet. The metal box needs to dissipate heat. Additionally, ensure the cabinet door is not locked or difficult to open.
Code Compliance Check
When building cabinetry around a panel, you must respect the National Electrical Code (NEC) regarding “working space.” Generally, this means you need a clear space of 30 inches wide and 36 inches deep in front of the panel. Do not build permanent shelving or benches that jut out in front of the panel door. The cabinet door hiding the panel is fine, but you cannot put a built-in bench directly in front of it that would prevent you from standing right up to the breakers.
3. Textile Wall Hangings and Weavings
For renters or those who do not want to drill heavy holes into the drywall, textiles are an elegant and soft solution. A macramé hanging, a vintage tapestry, or a structured weaving adds texture to a room while effortlessly hiding the industrial metal box. This works particularly well in bedrooms, nurseries, or boho-style living areas where hard-framed art might feel too cold.
The advantage of textiles is flexibility. There are no hinges to align and no heavy frames to support. In an emergency, you can simply flip the fabric up or sweep it aside to flip a breaker. This is also the safest option for areas prone to earthquakes, as there is no heavy glass to fall if the walls shake.
Styling Rules of Thumb
- Rod Placement: Mount the hanging rod at least 4 to 6 inches above the top of the panel box. This prevents the “hump” of the box from showing through the fabric.
- Density: Choose a weaving with a dense knot structure or a thick fabric backing. A loose, open-weave macramé will still show the gray metal peeking through the gaps.
- Length: The textile should extend at least 6 inches below the bottom of the panel box to elongate the wall visually.
4. The Sliding Barn Door or Track System
If you have a horizontal stretch of wall—common in basements or wide hallways—a sliding cover is a dynamic and functional choice. This involves installing a small rail system above the panel and mounting a cover that slides left or right. This could be a mini barn door, a sleek piece of finished plywood, or even a framed chalkboard.
This method is excellent because it requires zero clearance swing into the room. If your panel box is in a narrow corridor where a swinging cabinet door would hit the opposite wall, a slider is your best friend.
Material Selection
For a modern look, I often use a piece of frosted acrylic or perforated metal mounted on a simple aluminum U-channel track. For a farmhouse or rustic aesthetic, a reclaimed wood shutter on a mini barn door hardware kit works perfectly.
What I’d Do in a Real Project
- Hardware: I buy “cabinet door sliding hardware” rather than full-size door hardware. It is smaller scale and much quieter.
- Stoppers: I always install rubber stoppers on the track ends. You do not want to slide the cover open aggressively during a power outage and have it fly off the rails.
- Sizing: The track needs to be at least double the width of your cover so the panel is fully exposed when the door is slid open.
5. The “Color Drenching” Paint Technique
Sometimes the best way to hide something is to stop trying to cover it up and instead make it blend in. If your panel box is flush with the wall (not protruding), painting it the exact same color as the surrounding wall is a sophisticated, minimalist approach. This technique is often called “color drenching.”
The standard gray factory finish of a panel box is what draws the eye. By painting the metal door and the rim the same matte or eggshell finish as your drywall, you reduce the visual contrast. The box is still there, but the eye glides right over it because there is no color break to demand attention.
Step-by-Step for Durability
- Clean: Wipe the metal down with a degreaser to remove oils and fingerprints.
- Sand: Lightly scuff the metal surface with 220-grit sandpaper to give the paint something to grip.
- Prime: This is non-negotiable. Use a high-quality bonding primer specifically designed for metal. Do not use standard drywall primer; it will scratch off.
- Paint: Apply two coats of your wall color. I recommend using a small foam roller rather than a brush to avoid brush marks on the smooth metal surface.
Designer’s Note
Do not paint the inside of the panel box, the breakers, or the safety labels. That is a code violation and a safety hazard. Only paint the exterior metal door and the flush mount frame.
Final Checklist: Before You Conceal
Before you commit to any of these designs, run through this quick checklist to ensure you are balancing style with safety. I use this mental list on every job site before approving a carpenter’s plan.
- Access Speed: Can I get to the breakers in under 5 seconds in the dark?
- Clearance: Is there 30 inches of clear width and 36 inches of clear depth in front of the panel?
- Door Swing: Does the panel door still open a full 90 degrees?
- Labeling: Have I updated the circuit directory inside the door before covering it up?
- Fasteners: Am I sure my screws for shelves or art are not going into the wall cavity where the feeder wires are located? (Use a stud finder with voltage detection).
FAQs
Can I put a bookcase in front of my electrical panel?
Technically, no. You cannot place a heavy, movable piece of furniture like a bookcase directly in front of the panel if it blocks the required 30-inch wide by 36-inch deep working space. However, you can modify a bookcase to have a hinged back or a false section, provided the unit is built-in and the electrical code inspector in your area approves the accessibility.
Is it safe to cover an electrical panel with fabric?
Yes, as long as the fabric is not draped inside the box or touching any wires. The cover is aesthetic and sits on the wall surface. Ensure the fabric is not so heavy that it traps heat, although panel boxes generally should not be generating significant heat unless there is an electrical issue.
How do I hide a panel box that sticks out from the wall?
If your panel is surface-mounted (sticking out 4-6 inches), a simple picture frame won’t work. You will need to build a “box” or a shallow cabinet around it. The sliding barn door method also works well here if you mount the track on a header board that projects further than the panel box.
Can I hang a mirror over the electrical panel?
Yes, but be careful with weight. Mirrors are significantly heavier than canvas art. Ensure your hinges are rated for the weight of the mirror and that they are anchored into a stud, not just drywall anchors. I usually recommend acrylic mirrors for this application to reduce weight and risk of breakage.
Conclusion
Concealing an electrical panel box is one of those small design details that separates a finished home from a work-in-progress. It does not require a massive budget or a contractor license to fix. Whether you choose the softness of a textile, the utility of a sliding track, or the seamless look of color-matched paint, the goal remains the same: reclaiming your wall space without sacrificing safety.
Start by assessing your traffic flow and your DIY comfort level. If you are renting, grab a beautiful weaving. If you are renovating, plan the joinery. Just remember that the best design is one that works for your actual life—which includes the occasional need to flip a tripped breaker.
Picture Gallery


