
Culvert Landscaping Ideas for Stunning Yards
One of the most overlooked areas in residential landscaping is the culvert. That concrete or corrugated metal pipe running under your driveway is necessary for drainage, but it is rarely pretty. In my years designing exteriors, I have seen beautiful homes with immaculate lawns that stop abruptly at a muddy, weed-filled ditch right by the road.
Treating your culvert as a design feature rather than an eyesore instantly boosts curb appeal. It creates a cohesive look that extends your property line visually all the way to the street. For visual inspiration on how to transform these tricky drainage areas, be sure to check out the Picture Gallery at the end of this blog post.
Designing around a culvert requires a delicate balance of hydraulics and horticulture. You cannot simply block the water flow for the sake of aesthetics, or you will end up with a flooded driveway. This guide will walk you through safe, professional methods to turn that utility pipe into a stunning landscape element.
1. Assessing the Functionality and Engineering
Before you buy a single plant or stone, you must understand the water dynamics of your ditch. As a designer, my first step is never aesthetic; it is always functional analysis. If you impede the flow of water, you risk eroding your driveway foundation or flooding your neighbor’s yard.
Start by observing the culvert during a heavy rainstorm. Does the water rush through violently, or does it pool and drain slowly? High-velocity water requires heavy stabilization materials like riprap or large boulders. Slow-moving water allows for more delicate planting and smaller river rocks.
You also need to check your property survey for easements. In many municipalities, the culvert and the few feet surrounding it technically belong to the city or county right-of-way. While most towns are happy for you to beautify the area, they may require access for maintenance. Avoid permanent structures like cemented walls if you are within a utility easement.
Designer’s Note: The Slope Rule
A common failure point in culvert landscaping is underestimating the slope. If the sides of your ditch are steeper than a 3:1 ratio (three feet of horizontal run for every one foot of drop), mulch and small gravel will wash away.
In these cases, you must use “angular” rock rather than round river rock. Round rocks act like ball bearings and roll down slopes when wet. Angular, jagged rocks lock together and stay put.
Common Mistakes + Fixes
- Mistake: Blocking the pipe opening with a grate to stop trash.
- Fix: This often causes debris to pile up and dam the water. Instead, keep the opening clear and create a debris catch basin three to four feet upstream using larger stones to slow the water slightly.
- Mistake: Ignoring soil erosion around the pipe edges.
- Fix: Install heavy-duty non-woven geotextile fabric around the pipe collar before placing decorative stone. This prevents the soil from washing out from under your rocks.
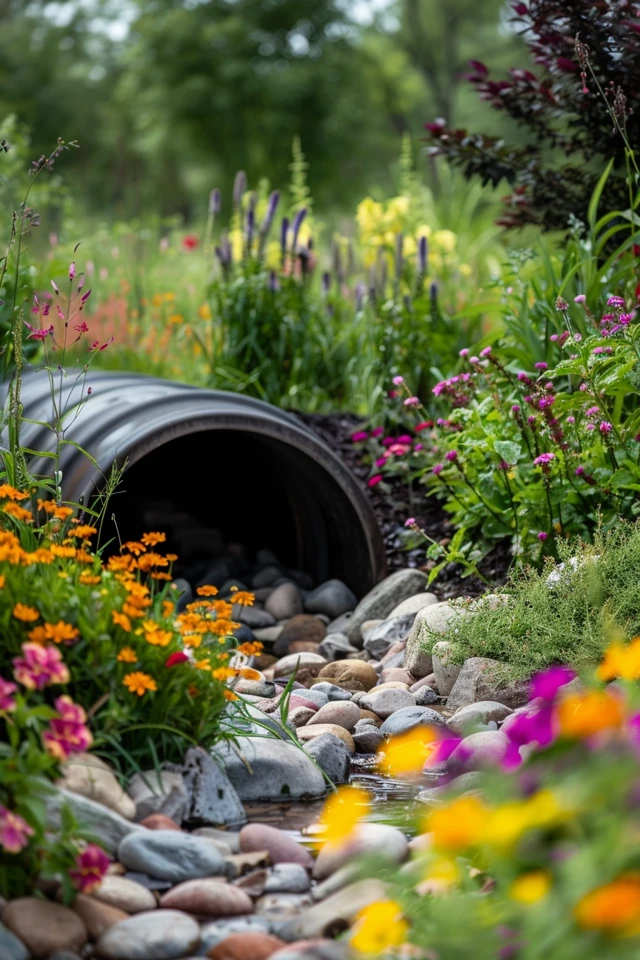
2. The Dry Creek Bed Aesthetic
The most reliable design solution for a culvert is mimicking nature with a dry creek bed. This approach works with the water rather than trying to hide the fact that drainage exists. It looks intentional during dry spells and functions perfectly during storms.
To achieve a professional look, you need to vary your stone sizes. A pile of uniform gravel looks like a construction site. I typically use a mix of three sizes: large “anchor” boulders (18–24 inches), medium river rock (4–8 inches), and smaller gravel (1–2 inches) to fill the gaps.
Placement is key to realism. Place the largest boulders at the “turns” of your ditch or near the culvert opening. This mimics how a real river deposits heavy stones. Use the medium stones to line the channel, and use the smallest gravel in the center where water would naturally flow.
Material Selection Guide
The color of your stone should complement your home’s exterior palette. If you have a warm brick house, look for river rocks with tan, beige, and rust hues. If your home has cool gray siding or slate accents, stick to granite or blue-gray river stones.
Do not use white marble chips. They stain quickly in muddy water, reflect too much glare, and look artificial in a natural ditch setting. Stick to natural fieldstone or local river rock for the best longevity.
What I’d Do in a Real Project
- Excavate: I dig out the channel slightly to ensure it is concave.
- Line: I line the entire ditch with heavy 5-ounce filter fabric (not the cheap weed barrier from big box stores).
- Anchor: I place three large boulders around the culvert mouth to hide the metal edge.
- Fill: I fill the bed with 6-inch river slicks, ensuring no fabric is visible.
3. Softscaping: Choosing the Right Plants
Plants soften the harsh look of rock and metal. However, the environment near a culvert is hostile. Plants here must tolerate “wet feet” during storms and potential drought conditions between rains. This duality is often called a “rain garden” environment.
Avoid plants with aggressive taproots that might seek out the water inside the pipe and crack it. Willow trees, for example, are notorious pipe-destroyers and should never be planted near a culvert. Instead, focus on plants with fibrous, shallow root systems that hold the soil together without damaging infrastructure.
Ornamental grasses are my go-to for these areas. They add height, movement, and texture while filtering pollutants from the road runoff. Varieties like Switchgrass (Panicum virgatum) or Feather Reed Grass are excellent choices. They stand tall enough to distract the eye from the dark pipe opening.
Top Plant Recommendations
- Joe Pye Weed: Loves moisture, attracts butterflies, and grows tall enough to screen the area.
- Siberian Iris: Thrives in wet soil and provides beautiful spring blooms with grass-like foliage the rest of the year.
- Daylilies: Incredible hearty. They work well on the upper banks of the ditch where the soil is drier.
- Creeping Jenny: Great for softening the edges of rocks. It loves water and will cascade over boulders.
Spacing and Layout
When laying out plants, keep woody shrubs at least four feet back from the pipe opening. This ensures that if you need to replace the pipe in ten years, you won’t have to rip out your mature landscaping. Plant in odd-numbered groups (drifts of 3, 5, or 7) for a natural, organic look.
Layer your planting by height. Place the shortest plants (ground cover) nearest the rock bed, medium perennials in the middle, and taller grasses or shrubs at the top of the bank. This creates a “bowl” effect that feels welcoming rather than overgrown.
4. Structural Disguises: Headwalls and Bridges
If you want a more tailored, high-end look, consider installing a decorative headwall. A headwall is a vertical wall built around the opening of the pipe. It serves two purposes: it acts as a retaining wall to hold back the soil, and it frames the pipe in attractive stone or brick.
For a DIY-friendly approach, use stackable landscaping block or flat flagstone. If you are hiring a mason, a stone-veneer headwall that matches your home’s foundation is a massive curb appeal upgrade. It turns the pipe into an architectural feature rather than a utility necessity.
Another fantastic way to hide a culvert is to build a bridge over it. Even if the ditch is narrow enough to jump across, a small wooden or stone bridge suggests a water feature. It creates a focal point that draws the eye away from the galvanized metal pipe below.
Bridge Design Rules
Scale is crucial here. A bridge that is too small looks like a toy, while one that is too large looks out of place. The bridge should extend at least 18 inches past the bank on either side for visual stability.
Ensure the bridge is anchored securely. In a flood event, an unanchored wooden bridge can float away and become a dam downstream. I recommend setting the bridge posts in concrete footings outside the flow line of the ditch.
Safety Considerations
If your culvert drop-off is significant (over 30 inches), you need to consider safety railings on your headwall or bridge. This is especially important if the culvert is near a sidewalk where children or pets walk. Integrated lighting is also a smart addition here to mark the edge at night.
5. Maintenance and Long-Term Care
Culvert landscaping is not a “set it and forget it” project. Because this area handles water flow, it accumulates silt, trash, and organic debris. If you neglect it, your beautiful dry creek bed will disappear under a layer of mud within two seasons.
Schedule a clean-up twice a year: once in late fall after the leaves drop, and once in early spring. You need to physically remove leaves from the rock bed. If leaves are left to rot between the stones, they turn into soil, which then invites weeds to grow directly in your rocks.
Weed control is the biggest challenge in rock beds. Even with filter fabric, weed seeds will blow in from the top and root in the dust trapped between stones. I recommend using a pre-emergent herbicide in early spring to prevent seeds from germinating. Alternatively, a flame weeder is a chemical-free way to spot-treat weeds in rock areas.
Handling Erosion
Inspect the areas around your headwall or boulders after major storms. If you see “piping” (small tunnels of water cutting behind your stones), you need to address it immediately. Pack these voids with a mixture of soil and gravel.
If a plant isn’t thriving, don’t force it. The microclimate in a ditch can change drastically from wet to dry. If a specific fern dies twice, swap it for a sedge or rush. Flexibility is key to successful landscape maintenance.
Final Checklist: The Project Roadmap
Here is the exact workflow I use when consulting on a drainage landscape project. Use this to keep your renovation on track.
Planning Phase
- Check Easements: Call your local municipality to confirm right-of-way rules.
- Call Before You Dig: Dial 811 to have underground utilities marked.
- Calculate Slope: Determine if you need angular rock (steep) or river rock (flat).
- Source Material: Visit a local rock yard to see stone colors in person (wet and dry).
Execution Phase
- Clear Vegetation: Remove all weeds and grass from the ditch area.
- Excavate: Shape the ditch to be smooth and consistent.
- Install Fabric: Lay down heavy-duty non-woven geotextile, pinning it every 12 inches.
- Set Headwall/Boulders: Place your largest structural elements first.
- Backfill Rock: Fill from the bottom up, interlocking stones where possible.
- Planting: Cut X-slits in the fabric for plants, digging holes slightly wider than the pot.
FAQs
Can I completely cover the end of the culvert pipe with rocks to hide it?
No. Never block the outlet or inlet. This will cause water to back up, potentially flooding your road or basement. You can obscure the view with tall grasses planted a few feet away, but the water path must remain open.
What is the best size rock for a drainage ditch?
For the main channel, 4-to-8-inch stone (often called “riprap” or “surge stone”) is best for stability. Pea gravel is too light and will wash away in the first storm. Use larger 12-to-18-inch stones for steep banks.
Do I need a permit to landscape my culvert?
Usually, you do not need a permit for surface landscaping like rocks and flowers. However, if you are extending the pipe, building a concrete wall, or changing the grade of the ditch, you will likely need a permit from the city engineering department.
How do I stop weeds from growing in the rocks?
Use a high-quality, non-woven geotextile fabric under the rocks. Do not use plastic sheeting, as it traps water. Keep the rocks free of leaves and debris, as decomposing organic matter creates soil for weeds to grow in.
Conclusion
Transforming a culvert from a muddy ditch into a landscape feature is one of the most rewarding weekend projects you can tackle. It solves a functional problem while adding significant polish to your property’s frontage. By choosing the right stone size, respecting the water flow, and selecting hardy plants, you can create a low-maintenance solution that lasts for years.
Remember that nature is dynamic. Your culvert landscape will evolve as plants mature and stones settle. Observe how the water interacts with your design during the first few storms and make adjustments as needed. With a little effort, that ugly metal pipe will become just another beautiful part of your home’s exterior charm.
Picture Gallery


