
DIY Sunken Fire Pit Ideas for Cozy Backyards
There is something inherently intimate about a sunken fire pit. By lowering the seating area below ground level, you instantly create a secluded destination that feels separate from the rest of the yard. It evokes the nostalgia of mid-century conversation pits while offering practical protection from the wind.
However, digging a hole in your backyard requires significantly more planning than placing a portable fire bowl on the patio. You are dealing with drainage, retaining walls, and permanent hardscaping that needs to stand the test of time. The payoff, though, is a high-end architectural feature that adds immense value to your property.
If you are looking for visual inspiration before reading the technical details, make sure to check out our curated Picture Gallery at the end of this blog post.
1. Site Selection and Drainage Logistics
Before you pick up a shovel, you must address the most critical aspect of a sunken fire pit: water management. A sunken pit is essentially a swimming pool without a liner. If you do not plan for drainage, it will fill with rainwater, breed mosquitoes, and ruin your furniture.
In my design projects, I always start with a percolation test. Dig a small test hole, fill it with water, and see how fast it drains. If you have heavy clay soil, simply digging a pit won’t work. You will likely need to install a French drain system that pipes water away from the pit to a lower point in the yard or a dry well.
Location is also dictated by safety and legal codes. Most municipalities require permanent fire structures to be at least 10 to 25 feet away from the home and property lines. You also need to look up—ensure you aren’t digging directly under low-hanging tree branches or power lines.
2. Determining the Right Dimensions and Scale
Scale is where many DIYers get it wrong. A sunken pit needs to be much larger than you think to be comfortable. If the footprint is too small, your guests will either burn their knees or knock knees with the person opposite them.
For a comfortable gathering space, I recommend a minimum diameter of 10 to 12 feet for the entire sunken area. This allows for a 3-to-4-foot wide fire element in the center, surrounded by adequate legroom and seating depth.
Here are the measurements I use for custom projects:
- Fire Pit to Seat Edge: Allow 24 to 30 inches of legroom. This lets people lean forward to warm their hands without feeling like their shoes are melting.
- Seat Height: Built-in bench seating should be 16 to 18 inches off the finished floor of the pit.
- Seat Depth: If you plan to add cushions (which you should), build the seat at least 20 to 24 inches deep. Standard 18-inch benches feel too narrow once you add a throw pillow.
Designer’s Note
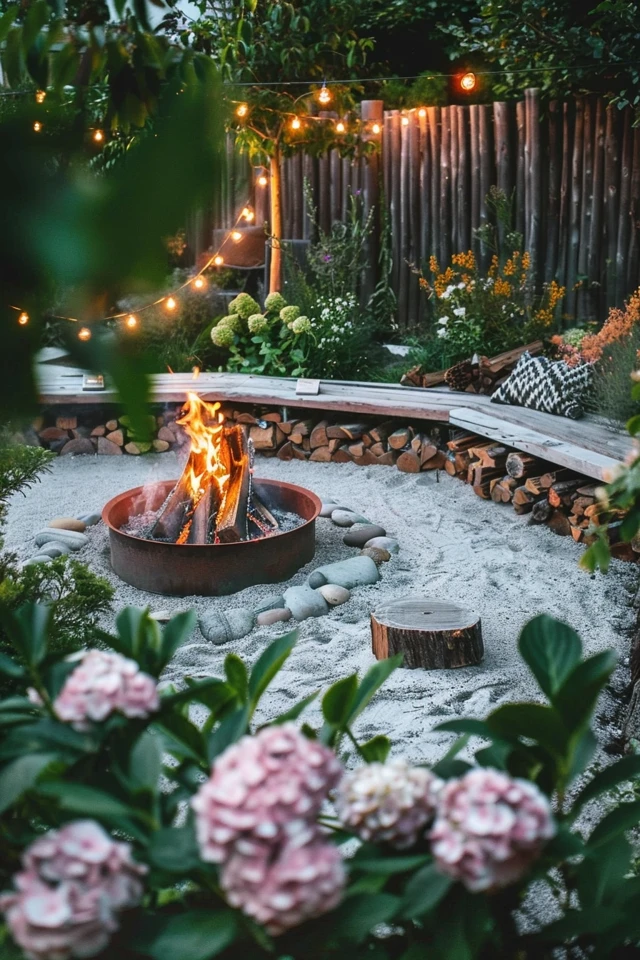
One of the most common issues I see in DIY sunken pits is the “dungeon effect.” You do not need to bury the pit six feet deep. A depth of 18 to 24 inches is usually sufficient to create that cozy, enclosed feeling while allowing guests to see out into the rest of the yard. This depth also makes the retaining walls double perfectly as backrests.
3. Selecting Materials for Retaining Walls and Flooring
The walls of your sunken pit are structural retaining walls. They must hold back the weight of the surrounding earth. For a DIY approach, interlocking concrete retaining wall blocks are the most user-friendly option. They stack without mortar and have a lip that locks them into the row below.
For a more polished aesthetic, I prefer using concrete masonry units (cinder blocks) faced with natural stone veneer or smooth stucco. This allows you to match the fire pit to the exterior of your main house, creating a cohesive design language across the property.
For the flooring inside the pit, avoid pouring a solid concrete slab unless you are installing a commercial-grade drain in the center. Instead, use permeable materials. A thick layer of crushed granite or decorative pea gravel allows rainwater to seep directly into the ground.
If you prefer a solid floor, use pavers over a sand base. Leave slight gaps between the pavers filled with polymeric sand or fine gravel to maintain permeability. This prevents puddles from forming around the fire area.
4. Fire Element Options: Wood vs. Gas vs. Smokeless
The fuel source you choose will dictate the infrastructure you need to install during the excavation phase.
Wood Burning:
This provides the most authentic crackle and scent, but smoke management is tricky in a sunken area. Because you are lower than the prevailing wind, smoke can get trapped in the “bowl.” I highly recommend using a smokeless fire pit insert (like a Solo Stove or similar technology) inside your masonry structure. These inserts use double-walled airflow to re-burn smoke, making the experience much more enjoyable.
Gas (Natural or Propane):
Gas is the cleanest and safest option for sunken pits. It requires running a gas line trench from your house meter to the pit before you pour any hardscaping. The benefit is instant ignition and no smoke.
Designer Tip on Gas Lines:
If you run a gas line, run a conduit for electricity in the same trench (check local codes for separation distance). Having power in the pit allows you to add floor lighting or outlets for charging phones, which elevates the functionality of the space.
5. Styling for Comfort and Ambiance
Once the hardscaping is done, styling is what makes the pit inviting. Hard stone and concrete can feel cold, so you need to soften the edges with textiles and lighting.
Lighting:
Lighting is mandatory for safety. You have created a trip hazard in your yard, so the steps leading down into the pit must be illuminated. I recommend low-voltage LED step lights integrated into the stair risers. Under-cap lighting on the seating wall also adds a warm, ambient glow that points downward, avoiding glare in your eyes.
Textiles:
Use outdoor-rated cushions for your built-in benches. Look for solution-dyed acrylic fabrics (like Sunbrella) which resist fading and mildew. Since the pit is lower than the ground, it can trap moisture, so ensure your foam is quick-drying “reticulated” foam.
Keep a weather-tight deck box nearby to store throw blankets. Sunken pits stay cooler than the rest of the yard, so guests will reach for blankets even on summer evenings.
Common Mistakes + Fixes
Mistake: Steep, narrow stairs.
Fix: Use landscape stair ratios. Outdoor steps should be more gradual than indoor stairs. Aim for a 6-inch riser height and a 14-inch tread depth. This feels more gracious and is safer for carrying trays of drinks.
Mistake: Ignoring the “weep holes.”
Fix: When building your retaining wall, you must leave small gaps or install pipes at the base to let water pressure from the surrounding soil escape. Without weep holes, hydrostatic pressure can push your wall inward over time.
Mistake: Building the fire ring too high.
Fix: In a sunken pit, the fire vessel should be low—about 12 to 14 inches high. If it is too tall, the heat goes over your head rather than warming your body.
What I’d Do in a Real Project: A Mini-Checklist
If I were designing a sunken fire pit for a client today, here is the exact specification list I would use to ensure success:
- Shape: Square or Rectangular. It is easier to construct with standard blocks and easier to tile than a circle.
- Depth: 20 inches deep. This is the perfect height for a built-in bench.
- Flooring: 3/4-inch crushed basalt gravel. It creates a modern, dark look that hides ash and drains instantly.
- Capstones: Limestone or Sandstone with a “bullnose” (rounded) edge. Sharp edges on seating walls are uncomfortable on the back of the knees.
- Access: Two entry points. If the pit is large, having stairs on opposite sides improves flow and prevents people from feeling trapped.
Final Checklist for Your DIY Build
Use this workflow to keep your project on track:
- Mark the perimeter: Use spray paint to outline the pit and the surrounding safety zone.
- Call 811: Never dig without checking for underground utility lines.
- Excavate: Dig out the soil, plus an extra 6 inches for the gravel base.
- Rough-in utilities: Lay your gas lines and electrical conduits now.
- Install drainage: Place your French drain pipe and cover with gravel.
- Build the walls: Construct the retaining wall and the central fire structure.
- Backfill: Fill the space behind the walls with gravel to assist drainage.
- Cap the walls: Glue down the seating capstones.
- Finish flooring: Lay your pavers or spread your decorative gravel.
- Style: Add cushions, fire media (lava rock or glass), and lights.
FAQs
How much does a DIY sunken fire pit cost?
A DIY project generally ranges from $2,000 to $5,000, depending on materials. If you require professional excavation or gas line installation, costs can easily exceed $8,000. Using standard retaining wall blocks and a wood-burning setup is the most budget-friendly route.
Do I need a permit for a sunken fire pit?
almost certainly. Because you are altering the grade of the land and building a retaining wall, most cities require a permit. If you are running gas or electric, you will definitely need inspections for those trades.
How do I childproof a sunken fire pit?
The drop-off is a hazard for toddlers. I recommend designing a custom cover for the pit when not in use, similar to a deck, or installing a temporary safety rail. Alternatively, plant dense, prickly hedging (like barberry or holly) around the perimeter to act as a natural barrier.
Conclusion
Building a sunken fire pit is a labor-intensive project, but it transforms a backyard from a flat lawn into a multi-dimensional living space. It encourages conversation, provides warmth, and acts as a stunning focal point even when the fire isn’t lit.
By focusing on the unglamorous details—drainage, scale, and ergonomics—you ensure that your cozy hideaway remains a joy to use for years to come. Take your time with the planning phase, measure twice, and enjoy the process of creating your own backyard sanctuary.
Picture Gallery


