
Dry River Bed Landscape Ideas for Your Garden
Designing a landscape isn’t just about placing pretty plants; it is about managing the flow of the environment. One of the most effective ways to handle water runoff while adding a stunning sculptural element to your yard is a dry river bed. This feature mimics the course of a natural stream, utilizing stone and gravel to create movement and texture even when the weather is bone dry.
Whether you are dealing with a soggy low spot in the yard or simply want to break up a large expanse of flat lawn, a dry creek is a versatile solution. It serves a dual purpose: acting as a drainage system during storms and a focal point during the drought season. We have compiled a stunning Picture Gallery at the end of this post to inspire your backyard transformation.
In this guide, I am going to walk you through the professional approach to designing, sizing, and styling a dry river bed. We will move past the basic DIY advice and look at the design principles that keep these features from looking like a pile of rocks. We will cover scale, material selection, and the critical softscaping that makes the river look like it has been there for centuries.
1. The Foundation: Purpose and Layout Strategy
Before you order a single ton of rock, you have to determine why you are building this. In my design practice, dry river beds usually solve a drainage problem.
If you have a downspout that washes out your mulch or a slope that erodes during heavy rain, the river bed acts as a channel. However, even if your yard is perfectly flat, you can build one purely for aesthetics to create a sense of movement.
The biggest mistake I see homeowners make is drawing a straight line. Nature creates curves, bends, and varying widths.
Mapping the Course
To get the layout right, grab two long garden hoses or a can of marking paint. Lay out the edges of your stream, ensuring it meanders naturally.
A good rule of thumb for scale is the 2:1 ratio. If your yard is roughly 50 feet wide, your stream should act as a significant feature, not a tiny ribbon. I rarely design a creek bed less than 3 feet wide at its narrowest point.
Varying the Width
Real rivers are never uniform. They widen at the bends and narrow in the straightaways.
When marking your outline, create “pools” where the bed widens to 5 or 6 feet, and “rapids” where it narrows to 2 or 3 feet. This variation creates visual tension and interest.
Designer’s Note: The Depth Illusion
In a real project, I always excavate the soil to a depth of 12 to 18 inches. You cannot just dump rock on top of the grass.
By digging down, you create a container for the water and allow the rocks to sit flush with the surrounding grade. This makes the feature look established rather than applied.
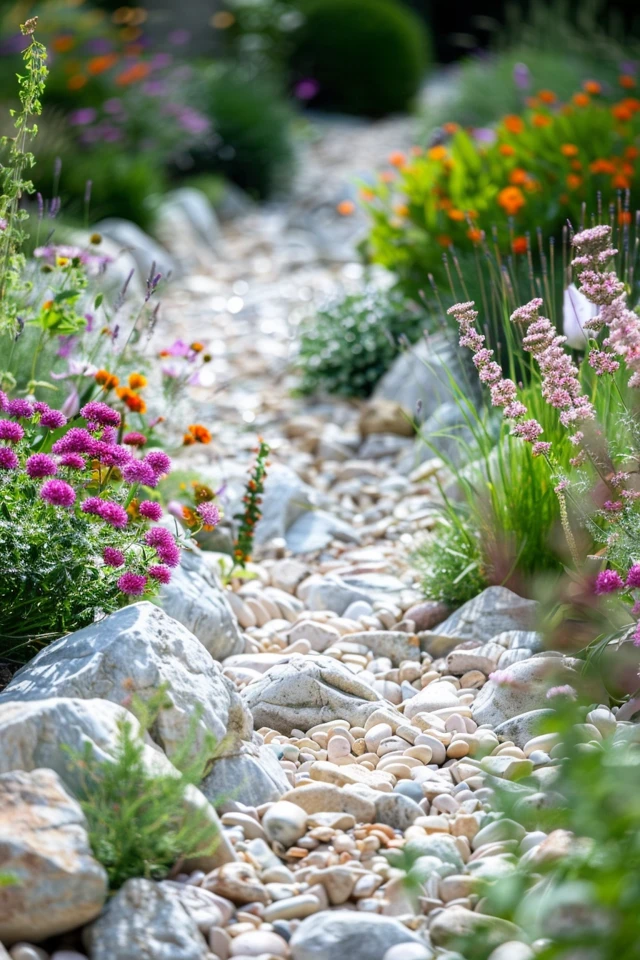
2. Material Selection: The Hierarchy of Stone
If you use only one size of rock, your river bed will look like a gravel driveway. To achieve a natural look, you must follow a strict hierarchy of stone sizes.
I categorize materials into three groups: Boulders (the anchors), Cobbles (the structure), and Gravel (the bed).
The Anchors (Boulders)
These are your 18-inch to 24-inch stones. They simulate the heavy rocks that a real river couldn’t wash away.
Place these at the bends of your river and at the “headwaters” (the start) and the “terminus” (the end). They direct the eye and hold the soil back on the curves.
The Structure (River Jacks or Cobbles)
These are typically 4-inch to 8-inch round stones. I use these to line the banks and create clusters around the boulders.
They act as the transition between the heavy boulders and the small gravel. Do not arrange them in a perfect row like a pearl necklace; group them naturally.
The Bed (Gravel and Pebbles)
This is your 1-inch to 2-inch river rock. This material covers the bottom of the trench and mimics the sediment at the bottom of a stream.
I typically use a mix of grey and tan tones to add depth. Avoid white marble chips or lava rock, as they look artificial and distract from the natural aesthetic.
Common Mistakes + Fixes
Mistake: Using rocks that are too small for the scale of the yard.
Fix: Upsize your boulders. If you can lift it easily with one hand, it is too small to be an anchor.
Mistake: Placing rocks on top of the soil without a barrier.
Fix: Always line your trench with high-quality, non-woven geotextile fabric. This prevents heavy rocks from sinking into the mud over time and stops weeds from taking over.
3. Construction Techniques for Longevity
Building a dry river bed is hard labor, but skipping steps will result in a maintenance nightmare.
The most critical technical element is the underlayment. Do not use cheap black plastic; it traps water and kills the soil biology, eventually cracking and letting weeds through.
Fabric Installation
Use a heavy-duty, non-woven landscape fabric (4 oz or heavier). This allows water to percolate into the soil while keeping the mud separate from your expensive stone.
When you lay the fabric, make sure you overlap the seams by at least 12 inches. I use landscape staples every few feet to pin it down before the rock arrives.
Rock Placement Logic
Start with your biggest boulders. I usually bury the bottom third of the boulder into the ground.
A floating boulder looks fake. By burying the base, it looks like the earth has eroded around it over time.
Once the boulders are set, fill in the center with your smallest gravel. Finally, arrange the medium cobbles along the banks and around the boulders to bridge the gap.
Managing Water Flow
If this is a functional drainage creek, pitch matters. You need a slope of at least 1/8 inch per foot to keep water moving.
If your yard is flat, you can still manage water by digging the center of the trench deeper than the sides. This keeps water away from the edges and centered in the stone bed.
4. Softscaping: Planting the Banks
Stone provides the structure, but plants provide the life. The goal is to make the river bed look like it cuts through a lush landscape.
You want to soften the hard edges of the rock with plants that have different textures and habits.
Texture Contrast
Since rocks are hard and round, I like to contrast them with fine-textured foliage. Ornamental grasses are my go-to choice here.
Varieties like Blue Fescue or Mexican Feather Grass move with the wind, mimicking the movement of water. Place them right at the edge of the rocks so they spill over.
Groundcovers and Creepers
To blend the stone into the rest of the garden, use creeping plants. Creeping Jenny (in wet areas) or Sedum (in dry areas) works wonders.
Plant these in the pockets between the medium-sized stones on the banks. Over time, they will grow over the rocks, blurring the line between the garden and the river.
The “Island” Effect
If your river bed is wide enough (over 5 feet), consider creating a small planting island in the middle.
Leave a mound of soil, cover it with fabric and mulch, and plant a specimen shrub or a large boulder paired with a fern. This forces the “water” (gravel) to split around it, adding tremendous visual interest.
What I’d Do in a Real Project
If I were designing a river bed for a shaded backyard, I would rely heavily on Ferns and Hostas. Their broad leaves contrast beautifully with grey river rock.
For a sunny, arid spot, I would use Yucca, Russian Sage, and Juniper. Always group plants in odd numbers (3, 5, or 7) for a more organic look.
5. Lighting and Accessories
To take your dry river bed from a simple drainage ditch to a high-end landscape feature, you need to think about how it looks at night and how people interact with it.
Bridge the Gap
If your river bed cuts across a walking path, you need a way to cross. A flat flagstone bridge is a subtle, modern option.
Select a large, flat slab of stone (approx. 3-4 feet long) and bridge it across the narrowest part of the creek. Ensure it rests securely on stable boulders on either side so it doesn’t rock when stepped on.
For a more rustic cottage look, a wooden arched bridge works well, but be mindful of maintenance. Wood in damp areas requires annual sealing.
Landscape Lighting
Lighting a river bed creates a magical effect at night. I recommend using two types of low-voltage light fixtures.
First, use submersible-rated spotlights if the area actually floods, or standard spotlights if it stays mostly dry. Aim these at the large boulders to create shadows and highlights.
Second, use path lights along the banks. Do not place them in a straight line. Stagger them to illuminate the plants that spill over the rocks.
The Wet Look
A professional trick to enhance the stone is to use a color-enhancing sealer on the river rocks.
This gives the stones that permanent “wet look,” which brings out the deep greys, reds, and tans that usually disappear when the stone is dry. This is optional but adds a very polished finish.
Final Checklist: Designing Your Dry River Bed
Before you break ground, run through this designer checklist to ensure you haven’t missed a critical step.
Check Utility Lines: Always call 811 or your local utility service before digging. You do not want to hit a gas or water line.
Calculate Materials: Measure length x width x depth to get cubic feet. Divide by 27 to get cubic yards. Remember, rock is heavy; one cubic yard of river rock weighs roughly 2,500 to 2,800 lbs.
Fabric is Mandatory: Verify you have enough heavy-duty geotextile fabric to cover the trench plus 12 inches of overlap on all sides.
Scale the Boulders: Ensure your largest rocks are proportional to your house. A two-story house needs 2-foot boulders; a small cottage can handle 1-foot boulders.
Water Source: Identify where the water is coming from (downspouts, uphill slope) and where it is going (pop-up emitter, rain garden, or storm drain).
Plant Palette: Select plants that can tolerate the specific conditions of the bank—often dry on top but moist deep down.
FAQs
How deep should a dry river bed be?
I recommend digging the trench 12 to 18 inches deep. This allows for about 4 inches of gravel at the bottom while keeping the banks high enough to contain water flow during heavy rains.
Do I need a permit to build a dry creek bed?
It depends on your municipality. Generally, if you are altering the drainage of your property or moving large amounts of soil, you should check with your local building department. You typically cannot redirect water directly onto a neighbor’s property.
How do I keep weeds out of the rocks?
The heavy-duty fabric underneath is your primary defense. However, dust and seeds will eventually blow into the rocks from above. I recommend using a leaf blower on a low setting to keep organic debris out of the rocks, and spot-treating any weeds that appear immediately.
Can I use a dry river bed on a steep slope?
Yes, but you need to take extra precautions against erosion. On steep slopes, I use larger rocks in the center of the bed to slow the water down. You may also need to install “check dams”—rows of larger rocks buried perpendicular to the flow—to act as speed bumps for the water.
What is the best color rock to use?
Look at the exterior of your home. If you have warm brick or beige siding, choose “Tennessee River Rock” or tan gravel. If you have a grey or blue house, stick to “Delaware Blend” or grey granite river rock. Integrating the hardscape color with the home architecture is vital for cohesion.
Conclusion
A dry river bed is one of the few landscape features that perfectly balances engineering with art. It solves the headache of backyard drainage while offering a canvas for beautiful stone and plant combinations.
By following the rules of scale, prioritizing the hierarchy of stone sizes, and softening the edges with lush planting, you can build a feature that looks like it was carved by nature rather than delivered by a dump truck.
Remember to take your time with the layout. The curves and the variations in width are what give the river its character. Whether it is raining or sunny, a well-designed dry creek will add value and beauty to your garden for decades to come.
Picture Gallery


