
Elegant Floor to Ceiling Fireplace Tile Ideas
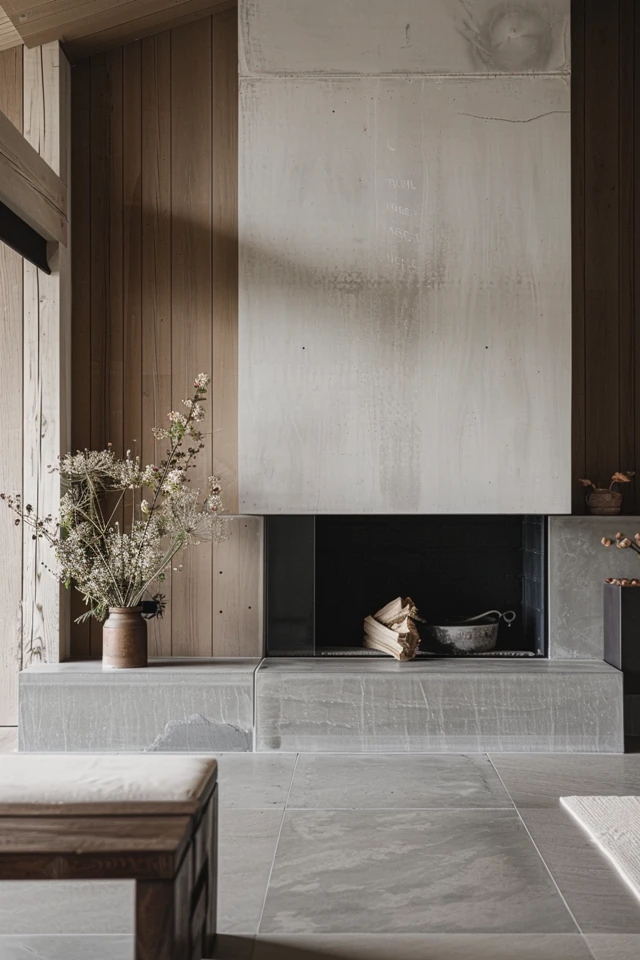
A floor-to-ceiling fireplace is one of the most powerful architectural elements you can have in a living space. It immediately draws the eye upward, making standard eight-foot ceilings feel loftier and turning a basic heating element into a dramatic focal point. When you commit to tiling the entire vertical span, you are essentially creating a permanent piece of art that anchors the room.
However, designing a vertical expanse like this requires more than just picking a pretty mosaic. You have to consider the weight of the visual, the interaction with natural light, and the practicalities of heat codes. If you are looking for visual inspiration and specific examples, please be sure to visit the Picture Gallery at the end of this blog post.
I have designed dozens of these features, and the difference between a “good” fireplace and a “breathtaking” one usually comes down to the details of the layout and the edges. In this guide, I will walk you through the professional considerations for selecting, sizing, and installing tile that stands the test of time.
1. Choosing the Right Scale and Proportion
Scale is the first hurdle in vertical fireplace design. When you take a material all the way to the ceiling, the size of the individual tile dictates how busy or serene the finished product looks.
For a modern, sleek aesthetic, large-format tiles are your best friend. I often specify tiles that are 24×48 inches or even larger porcelain slabs. Using large tiles minimizes grout lines, which creates a monolithic, stone-slab look without the massive price tag of a single piece of marble.
If you prefer a more traditional or transitional look, smaller tiles like zellige or subway bricks work well, but they introduce visual texture. When using smaller tiles on a tall surface, the grout color becomes critical. High-contrast grout (like dark gray grout on white tile) emphasizes the grid and can look chaotic on a 10-foot wall.
Designer’s Note: The “Sliver” Rule
In my projects, I always conduct a dry layout or a computer rendering to check the cuts at the ceiling and floor. The worst outcome is ending up with a one-inch sliver of tile at the very top of the wall. If your math shows you will have a tiny sliver, you must shift the entire layout down so you have substantial cut pieces at both the top and bottom.
Common Mistakes + Fixes
- Mistake: Ignoring the viewing distance. Small, intricate mosaics can look like a solid color from the sofa, losing their detail.
- Fix: If you use small mosaics, ensure they have high variation in color or texture so the pattern reads clearly from 10 feet away.
- Mistake: Overwhelming a small room with dark, large-scale tile.
- Fix: In compact spaces, use lighter colors with a gloss finish to reflect light and keep the vertical pillar from feeling oppressive.
2. Material Selection: Aesthetics vs. Durability
Not all tiles are rated for high-heat environments. While the wall surrounding a gas or electric insert doesn’t get as hot as the inside of a wood-burning firebox, it still experiences thermal cycling.
Porcelain is generally the gold standard for fireplace surrounds. It is incredibly dense, heat resistant, and creates a high-end look for a moderate cost. Modern porcelain printing technology is so advanced that it is often difficult to distinguish it from real Calacatta marble or limestone.
Natural stone acts as a beautiful heat sink but requires more maintenance. Materials like slate, split-face travertine, or stacked stone offer incredible texture but can be difficult to clean. If you choose a porous natural stone, you must seal it annually to prevent soot and ash from staining the face of the fireplace.
Real-World Constraints: Weight and Framing
If you are retrofitting an existing fireplace with heavy natural stone or thick concrete tiles, you need to check the framing. A floor-to-ceiling installation adds significant dead load to the wall. I always verify that the drywall is actually cement board or fiber-cement backing, which is necessary to support the weight and adhesion of heavy vertical tile.
What I’d Do in a Real Project (Material Checklist)
- Family with kids/pets: I specify matte porcelain. It doesn’t show fingerprints, wipes down easily with water, and resists scratching from toys or claws.
- Modern minimalist: I use large-format “concrete look” tiles. They provide an industrial edge and the large size makes the room feel expansive.
- Transitional luxury: I opt for a honed marble mosaic. The honed finish feels softer and more organic than polished stone, bridging the gap between modern and traditional.
3. Texture and Finish: Managing Light and Glare
The finish of your tile changes how the fireplace interacts with the room’s lighting. This is an often-overlooked aspect of design that creates ambiance.
Glossy or polished tiles are excellent for bouncing light around a darker room. However, you must be careful with placement. If your fireplace is directly opposite a large window or has recessed can lights directly above it, a high-gloss tile will act like a mirror. You might end up seeing the reflection of your ceiling fan or light bulbs rather than the beauty of the tile.
Matte or textured finishes absorb light. They are much more forgiving regarding installation imperfections because they don’t show lippage (unevenness between tiles) as much as glossy tiles do. Textured tiles, such as 3D wave patterns or split-face stone, add depth that changes as the sun moves across the room.
Lighting the Vertical Space
To truly elevate a floor-to-ceiling design, I recommend installing wall-washer recessed lights or track heads about 18 to 24 inches away from the fireplace wall.
Aim the light to graze down the front of the tile. This technique highlights the texture of stone or the undulation of handmade ceramics. Without this dedicated lighting, a dark tiled fireplace can look like a black hole at night.
Designer’s Note: Dust Catchers
I love the look of rough-hewn stacked stone, but I warn my clients about dust. In a high-ceiling room, the upper portions of that rough stone will collect dust that is hard to reach. If you have allergies, stick to a flat-faced tile that can be easily wiped with a Swiffer on an extension pole.
4. Layout Patterns and Edge Detailing
The pattern in which you lay the tile dictates the energy of the room. A standard “running bond” (brick pattern) is classic and safe. However, for a floor-to-ceiling application, I often prefer a “stacked bond.”
Stacking tiles directly on top of one another creates continuous vertical lines that emphasize height. This is particularly effective in rooms with lower 8-foot ceilings, as it tricks the eye into thinking the room is taller.
Herringbone is stunning but labor-intensive and results in significant material waste due to the angled cuts at the edges. If you choose herringbone for a full-height fireplace, order at least 20% extra overage rather than the standard 10%.
The Edge Problem
The biggest giveaway of an amateur DIY job is the exposed edge of the tile. Most tiles do not have a finished side. When you tile around the corner of a fireplace bump-out, you need a plan for that transition.
Option A: Mitering. This is the most professional look. The installer cuts the edge of two tiles at a 45-degree angle so they meet at a perfect point. This makes the column look like a solid block.
Option B: Schluter Strips. These are metal edging strips used to hide the raw edge of the tile. They come in brass, black, chrome, and white. This is a cleaner, more modern look and is much durable than mitering, which can be prone to chipping if hit.
Option C: Bullnose. This is a traditional approach where you buy coordinating pieces with a rounded, finished edge. This is becoming less common in modern design as many tile lines no longer offer matching bullnose.
5. Integrating Mantels and Hearths
A floor-to-ceiling tile face does not mean you have to skip the mantel. In fact, a mantel breaks up the vertical plane and provides a necessary visual pause.
For a modern aesthetic, I often use a “floating” beam mantel. We install heavy-duty steel brackets into the studs before the tile goes up. The tile is then cut around the brackets, and the wood beam slides on, looking like it is piercing through the stone.
If you omit the mantel for a sleek look, you need to consider the television. If you plan to mount a TV on the tile, you must know where your studs are before you tile. I recommend installing a recessed media box for power and HDMI cables so the TV sits flush against the tile without visible wires.
Hearth Considerations
The hearth is the floor section immediately in front of the firebox. Building codes usually require 16 to 20 inches of non-combustible material extending into the room.
Flush Hearth: I love using the same tile from the wall on the floor, inset flush with the hardwood. It creates a seamless transition.
Raised Hearth: A floating bench or a raised brick hearth adds dimension. It also provides extra seating during parties. If you do a raised hearth, consider capping it with a solid slab of stone (like quartz or granite) rather than tiling the top, as grout lines on a seat can be uncomfortable and hard to keep clean.
Common Mistakes + Fixes
- Mistake: Mounting a wood mantel too close to the firebox.
- Fix: Check your local fire code and the manufacturer’s manual. Most require combustible materials (wood) to be at least 12 inches above the firebox opening.
- Mistake: Using white grout on a hearth floor.
- Fix: Gravity brings ash and dirt down. Always use a medium gray or dark grout for the floor portion of the fireplace, even if the wall grout is light.
Final Checklist: What I’d Do in a Real Project
If I were managing your fireplace renovation tomorrow, this is the checklist I would run through to ensure success.
1. Structural Check
- Verify the wall framing is 16″ on center.
- Ensure the substrate is cement board, not standard drywall.
- Check if the floor is level; if not, the first row of tile must be scribed to fit.
2. Layout Planning
- Tape the outline of the fireplace on the wall to visualize the width.
- Calculate the tile cuts to avoid slivers at the top or sides.
- Mark the exact location of the mantel and TV mount on the backing board before tiling starts.
3. Material Prep
- Order 15-20% extra tile for cuts and breakage.
- Select a grout that resists heat and staining (epoxy grout is great but hard to install; high-performance cement grout is standard).
- Choose your edge trim (metal strip or mitering) before installation day.
4. Installation Day
- Use a laser level to keep vertical lines perfectly straight.
- Back-butter large tiles (apply mortar to the wall and the back of the tile) to ensure 100% adhesion.
- Clean grout haze immediately, especially on textured stone.
FAQs
Can I tile directly over a brick fireplace?
Yes, but you usually cannot adhere tile directly to the brick surface with standard mortar. The best practice is to attach a layer of cement backer board over the brick using masonry screws. This provides a flat, stable surface for the new tile. If you must tile directly, you need a polymer-modified thin-set mortar designed for difficult surfaces, and you may need to “parge” (smooth out) the brick first.
How much does a floor-to-ceiling fireplace tile project cost?
Cost varies wildly by region and material. However, for a standard 8-foot wide by 9-foot tall fireplace, expect to pay between $2,000 and $5,000 for labor. Materials can range from $5 per square foot for basic porcelain to $50+ per square foot for high-end marble. Don’t forget to budget for demolition of the old surround and debris disposal.
How do I clean soot off textured tile?
Prevention is key, so ensure your flue is drawing correctly. If soot happens, use a mixture of warm water and TSP (Trisodium Phosphate) or a specialized fireplace cleaner. Use a soft nylon scrub brush to get into the crevices. Avoid wire brushes, as they can scratch porcelain and natural stone.
Is there a renter-friendly way to do this?
For renters, you cannot permanently tile over a fireplace. However, you can build a “false front.” This involves building a thin wooden frame that fits over the existing fireplace (ensuring safety clearances for heat). You can tile this wooden frame. When you move, you simply detach the frame and take it with you. Alternatively, high-quality peel-and-stick tiles can work on the existing surround if the fireplace is purely decorative and never used for heat.
Conclusion
Creating a floor-to-ceiling fireplace is a commitment to bold design. It transforms the architecture of your home and provides a sense of grandeur that paint or wallpaper simply cannot achieve. Whether you choose a moody, dark slate or a bright, reflective porcelain, the verticality of the design will always work to make your room feel larger and more cohesive.
Remember that the success of this project lies in the boring details: the layout math, the edge treatments, and the substrate preparation. Take the time to plan these elements, and you will have a feature wall that looks as safe and solid as it is beautiful.
Picture Gallery


