
Elevate Your Space with Accent Wall Molding Ideas
Wall molding is often the missing ingredient that transforms a plain room into a curated architectural statement. It is the bridge between a house that feels like a generic box and a home that feels like a custom-designed sanctuary.
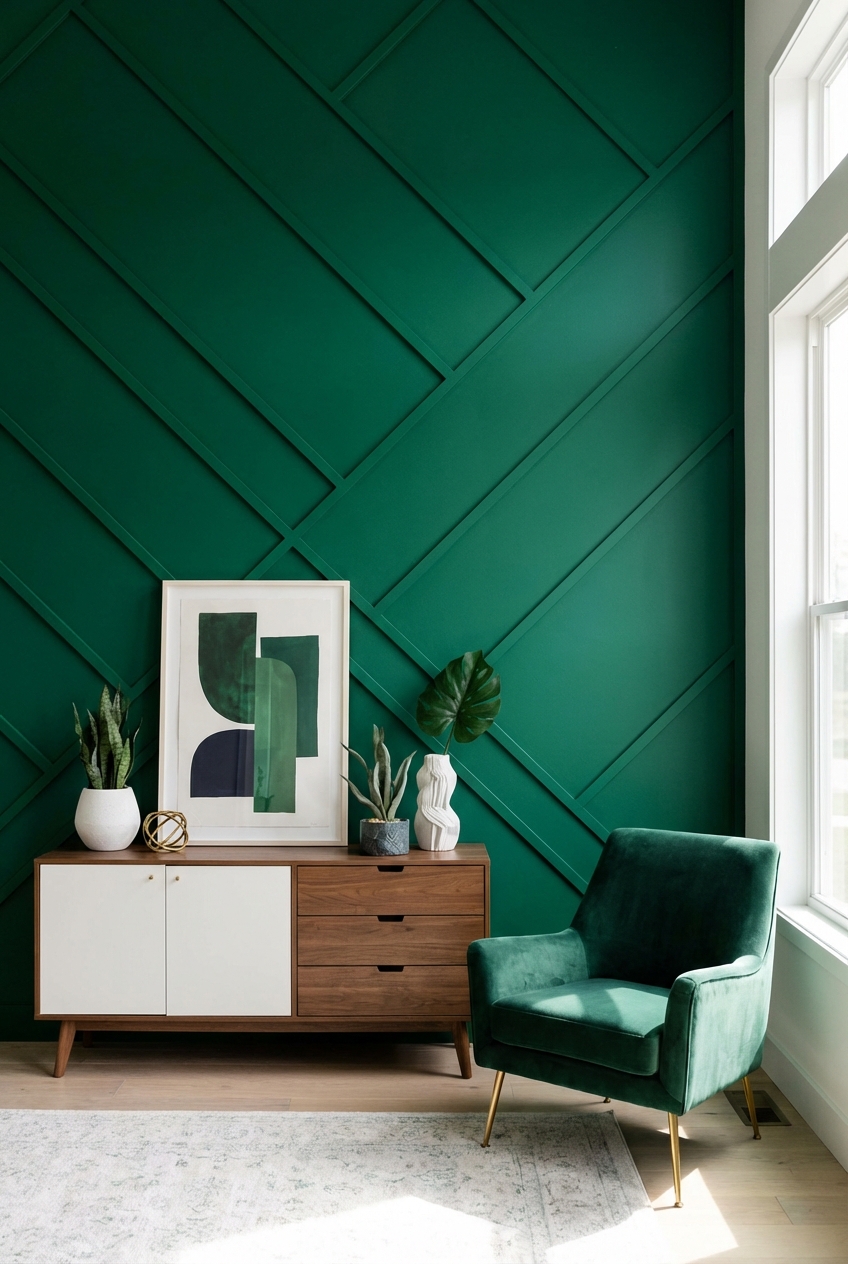
To help you visualize how these different styles work in real-world settings, I have curated a comprehensive Picture Gallery at the end of the blog post for your inspiration. Whether you are looking for the timeless elegance of picture frame molding or the modern edge of vertical slats, this guide covers every technical and aesthetic detail you need to succeed.
At-a-Glance: Key Takeaways
- Molding adds depth and texture, allowing you to use single-color palettes without the space feeling flat or boring.
- The scale is more important than the style; always size your molding boxes or slats in proportion to your ceiling height and furniture.
- Material choice matters: MDF is budget-friendly and easy to paint, while solid pine or oak provides durability for high-traffic areas.
- Preparation is 90% of the work, specifically the transition between the molding and your baseboards or crown.
- Lighting is the silent partner of wall molding; shadows created by the trim are what actually give the wall its dimension.
What This Style Means (and Who It Is For)
Accent wall molding is the art of using wood or composite strips to create geometric patterns, frames, or textures on a flat surface. In the world of interior design, we call this architectural millwork. It is a way to bake character directly into the “bones” of the room rather than relying solely on furniture and decor.
This approach is perfect for homeowners who want a high-end look without necessarily buying expensive new furniture. It is for the person who feels their room is “missing something” even after they have hung art and rolled out a rug. Molding provides a sense of permanence and history, even in a brand-new build.
If you live in a rental, there are even lightweight, removable options using high-density foam and Command strips. For those with pets or children, traditional wood wainscoting serves a dual purpose: it looks beautiful and protects your drywall from scuffs, vacuum cleaner bumps, and sticky hands. It is a design choice that marries form and function perfectly.
The Signature Look: Ingredients That Make It Work
To achieve a professional finish, you cannot just slap some wood on a wall. You need to understand the “ingredients” that contribute to a cohesive look. The most successful accent walls rely on three pillars: profile, material, and finish.
The profile refers to the shape of the molding. A “shaker” style uses flat, square edges for a clean, modern, or farmhouse look. An “oogee” or “beaded” profile features curves and dips, which lean toward traditional, Parisian, or colonial aesthetics. Choosing one and sticking with it throughout the room is vital for visual harmony.
Material choice affects the longevity of your project. For most interior accent walls, MDF (Medium Density Fiberboard) is the gold standard because it does not have knots, it does not warp, and it comes pre-primed. However, if you are planning to stain the wood to show the grain, you will need a hardwood like white oak or walnut.
Finally, the finish—specifically the paint sheen—dictates how the light hits the molding. I typically recommend a Satin or Semi-Gloss finish for the molding itself, even if the wall is Matte. This slight difference in sheen makes the architectural details pop without being overly shiny.
One of the most common mistakes I see is homeowners choosing molding that is too thin for the room’s scale. If you have 10-foot ceilings, a 1-inch wide trim will look like a toothpick. In my experience, a 2-inch or 2.5-inch width is the “sweet spot” for standard 8-to-9-foot ceilings. Always buy a single 8-foot piece of a few different widths and tape them to the wall before committing to the full purchase.
Layout & Proportions (Designer Rules of Thumb)
Layout is where most DIY projects go off the rails. You want the wall to look balanced, not cluttered. Here are the specific measurements and rules I use when designing millwork for my clients.
- The Rule of Thirds: If you are doing wainscoting (molding on the bottom half of the wall), the height should be roughly one-third of the total wall height. For an 8-foot ceiling, that is approximately 32 to 36 inches high including the top rail.
- Spacing for Picture Frames: When creating boxes on a wall, keep the gap between the boxes and the edges of the wall (and between each box) consistent. A 4-inch to 6-inch gap is usually ideal. Anything wider than 8 inches starts to look disconnected.
- Symmetry vs. Asymmetry: In a bedroom, center your main molding boxes behind the nightstands or the headboard. In a living room, use the fireplace or a large piece of art as your “anchor” and build the molding out from that center point.
- Handling Outlets: Nothing ruins a beautiful molding wall like a plastic outlet sitting halfway across a wood trim piece. Plan your boxes so that outlets either sit fully inside a frame or fully outside of it. If an outlet must sit on the trim, use a “block” to house the outlet so the trim meets it cleanly.
If you are working with a small space, avoid “busy” patterns like small diamonds or intricate grids. Instead, go for tall, vertical rectangles. This draws the eye upward and makes a cramped room feel significantly taller than it actually is.
Step-by-Step: How to Recreate This Look
Creating a professional-grade accent wall requires a methodical approach. Follow these steps to ensure your lines are straight and your finish is flawless.
- Map it out with tape: Use painter’s tape to “draw” the molding on your wall. Leave it up for 24 hours. Walk past it, sit on your sofa, and see if the proportions feel right. It is much easier to move tape than it is to move nailed wood.
- Find your studs: Use a stud finder to mark where the vertical supports are behind your drywall. While construction adhesive helps, nailing into studs ensures the molding will never pull away from the wall as the house settles.
- Measure and cut: Use a miter saw for clean 45-degree angles. If you are doing a simple grid, 90-degree butt joints are fine, but for picture framing, 45-degree angles are non-negotiable.
- Install the “Anchor” pieces: Install your top and bottom horizontal rails first using a laser level. Never trust your floor or ceiling to be perfectly level—they rarely are. A laser level ensures your molding looks straight even if the house is slightly crooked.
- Glue and Nail: Apply a small bead of construction adhesive to the back of the trim, then secure it with 2-inch brad nails. The glue provides the long-term hold, while the nails hold it in place while the glue dries.
- The “Magic” Step (Caulk and Wood Filler): This is what separates pros from amateurs. Fill every nail hole with wood filler and run a thin bead of paintable caulk along every edge where the wood meets the wall. This hides the gaps and makes the molding look like it is part of the wall itself.
- Sand and Paint: Once the filler is dry, sand it flush. Prime any bare wood, then apply two coats of your chosen paint. Using a small foam roller on the flat parts and a brush for the corners will give you a “sprayed” factory finish look.
Budget Breakdown: Low / Mid / Splurge
Wall molding is surprisingly scalable in terms of cost. You can achieve a transformation on almost any budget depending on the materials and labor you choose.
Low Budget ($100 – $300): Focus on a “Picture Frame” DIY project using MDF trim. By doing the labor yourself and using a single wall as an accent, you only need basic hand tools, a miter box, and a few gallons of paint. This is the highest ROI (Return on Investment) for a small living room or bedroom.
Mid-Range ($500 – $1,500): This budget allows for “Board and Batten” or a full-wall “Grid” pattern. You might hire a carpenter for the cuts while you handle the painting and finishing. At this level, you can afford higher-quality primed pine molding which is more impact-resistant than MDF.
Splurge ($2,500+): At this level, you are looking at custom-milled hardwoods, intricate “Judges Paneling,” or floor-to-ceiling walnut slats. This usually involves professional installation, integrated LED strip lighting hidden behind the molding, and high-end lacquer finishes. This is ideal for formal dining rooms or home theaters.
Common Mistakes (and How to Fix Them)
Even with the best intentions, certain errors can make your molding look like a DIY project gone wrong. Here is how to avoid them.
Mistake: Forgetting the Baseboard Transition. Many people buy molding that is thicker than their existing baseboards. When the vertical piece meets the baseboard, it sticks out past it, creating an awkward “lip.”
The Fix: Either replace your baseboards with a thicker version or use a “plinth block” at the bottom of your molding to create a deliberate, decorative transition point.
Mistake: Skipping the Caulk. If you don’t caulk the edges, you will see tiny black shadows where the wood meets the drywall. This makes the trim look like it was just stuck on the wall.
The Fix: Use a high-quality, flexible, paintable caulk. Wipe it with a damp finger or a caulk tool immediately after applying to get a smooth, concave line.
Mistake: Incorrect Spacing Around Windows. People often run molding too close to window casings, making the wall look crowded.
The Fix: Maintain the same “reveal” (the distance between the molding and the edge) around windows and doors as you do between the boxes themselves. Usually, 4 inches of breathing room is perfect.
Room-by-Room Variations
Not every molding style belongs in every room. The “vibe” of the space should dictate the complexity of the design.
The Primary Bedroom
In the bedroom, I recommend “Picture Frame” molding. It is soft, elegant, and provides a perfect frame for your headboard. For a moody, designer look, paint the molding, the wall, and the baseboards the exact same color in a matte or eggshell finish. This creates a sophisticated, “enveloped” feeling that promotes rest.
The Dining Room
The dining room is the traditional home of wainscoting or “Chair Rail” molding. Historically, this was used to protect walls from being scuffed by dining chairs. Today, it adds a formal touch. Consider a two-tone approach: a deep charcoal or navy on the bottom molding and a lighter neutral or a bold wallpaper on the top half of the wall.
The Living Room
For a modern living room, a vertical slat wall (also known as “Acoustic Slat Panels”) is incredibly popular. These are thin strips of wood placed close together. Beyond the aesthetic, they actually help dampen sound in large, open-concept rooms with high ceilings. If your living room feels “echoey,” this is the solution for you.
The Foyer or Entryway
First impressions matter. “Board and Batten” is my go-to for foyers. It feels sturdy and welcoming. You can even integrate “shaker hooks” into the top rail to hang coats and bags, turning your architectural accent into a functional mudroom-style wall.
Finish & Styling Checklist
Before you call the project finished, go through this “Designer’s Checklist” to ensure the styling matches the quality of the construction.
- Check the Sheen: Does the paint look consistent across all the trim? If you see “flashing” (shiny spots), you may need one more light coat.
- Hardware Coordination: If your molding wall features a door or cabinets, ensure the hardware (knobs/hinges) matches the “era” of the molding. Traditional molding pairs well with brass; modern slats pair well with matte black.
- Art Placement: If you have created “frames” on the wall, your art should be centered within those frames. The art piece should occupy about 60-75% of the inner frame’s width to look balanced.
- Lighting: Install a picture light or a wall sconce above or within the molding frames. This casts downward shadows that highlight the depth of the wood.
- Furniture Distance: Ensure your furniture isn’t pushed directly against the molding if possible. Leaving a 1-inch gap prevents the furniture from scuffing your new paint job and allows the architecture to “breathe.”
What I Would Do in a Real Project: Mini-Checklist
When I am managing a renovation for a client, these are the non-negotiables I insist on during the “rough-in” phase:
- Check all wall surfaces for “bowing.” If the wall is curved, you will need to use more adhesive and possibly shim the molding to make it look straight.
- Always paint the wall before you install the molding if you are doing a two-tone look. It saves hours of tedious “cutting in” with a brush.
- Verify the location of light switches. If a switch lands right where a piece of molding should go, I move the switch 2 inches to the left or right before the molding starts.
- Use a “damp cloth” test on the wall. If the wall is dusty or greasy (common in kitchens), the adhesive won’t stick. Clean the wall with TSP (Trisodium Phosphate) first.
FAQs
Does wall molding make a room look smaller?
Actually, the opposite is usually true. By adding vertical lines, you draw the eye upward, which can make ceilings feel higher. However, avoid very dark colors and very thick molding in tiny, windowless rooms, as that can feel slightly heavy.
Is wall molding out of style?
Millwork has been around for centuries. While specific patterns (like the “Modern Farmhouse” X-pattern) might go in and out of fashion, the concept of adding architectural interest to walls is timeless. Stick to classic picture frames or simple vertical lines for maximum longevity.
Can I install molding over textured walls?
Yes, but it is more difficult. If you have “orange peel” or “knockdown” texture, the molding won’t sit perfectly flush. You will need to use more caulk to fill the gaps behind the wood. For a truly professional look, some designers choose to install thin “1/4 inch skin” panels of smooth hardboard over the textured wall before adding the molding.
Will it increase my home’s value?
High-quality, well-installed millwork is one of the few DIY projects that actually increases appraisal value. It suggests a “custom home” level of detail that buyers are often willing to pay a premium for.
Conclusion
Accent wall molding is one of the most rewarding home improvement projects you can undertake. It requires more patience than it does raw strength, and the results are immediate. By paying attention to scale, choosing the right materials, and being meticulous with your finishing (caulk is your best friend!), you can turn a standard room into a designer-level space.
Remember that design is personal. While these rules provide a framework for success, don’t be afraid to experiment with color and pattern to reflect your own style. Architectural molding is not just about the wood—it is about the way it captures light, creates shadow, and gives your home a unique personality.
Picture Gallery


