
Festive Christmas Photo Booth Ideas for Holiday Fun
Nothing breaks the ice at a holiday gathering quite like a photo booth. It gives guests a dedicated activity, encourages people to mingle, and provides a tangible memory to take home. As an interior designer, I view a photo booth not just as a party prop, but as a temporary installation that needs to integrate with the flow and style of your home.
When planned correctly, these setups can elevate the entire aesthetic of your party rather than looking like a cluttered corner. For those looking for visual inspiration, be sure to check out the extensive Picture Gallery at the end of this blog post.
However, a great photo booth requires more than just taping some tinsel to a wall. You have to consider lighting, traffic flow, and structural integrity to ensure it survives the night. Below, I will walk you through the design principles and practical steps to create a festive, functional, and beautiful photo station.
1. Selecting the Right Location and Layout
The most common mistake hosts make is jamming a photo booth into a high-traffic bottleneck. If you place your station near the kitchen entry or the front door, you create a “traffic jam” that frustrates guests trying to refill drinks or use the restroom.
You need to identify a “dead zone” in your floor plan. This is typically a corner of the living room or a rarely used dining buffet area that is out of the main circulation path.
Designer’s Note: The Golden Rule of Space
In professional design, we look for a minimum footprint of 6 feet by 9 feet for a photo station. You need roughly 2 feet of depth for the backdrop and people standing, plus 5 to 7 feet of clearance for the photographer or tripod to get a full frame. If you try to squeeze this into a hallway, you will end up with unflattering, distorted wide-angle shots.
Analyzing the Light Sources
Never set up your booth directly in front of a window unless it is daytime and you want backlit silhouettes (which usually isn’t the goal). If hosting at night, avoid placing the booth directly under a recessed can light. This creates “raccoon eyes” with harsh shadows in the eye sockets.
Traffic Flow Checklist
- Ensure there is a 3-foot clearance lane behind the photographer so guests can walk past without ducking.
- Locate the prop table to the side of the booth, not in front of it, to keep lines moving.
- Keep the booth away from heat sources like fireplaces or radiators to prevent melting props or overheating electronics.
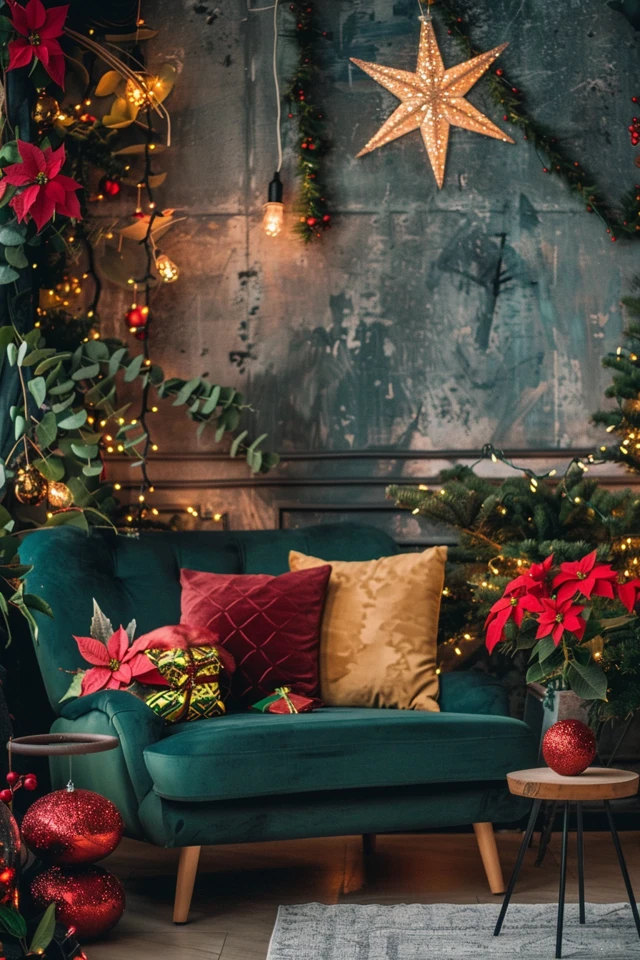
2. Constructing a Professional-Grade Backdrop
The backdrop is the anchor of your photo booth design. As a designer, I avoid plastic tablecloths taped to the wall because they reflect flash photography poorly and often look cheap.
Instead, aim for materials with texture and matte finishes. Velvet, heavy cotton, or fresh greenery absorb light beautifully and make skin tones look softer in photos.
The Tension Rod Hack
If you are a renter or want to protect your paint, do not use tape. Install a tension rod inside a door frame or between two close walls. You can drape heavy curtains, macrame, or garlands from this rod without damaging a single inch of drywall.
Common Mistakes + Fixes
Mistake: The backdrop is too narrow.
Fix: Your backdrop should be at least 6 to 8 feet wide. If it is narrower, horizontal photos will show the “real” messy room on the edges.
Mistake: The backdrop is too short.
Fix: Mount the backdrop at least 7 feet high. If your guests are tall, you do not want the top of the backdrop cutting through their heads in the frame.
Material Recommendations
- Matte Wrapping Paper: If on a budget, tape strips of high-end, matte wrapping paper to a foam board. Avoid foil paper as it creates glare.
- Living Walls: Use 3M Command Hooks to hang layers of real or faux cedar garlands. The texture reads incredibly well on camera.
- Velvet Curtains: A dark green or burgundy velvet curtain adds instant luxury and depth to images.
3. Lighting: The Secret to Flattering Photos
Lighting is the single most critical element of interior design, and it is even more vital for photography. The ambient light in your living room (usually around 2700 Kelvin, which is very yellow) is often too dim for crisp photos.
You need to introduce a dedicated light source. However, you should avoid the clinical, blue-white light of cheap LEDs (5000K+), which kills the cozy holiday vibe.
What I’d Do in a Real Project
I recommend using a ring light or two softbox lights positioned at eye level. Set the color temperature to “Daylight” or “Cool White” (approx 3500K to 4000K) to balance the warmth of your home with enough brightness to capture faces clearly.
Positioning the Lights
The light source should be directly in front of the subject, slightly above eye level, and angled down. If you place lights on the floor pointing up, you create horror-movie shadows.
Managing Glare
If your backdrop includes shiny ornaments or tinsel, test your lighting setup an hour before the party. You may need to diffuse the light by draping a thin white sheet over the lamp or bouncing the light off a white ceiling rather than pointing it directly at the reflective background.
4. Curating Props and Furniture
Restraint is a designer’s best friend. Instead of buying a bulk pack of 50 cardboard props on sticks, curate a small collection of higher-quality items that match your party’s theme.
If your home decor is “Scandi Minimalist,” choose props made of wood, felt, and wool. If your theme is “glam,” stick to metallics and sequins.
Furniture as a Prop
Including a piece of furniture invites guests to pose more naturally. A velvet armchair, a vintage wooden bench, or a leather ottoman allows for layered posing where some guests sit and others stand.
The “Triangle Rule” for Styling
When setting up your prop table or the seating area within the booth, use the triangle rule. Arrange items of varying heights to keep the eye moving. For example, place a tall floor plant on the left, a medium-height chair in the center, and a low basket of props on the right.
Prop Storage and Safety
- The Basket Method: Use a deep woven basket for stick props. It looks tidier than scattering them on a table.
- Avoid Glass: Never use real glass ornaments or glasses as props. Guests will drop them. Use high-quality shatterproof alternatives.
- Sanitation: If you are using wearable props like glasses or hats, keep them minimal or have a small sanitizing station nearby.
5. Technical Setup and Logistics
You do not need a professional DSLR camera to have a successful photo booth. An iPad or a smartphone on a tripod is sufficient, provided the stability is there.
Tripod Placement
Set your tripod so the camera lens is roughly 5 feet off the ground. This is a neutral height that captures both sitting and standing guests without extreme angles.
App Integration
Use a dedicated photo booth app (like Simple Booth or Touchpix) rather than the standard camera app. These apps often feature a countdown timer, which is essential for letting guests compose themselves before the shutter fires.
Printing vs. Digital
Instant printers (like the Canon Selphy or Fujifilm Instax Link) are fantastic party favors. If you go this route, provide a small designated table for the printer to prevent paper jams. Alternatively, set up a QR code that guests can scan to instantly download their digital photos.
Cable Management
This is a huge safety concern. Tape down all extension cords for lights and chargers using gaffer tape (which doesn’t leave residue like duct tape). As a designer, visual clutter ruins the look, so tuck cords behind the backdrop or under rugs whenever possible.
Final Checklist
Before your first guest arrives, run through this designer-approved checklist to ensure your station is ready for action.
- Distance Check: Can you fit 3 people in the frame without moving the tripod?
- Height Check: Is the top of the backdrop visible in the viewfinder? (It shouldn’t be).
- Light Check: Take a test photo. are the faces bright? Is there glare on glasses?
- stability Check: Is the backdrop secure? Will it fall if someone brushes against it?
- Storage Check: Is there a small side table for guests to set down their drinks while posing?
- Power Check: are all devices plugged in or fully charged?
Frequently Asked Questions
How do I make a photo booth work in a small apartment?
Use a “vertical” strategy. Clear a narrow section of wall (even a hallway end) and use the door frame for hanging fabric. Use a wide-angle lens attachment for your phone if you lack depth. Avoid bulky furniture and stick to standing poses.
What is the best color for a holiday backdrop?
Deep forest green or navy blue are the most versatile. They make red holiday outfits pop and look elegant. White backdrops can be tricky because they show dirt easily and can wash out skin tones if the lighting isn’t perfect.
How can I soundproof the area?
Photo booths get loud. If possible, place a thick rug (roughly 5×7 or 8×10) under the photo zone. This dampens foot traffic noise and reduces the echo of laughter, helping keep the overall noise level of the party manageable.
My rental doesn’t allow nails. How do I hang heavy garlands?
Use 3M Command “Heavy Duty” hooks (look for the ones rated for 5lbs+). Use three or four hooks across the top of your backdrop area to distribute the weight. Alternatively, a photographer’s backdrop stand kit can be bought online for under $50 and touches no walls.
Conclusion
Creating a festive Christmas photo booth is about more than just fun; it is about intentional design that facilitates connection. By applying interior design principles regarding flow, lighting, and scale, you turn a simple party activity into a polished feature of your holiday hosting.
Remember to respect the architecture of your home, keep safety in mind with cords and props, and prioritize lighting that makes your guests feel confident. When you blend functionality with festive aesthetics, you create a space where memories are made effortlessly.
Picture Gallery


