
Floating Shelves Ideas Around TV for Chic Decor
The television is often the undisputed focal point of a living room, yet it presents a difficult design challenge. When turned off, it is essentially a large, black void that can suck the energy out of a well-curated space. I often see homeowners struggling to balance the necessity of the screen with the desire for a warm, inviting atmosphere.
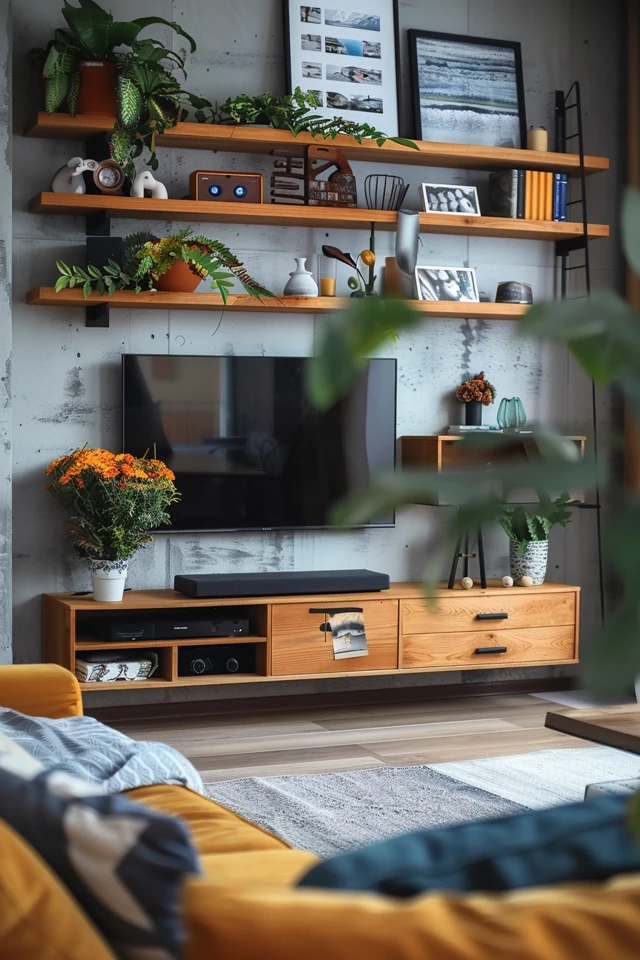
Years ago, I worked with a client who refused to put anything on the wall behind her television because she was terrified of visual clutter. The result was a stark, clinical wall that made the room feel unfinished and cold. We introduced floating shelves in a warm walnut finish, flanking the screen, and the transformation was immediate; the shelves anchored the TV and turned the wall into a feature rather than an eyesore.
Floating shelves offer the perfect middle ground between bulky entertainment centers and empty minimalism. They provide a stage for personality, soften the harsh angles of modern electronics, and offer practical storage. For more visual inspiration, make sure to check out our curated Picture Gallery included at the end of this blog post.
1. Determining the Layout and Composition
Before you buy a single plank of wood, you must decide on the configuration that suits your architecture. The layout dictates the flow of the entire room.
The Symmetrical Stack
Symmetry creates a sense of calm and order, which is why it is the go-to for traditional and transitional homes. This involves placing an equal number of shelves on the left and right sides of the television.
I typically recommend three shelves on each side for standard 8-foot ceilings. This fills the vertical space without crowding the ceiling line.
If you have a very wide media console, align the floating shelves with the outer edges of the console below. This creates a cohesive, box-like frame around the television.
The Asymmetrical Balance
For a more modern or eclectic vibe, an asymmetrical layout works wonders. This might look like two shelves on the left and one long shelf on the right, offset at different heights.
This approach requires a keen eye for “visual weight.” If you have fewer shelves on one side, you might balance it with a taller floor lamp or a large indoor plant on the floor below.
The Overhead Bridge
One long floating shelf running above the TV can connect two side stacks, effectively framing the screen. However, this is risky.
If installed too low, it casts a shadow on the screen. If installed too high, it looks like it is floating away from the rest of the composition.
Designer’s Note: The Breathing Room Rule
The most common error I see is crowding the television. You must leave negative space between the edge of the TV screen and the start of the shelf. I strictly follow a 6-inch to 8-inch buffer zone. If the shelves are closer than 6 inches, the setup feels cramped, and the decor distracts you while you are trying to watch a movie.
2. Selecting Materials and Dimensions
The material you choose sets the tone for the room’s texture. It is not just about color; it is about the tactile quality of the finish.
Wood Tones and Grain
Natural wood adds warmth to the plastic and glass dominance of a TV zone. White oak is currently very popular for a Scandi or California Casual look.
Walnut provides a moody, mid-century modern aesthetic. If your flooring is wood, try to coordinate the shelf tone, but it does not need to match perfectly. A tone that is two shades lighter or darker than the floor often looks better than a near-miss match.
Painted and Lacquered Finishes
For a seamless, built-in look, paint the shelves the exact same color as the wall. This makes the shelves disappear visually, allowing the objects upon them to “float” truly.
This is an excellent strategy for small rooms. Reducing visual contrast expands the sense of space.
Depth and Thickness
This is where functionality meets aesthetics. Standard floating shelves are usually 10 to 12 inches deep.
Pro Tip on Depth: Do not go deeper than 12 inches next to a TV unless you have a massive room. Deep shelves cast larger shadows and can make the TV feel recessed, which affects viewing angles.
Pro Tip on Thickness: I prefer chunky shelves that are at least 2 inches thick. Thin shelves (under 1 inch) can look cheap and often bow under the weight of books.
What I’d Do in a Real Project:
- Measure the TV width: I ensure the total width of the shelving unit (plus the TV) creates a balanced ratio on the wall.
- Check the Studs: Floating shelves have no visible brackets, so they rely entirely on internal hardware. I always locate studs before finalizing the design. If studs aren’t centered, I use toggle bolts, but I prefer blocking the wall during renovation if possible.
- Hardware Selection: I refuse to use standard plastic wall plugs for floating shelves. I only use heavy-duty steel mounting brackets that slide into the shelf.
3. The Art of Shelfscaping (Styling)
Styling the shelves is where the magic happens. This is also where most homeowners panic. The goal is curated, not cluttered.
The Triangle Method
Arrange items so they form visual triangles. For example, a tall vase on the top left shelf, a medium plant on the middle right, and a stack of books on the bottom left creates a zigzag path for the eye.
This prevents the display from looking static or blocky.
Layering and Depth
Don’t just line items up like soldiers in a row. Lean a piece of art against the back of the shelf, then place a small bowl or candle in front of it.
Overlap creates depth. It makes the shelves feel lived-in rather than like a store display.
What to Display (and What to Hide)
Do Display:
- Hardcover books (remove the dust jackets for a cleaner look).
- Sculptural objects (wood chains, ceramic knots).
- Trailing plants (Pothos or Ivy soften the hard lines of the shelves).
- Framed family photos (keep frames cohesive, perhaps all black or all brass).
Don’t Display:
- DVD cases or video game boxes (hide these in the media console).
- Small, tchotchke-sized items that disappear from a distance.
- Remote controls (unless in a designated decorative box).
Common Mistakes + Fixes
Mistake: Using too many small items.
Fix: Group small items on a tray or stack them on top of horizontal books. One large item makes a better impact than five small ones.
Mistake: Ignoring the color palette.
Fix: Stick to the “60-30-10” rule for your accessories. 60% neutral, 30% secondary color (perhaps from your rug), and 10% accent metal (brass or black).
4. Lighting and Technical Integration
Floating shelves around a TV offer a unique opportunity to introduce ambient lighting. This is crucial for reducing eye strain, known as “bias lighting.”
Undershelf Lighting
LED strip lights routed into the bottom of the shelves can cast a soft glow downward. This highlights the objects on the shelf below and adds a high-end, custom joinery feel.
If you are renting or can’t hire an electrician, use rechargeable, motion-sensor LED bars that stick magnetically to the underside of the wood.
Sconces and Picture Lights
I often install articulating wall sconces above the top shelf. This adds a metallic hardware element that breaks up the wood and drywall.
Picture lights mounted above art leaning on the shelves add sophistication. Battery-operated versions with remote controls are life-savers here.
Managing the Cords
Nothing ruins the “floating” illusion faster than a power cord dangling from a shelf.
If you are incorporating lamps or speakers on your shelves, you must plan for cord management. I drill grommet holes through the shelves and run cords down a channel painted to match the wall color, or route them behind the drywall if it is a permanent installation.
5. Practical Considerations for Real Life
Interior design must be livable. When styling around a TV, we have to consider heat, dust, and safety.
Heat Management
Televisions generate heat. If you place a shelf directly above the TV, it can trap rising heat, potentially shortening the lifespan of your electronics.
To mitigate this, ensure the shelf above the TV is mounted at least 8 to 10 inches above the top ventilation vents of the screen.
Dust Control
Electronics attract dust due to static charge. Floating shelves near a TV will get dustier than shelves elsewhere in the house.
Choose finishes that are easy to wipe down. I avoid rough-hewn, reclaimed wood near sensitive electronics because it traps dust and sheds splinters. A smooth satin or matte finish is much easier to maintain.
Safety First
If you live in an earthquake zone or have active children, secure your decor. Use museum wax to anchor breakable vases or heavy sculptures to the shelf surface.
Ensure the shelves themselves are rated for the weight you are applying. Books are deceptively heavy. A 3-foot span of hardcover books can weigh over 40 pounds.
Final Checklist: From Blank Wall to Chic Decor
Before you start drilling, run through this quick checklist to ensure you haven’t missed a step.
Planning Phase:
- Measure the wall height and width.
- Measure the TV and media console.
- Tape out the shelf locations using painter’s tape to visualize the layout.
- Check for studs and electrical wiring behind the drywall.
Buying Phase:
- Select shelf depth (10-12 inches recommended).
- Select shelf thickness (2 inches minimum for high-end look).
- Purchase heavy-duty anchors or toggle bolts if studs don’t align.
Installation Phase:
- Install the media console first (it grounds the spacing).
- Mount the TV.
- Install the shelves, starting with the lowest one to ensure clearance from furniture.
- Use a long level; even a millimeter off will look crooked next to the straight lines of a TV.
Styling Phase:
- Place the largest items first (large vases, tall art).
- Add stacks of books for horizontal weight.
- Fill gaps with medium objects.
- Finish with greenery to bring life to the wall.
FAQs
How high should the first shelf be from the floor?
If you have a media console, the first shelf should start roughly 18 to 24 inches above the surface of the console. This allows space for a lamp or tall plant on the console without hitting the shelf. If there is no console, the lowest shelf usually sits about 30 to 36 inches off the floor.
Can I put shelves around a TV if the TV is not centered on the wall?
Yes, this is actually a great way to fix visual imbalance. If your TV is off-center, use floating shelves on the wider side of the wall to fill the negative space. This creates an asymmetrical balance that looks intentional rather than accidental.
What is the best color for shelves around a black TV?
Dark wood (walnut or espresso) blends well with the black screen, creating a moody, theater-like vibe. Light wood (oak or ash) creates high contrast, making the shelves pop. Black shelves can sometimes be too heavy unless the wall is also dark.
How do I style shelves without them looking messy?
The secret is “grouping.” Do not spread items out evenly. Group objects in clusters of three. Leave at least 30% of the shelf empty. Negative space is just as important as the decor itself.
Is it okay to lean art behind the TV?
No, I do not recommend leaning art directly behind the TV screen. It looks cluttered and obstructed. However, leaning art on the shelves around the TV is a fantastic idea.
Conclusion
Adding floating shelves around your TV is one of the highest-impact upgrades you can make to your living room. It solves the problem of the “black box” by integrating technology into your overall design scheme.
Whether you choose a symmetrical library look or a modern asymmetrical arrangement, the key is respecting the scale of your room and leaving enough negative space for the eye to rest. Remember that your home should tell your story. Use these shelves to display the books you have actually read, the souvenirs from your travels, and the photos that make you smile.
When done correctly, the TV becomes just one element of a beautiful wall, rather than the only thing you see.
Picture Gallery


