
Floating Shelves Ideas Around TV for Stylish Decor
Introduction
The television is often the undisputed focal point of a living room, but let’s be honest: a big, black rectangle on a blank wall isn’t exactly inspiring. In my years of designing residential interiors, one of the most common complaints I hear from clients is that their media wall feels cold or unfinished. They buy a beautiful console and mount the TV, but the empty vertical space on either side makes the screen look disconnected and stark.
Floating shelves are my favorite solution for this dilemma because they bridge the gap between functionality and art. They frame the technology, drawing the eye away from the plastic bezel and toward curated textures, colors, and personal artifacts. I remember a specific project in a small Seattle apartment where the client was ready to build massive custom cabinetry. By switching to airy floating shelves, we saved them nearly $3,000 and kept the room feeling open rather than boxy.
This guide will walk you through the technical layout, the material selection, and the styling secrets I use to make these shelves look professionally installed. For visual inspiration, remember to check out the curated Picture Gallery at the end of the blog post. Let’s turn that blank wall into your favorite part of the room.
1. Assessing Layout and Scale: The Engineering Phase
Before you buy a single plank of wood, you need a plan. The biggest failure point I see in DIY shelf installation is poor scaling. If the shelves are too short, the TV looks like it is crushing them. If they are too deep, they encroach on your walking path.
The Golden Ratio of TV Shelving
In design, visual weight is everything. Your shelving arrangement should generally be wider than the TV itself to create a sense of balance. If you have a 65-inch TV (which is roughly 57 inches wide), your shelving arrangement on the sides should extend outward enough so the TV doesn’t feel top-heavy. I typically recommend that the total width of the media console below should be at least 6-8 inches wider than the TV on each side. The floating shelves should visually align with the outer edges of that console to create a grounded, cohesive square or rectangle shape.
Vertical Spacing Rules
How much space should be between shelves? This is a question I answer almost daily.
- Standard Spacing: 12 to 15 inches between shelves is the sweet spot. This allows enough room for standard hardback books, 5×7 picture frames, and small vases without leaving awkward empty gaps.
- TV Clearance: Never install a shelf flush against the side of the TV. Leave a “breathing room” gap of at least 4 to 6 inches between the edge of the screen and the start of the shelf. This prevents the setup from looking crowded and ensures you can access ports on the back of the TV.
- Height from Floor: The lowest shelf should start at least 18-24 inches above your media console. This allows you to place taller items (like a lamp or a tall vase) on the console surface without hitting the shelf above.
Symmetry vs. Asymmetry
Symmetrical layouts (identical shelving stacks on both sides) are safer and more traditional. They work best in formal living rooms or spaces where the TV is centered perfectly on a wall. Asymmetrical layouts (perhaps two shelves on one side and three on the other, or staggered heights) feel more modern and dynamic. However, asymmetry requires a keener eye for balancing visual weight. If you go asymmetrical, ensure the “heavier” side is balanced by a floor lamp or large plant on the opposing side.
Designer’s Note: Always use painter’s tape to mock up the shelves on the wall before drilling. Live with the tape outlines for 24 hours. Watch how the natural light hits that wall and ensure the tape doesn’t feel overwhelming from the sofa.
2. Selecting Materials and Finishes
The material you choose dictates the vibe of the room. It also determines durability. In a high-traffic family room, a delicate glass shelf might be a disaster waiting to happen.
Wood Tones and Grain
If you are going for a warm, organic look, solid wood or high-quality wood veneer is the standard. The key here is not to match your floors perfectly. In fact, matching the wood floors exactly can make the room look like a “wood box.” Instead, look for a complementary tone.
- Contrast approach: If you have pale white oak floors, try a rich walnut for the shelves to add depth.
- Tonal approach: If you want a serene, monochrome look, match the shelves to the media console, not the floor.
Paint and Lacquer
For a built-in look without the custom price tag, painted shelves are excellent. I often paint floating shelves the exact same color as the wall behind them. This is a fantastic trick for small spaces because it reduces visual clutter. The shelves disappear, making the objects on them appear to float. If you choose this route, ensure the finish is semi-gloss or satin, which is easier to wipe down than matte paint.
Shelf Thickness Matters
The thickness of the shelf conveys quality. Flimsy, 0.5-inch shelves often look cheap and can bow under the weight of books.
- The Pro Standard: Aim for a thickness of at least 1.5 to 2 inches. This “chunky” look mimics custom joinery.
- Hardware Consideration: Thicker shelves are also necessary to hide the heavy-duty internal brackets required for floating installation. You need that internal depth to house the steel rod supports.
Common Mistake + Fix: A common mistake is buying shelves that are too deep for a media wall. Standard kitchen shelves are often 12 inches deep, which can cast shadows on the TV and feel intrusive. The Fix: For TV flanking, stick to a depth of 8 to 10 inches. This is deep enough for books and decor but shallow enough to remain unobtrusive.
3. The Art of Styling: The Triangle Rule
Once the shelves are up, the panic sets in. How do you fill them without making it look like a garage sale? Styling is about editing. It is about what you leave off the shelves as much as what you put on them.
The Visual Triangle
This is the oldest trick in the designer handbook because it works. Imagine a triangle connecting three items across your shelves. You might have a wood bowl on the top left, a wood picture frame on the middle right, and a wood box on the bottom left. By spreading a specific material or color in a triangular pattern, you force the eye to move around the entire display, creating a sense of rhythm.
Balancing Weight
Visual gravity is real. Darker, larger items should generally go on the lower shelves to “ground” the vignette. Lighter, more delicate items (glass, small ceramics) belong on the upper shelves. If you put heavy encyclopedias on the top shelf and small trinkets on the bottom, the room will feel top-heavy and uneasy.
The “Z” Formation
For books, don’t just line them up vertically like a library. That looks stiff.
- Stack and Lean: distinct stacks of books horizontally, and lean others vertically.
- Bookends: Use sculptural objects as bookends rather than actual office-supply bookends. A heavy geode or a marble cube works perfectly.
- Negative Space: You do not need to fill every inch. In fact, you should aim to leave about 20% of the shelf empty. Negative space allows the eye to rest and makes the decor stand out.
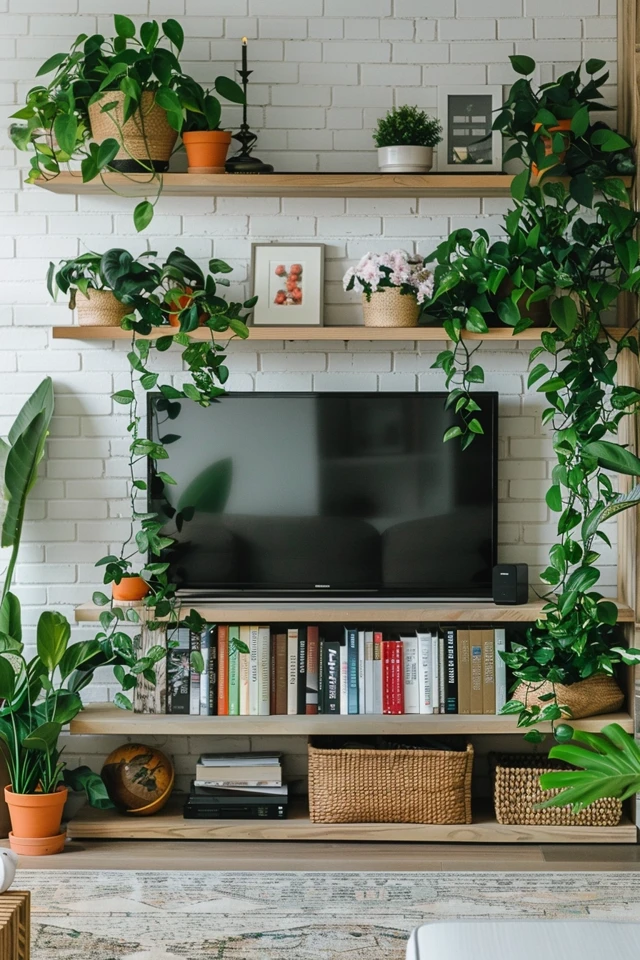
What I’d do in a real project: I always mix “hard” and “soft” items. If I have a lot of rectangular books and square frames (hard shapes), I will introduce a round vase, a trailing pothos plant, or a drift-wood piece (soft/organic shapes) to break up the grid.
4. Managing Tech and Lighting
Nothing ruins a beautiful floating shelf setup faster than a tangle of HDMI cables dangling down the wall. In the modern home, cable management is not an afterthought; it is part of the design.
Hiding the Wires
If you are renovating, I always insist on installing an in-wall cable management kit (often called a “brush plate”) behind the TV and another one behind the media console. This allows you to run cords through the wall cavity.
- The Renter’s Hack: If you cannot cut into the drywall, use paintable cord covers (raceways). Install them vertically centered below the TV. Paint them the exact same color as the wall. They won’t disappear, but they will blend in significantly.
- Shelf Lighting: Adding light creates luxury. LED strip lighting routed into the underside of floating shelves provides a gorgeous ambient glow for movie nights. If you don’t want to wire electricity, buy rechargeable, magnetic puck lights that stick to the underside of the shelf. They are remote-controlled and great for mood lighting.
Soundbars and Peripherals
If you have a soundbar, avoid placing it on a floating shelf above the TV. It creates a weird visual “brow” over the screen. Ideally, mount the soundbar directly to the wall a few inches below the TV, or place it on the media console surface. If you have cable boxes or gaming consoles, try to hide them in the cabinet below. If they must go on the shelves, place them on the lowest shelf and use cable ties to cinch the wires tight to the back of the shelf brackets.
5. Practical Constraints: Kids, Pets, and Drywall
Interior design must be livable. I have seen clients put fragile glass vases on low shelves in a house with a Golden Retriever. That vase lasted three days.
Pet and Child Safety
If you have toddlers or active pets, the lower shelves are “no-break zones.”
- Material Swap: Instead of ceramics, use wood bowls, woven baskets, or metal sculptures on the bottom two shelves.
- Anchor Everything: Floating shelves are heavy. If a child hangs on one, it can be catastrophic. Ensure your shelves are drilled into studs. If stud placement is impossible, you must use high-weight toggle bolts (like SnapToggles), not just standard plastic wall anchors.
- Corner Safety: Floating shelves often have sharp 90-degree corners at head height for kids. Consider shelves with a slight radius edge or ensure they are placed high enough to avoid collisions.
Weight Limits
Floating shelves rely entirely on the bracket’s grip on the wall. They are not the place for your collection of heavy vinyl records or dense textbooks unless you are 100% sure they are mounted into studs with industrial hardware.
- Drywall limits: A shelf in drywall anchors might hold 20-30 lbs safely.
- Stud limits: A shelf in studs can often hold 50-75+ lbs.
- Sagging: If you use a long shelf (over 36 inches), it needs more than two brackets, or it will eventually bow in the middle.
Designer’s Note: When styling for a client with cats, I intentionally leave the very top shelf empty or minimal. Cats love high vantage points. If you fill it with fragile items, the cat will clear the shelf for you.
Final Checklist: The Installation Day Protocol
Before you pick up the drill, run through this checklist. This is the exact mental process I use on installation days to ensure we don’t make mistakes that require patching and repainting.
- Stud Check: Have I located the studs and marked them with blue tape?
- Mock-up: Did I tape the outline of the shelves on the wall to verify the height and width feels right from the sofa?
- Clearance: Is there at least 4 inches between the TV edge and the shelf start?
- Hardware: Do I have heavy-duty toggle bolts for areas where I can’t hit a stud?
- Level: Do I have a long spirit level (24-inch minimum)? Small torpedo levels can be inaccurate over long distances.
- Lighting: If I am adding lights, do I have the batteries or the outlet plan ready?
- Decor Volume: Do I have enough items to fill the shelves without cluttering them? (Rule of thumb: Buy 20% more than you think you need, and return what you don’t use).
Frequently Asked Questions
Q: Can I put floating shelves above the TV?
A: You can, but proceed with caution. A single long shelf above the TV often creates a “brow” effect that casts a shadow on the screen. It can also make the TV feel boxed in. If you have very high ceilings (9 feet or higher), a shelf high above the TV can work to display art, but keep it shallow and styled minimally.
Q: How do I dust floating shelves with so much stuff on them?
A: This is the maintenance reality! I recommend using a microfiber duster on an extendable pole for weekly dusting. Once a month, take everything off. This is actually a good thing—it gives you a chance to re-style. Moving items around keeps the room feeling fresh.
Q: Can I use floating shelves if I rent?
A: Yes, but be prepared to patch. Floating shelves require substantial holes for the brackets. If you are renting, look for “no-drill” or minimal-damage shelving options, though these usually hold very little weight. Alternatively, use tall, open bookcases (etageres) that flank the TV. They give the look of built-ins without the wall damage.
Q: My TV is in a corner. Can I still use floating shelves?
A: Corner TV setups are tricky. Instead of flanking the TV, try installing shelves on just one wall adjacent to the TV. This draws the eye out from the corner and expands the room. Keep the shelves on the longer wall to create a visual anchor.
Conclusion
Adding floating shelves around your TV is one of the highest-impact upgrades you can make to your living room. It transforms a utilitarian wall into a personal gallery, balancing the cold technology of the screen with the warmth of your life’s collections.
Remember that perfection is not the goal—balance is. Don’t be afraid to rearrange your books, swap out art, or move plants around until it feels right. The beauty of shelves is that they are not permanent; they evolve as your style evolves. Start with a solid layout plan, buy quality materials that fit your home’s architecture, and respect the negative space.
Picture Gallery


