
Fresh Looks: Painting Bathroom Cabinets Color Ideas
Few projects offer a higher return on investment than painting a bathroom vanity. It transforms the focal point of the room without the cost or plumbing headaches of a full renovation. Whether you are dealing with dated honey oak or a builder-grade white box, a fresh coat of paint can shift the entire mood from tired to custom-designed.
I have seen countless bathrooms where the tile and flooring seemed hopeless until the right cabinet color tied everything together. It is about understanding how the cabinet color interacts with your fixed elements, like countertops and shower surrounds. If you are looking for visual inspiration to guide your choice, be sure to check out the Picture Gallery at the end of the blog post.
In this guide, we will move beyond basic color swatches. We will discuss durability in humid environments, how lighting changes paint perception, and the specific application techniques used by pros to get a factory-finish look. Let’s dive into creating a space that feels brand new.
1. Assessing Fixed Elements and Undertones
Before you even look at a paint deck, you must analyze what is staying in the room. In a kitchen, you might change the backsplash, but in a bathroom, the floor tile and shower surround are usually permanent. Your cabinet color must harmonize with these hard finishes.
Start by identifying the undertones of your countertop and floor. If you have Carrara marble or gray-veined quartz, you are working with cool undertones (blues, purples, crisp whites). If you have travertine, beige slate, or granite with brown speckles, you are working with warm undertones (yellows, oranges, creams).
Fighting the undertone is the most common error homeowners make. Painting a vanity a cool, icy blue when the floor is a warm beige travertine will make the floor look dirty and the vanity look out of place. You want to bridge the gap between the materials.
Designer’s Note: The “White” Trap
A common mistake I see is assuming “white” is a safe bet. If your toilet, tub, and sink are standard white porcelain, but you paint the cabinets a creamy off-white (like White Dove), your fixtures might look blue or grey by comparison. Conversely, if you paint the cabinets a stark, cool white, your almond-colored tub will look dingy and old. Always hold your white swatch directly against the sink and toilet bowl.
Lighting Temperature Matters
Bathrooms often lack natural light, relying heavily on artificial fixtures. The Color Rendering Index (CRI) and temperature of your bulbs will drastically change how your paint looks.
- 2700K (Warm White): This casts a yellow glow. It will turn blues into greens and make crisp whites look cream.
- 3000K (Soft White): A neutral middle ground that is flattering for skin tones and fairly accurate for paint.
- 4000K (Cool White/Daylight): This creates a blue tint. It makes grays look very stark and can make warm wood tones look flat.
I recommend installing 3000K bulbs before testing any paint samples. This ensures you are seeing the true color as it will look in your daily routine.
2. The Curated Palette: Trending vs. Timeless
When selecting a color, consider the vibe you want to achieve. Bathroom trends are currently split between organic, spa-like serenity and bold, moody drama. Here is how to execute the best looks.
The Organic Spa (Greens and Warm Greys)
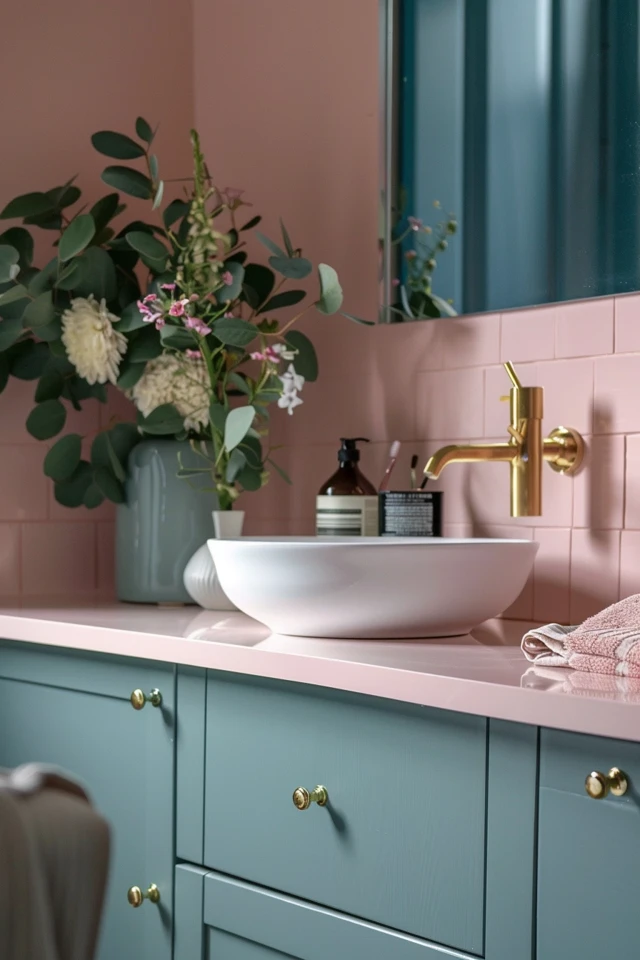
Sage green and warm “greige” (grey-beige) are massive right now because they feel clean but not sterile. These shades pair beautifully with brass hardware and wood accents.
- Best for: Bathrooms with white subway tile or marble.
- Try this: A muted eucalyptus green brings nature indoors. It is calming and works well in spaces with no windows.
- Pair with: Natural woven baskets and cream-colored textiles.
The Moody Powder Room (Navies, Charcoals, Blacks)
Small powder rooms are the best place to take a risk. Because you don’t shower in them, humidity is less of an issue, and you spend less time there, so the dark color doesn’t feel oppressive.
- Best for: Small square footage where you want to create a “jewel box” effect.
- Try this: A deep charcoal or midnight blue. Dark cabinets recede visually, which can actually make a small vanity feel less bulky.
- Pair with: Polished chrome or polished nickel hardware for high contrast.
The Clean Classic (Crisp Whites and Pale Blues)
If you are preparing a home for resale or renting, you cannot go wrong with a clean white or a barely-there blue. It signals hygiene and brightness.
- Best for: Master bathrooms that need to feel expansive.
- Try this: A pure white if your stone is cool, or a Swiss Coffee style off-white if your stone is warm.
- Pair with: Matte black hardware for a modern farmhouse look, or glass knobs for a vintage feel.
Common Mistakes + Fixes
Mistake: Picking a color that is too saturated (bright).
Fix: Colors intensify on a large surface. If you like a sunny yellow on the chip, it will look like a school bus on the cabinet. Always choose a “muddier” version of the color you like. Pick the swatch, then go two shades greyer or more muted.
3. The Finish Factor: Durability and Sheen
Bathroom cabinets endure a harsh environment. They face steam, water splashes, hairspray, and cleaning chemicals. Standard wall paint will fail here; it will peel or remain tacky (a phenomenon called “blocking”) where doors touch the frame.
Choosing the Right Sheen
For cabinetry, you generally want a Satin or Semi-Gloss finish.
- Satin: This offers a soft glow that hides imperfections in the wood grain better than higher glosses. It is modern and sophisticated.
- Semi-Gloss: This is more traditional and slightly more durable against scrubbing. It reflects more light, which can highlight dents or bad sanding jobs.
- Avoid: Flat/Matte (too hard to clean) and High Gloss (shows every flaw unless professionally sprayed).
Material Selection: Alkyd vs. Acrylic
For a professional, hard finish, look for a waterborne alkyd enamel (often labeled as “Cabinet & Trim” paint).
- Waterborne Alkyd: These paints mimic the hardness and leveling of oil-based paints but clean up with soap and water. They cure to a hard shell that resists scratching.
- Urethane Acrylic: Another excellent option that provides flexibility and moisture resistance.
What I’d Do in a Real Project
If I am painting a client’s laminate or thermofoil vanity (the smooth, plastic-like coating), I do not rely on paint alone. I always use a high-bond bonding primer first. If you skip this on laminate, the paint will scratch off with a fingernail. For real wood, a stain-blocking primer is essential to stop wood tannins from bleeding through light paint colors.
4. Hardware and Styling Coordination
Painting the cabinet is only 80% of the visual update. The hardware is the jewelry that defines the style. If you keep the old, pitted hinges or dated porcelain knobs, the project will fall flat.
Mixing Metals
You do not need to match your faucet exactly, but the metals should coordinate.
- Blue/Green Cabinets: Look fantastic with Champagne Bronze or Unlacquered Brass. The warmth of the gold offsets the cool paint.
- White/Grey Cabinets: look crisp with Matte Black or Polished Nickel.
- Black/Espresso Cabinets: Need contrast. Go with Chrome or Brass. Avoid Oil Rubbed Bronze, as it gets lost against the dark wood.
Sizing Rules of Thumb
When upgrading hardware, scale is critical.
- Knobs: Standard size is 1 1/4 inch diameter. Use these on doors.
- Pulls: Use these on drawers. A good rule is that the pull should be about 1/3 the width of the drawer front. If you have a 24-inch wide drawer, an 8-inch pull looks luxurious. A tiny 3-inch pull will look cheap and out of scale.
Drilling New Holes
If you are changing from a knob to a handle, or if the new handle has different hole spacing (center-to-center measurement), you must fill the old holes before you paint. Use a high-quality wood filler, overfill slightly, let it dry, and sand it perfectly flat. If you can feel the bump with your finger, you will see it through the paint.
5. Execution: The Process for a Smooth Finish
The difference between a DIY-look and a pro-look is rarely the paint brand; it is the preparation. In a bathroom, cleanliness is the priority before you even pick up sandpaper.
Step 1: Degreasing
Bathrooms accumulate hairspray residue, lotion, and soap scum. Sanding this residue just grinds the wax into the wood, preventing paint adhesion. Clean the cabinets thoroughly with a TSP (Trisodium Phosphate) substitute or a heavy-duty degreaser first.
Step 2: Scuff Sanding
You do not need to strip the cabinets to bare wood. You just need to de-gloss the old finish so the primer can bite. Use 120-grit sandpaper and sand all surfaces. Vacuum the dust, then wipe with a tack cloth.
Step 3: The Order of Operations
1. Remove doors and drawer fronts. Lay them flat on a drop cloth or sawhorses.
2. Remove all hardware and put it in a labeled baggie.
3. Tape off the walls and floor inside the cabinet.
4. Prime everything. Let it dry according to the can instructions.
5. Lightly sand the primer with 220-grit paper to smooth out “nibs.”
6. Apply two coats of your finish paint, sanding lightly between coats.
Pro Tip: The “Floetrol” Secret
If you are brushing or rolling rather than spraying, add a paint conditioner (like Floetrol) to your paint. This slows down the drying time, allowing the paint to “level out” and eliminate brush marks. It is the secret weapon for a glass-like finish without a spray gun.
Final Checklist
Before you start painting, ensure you have ticked all these boxes to avoid mid-project panic.
Preparation Phase
- Clean surfaces with degreaser to remove hairspray and soap scum.
- Remove doors, drawers, and hardware. Label each hinge to ensure they go back on the same door.
- Fill old hardware holes if changing pull sizes.
- Sand all surfaces with 120-grit paper (dull the shine).
- Vacuum dust and wipe with a tack cloth.
Painting Phase
- Tape off the floor and walls where the vanity meets the room.
- Apply high-bond primer (especially for laminate) or stain-blocking primer (for wood).
- Sand primer with 220-grit paper.
- Apply first coat of Cabinet Enamel (use a mini foam roller for large areas, angled sash brush for corners).
- Allow full dry time (check the can—usually 4-6 hours).
- Lightly sand with high-grit sponge.
- Apply second coat.
Curing Phase
- Let cabinets cure for at least 48 hours before reattaching hardware (paint may feel dry but is still soft).
- Install rubber bumpers on door corners to prevent sticking.
FAQs
Do I really need to sand if the primer says “no sanding required”?
Yes. While chemical bonders have improved, a bathroom is a high-humidity, high-touch zone. A quick scuff sand takes 20 minutes and guarantees the paint won’t peel when you wipe it down next month. It is cheap insurance for your hard work.
Can I paint the inside of the cabinets?
Technically yes, but I usually advise against it. The inside of cabinets is prone to scratching from bottles and baskets. It is labor-intensive and rarely looks good for long. Instead, clean the wood or apply a fresh, patterned shelf liner for a pop of color that is easy to replace.
What is the best roller for cabinet doors?
Use a high-density foam roller or a mohair roller. Standard microfiber wall rollers have a “nap” that leaves a bumpy texture (orange peel). Foam and mohair lay the paint down very smoothly.
How long until I can shower in the bathroom?
You can use the toilet and sink once the paint is dry to the touch, but try to avoid generating heavy steam (hot showers) for at least 24 to 48 hours. Humidity interferes with the curing process and can cause the paint to remain soft or tacky.
Conclusion
Painting your bathroom cabinets is a weekend project that completely changes the narrative of your home. It allows you to correct design mistakes of the past—like orange-toned wood or yellowing melamine—without the dust and cost of demolition.
Remember that the success of this project lies in the prep work and the product selection. Using a specific cabinet enamel rather than wall paint ensures your hard work lasts for years against moisture and daily wear. Take the time to sample your colors under your actual bathroom lighting, and don’t be afraid to go a little bolder in a small space. With the right color and new hardware, you will likely find you didn’t need a full renovation after all.
Picture Gallery


