
Fresh Shiplap Bathroom Wall Ideas for Your Home
Introduction
Shiplap has evolved far beyond its rustic farmhouse roots to become a staple of texture and architectural interest in modern interior design. In my years of designing bathrooms, I have used these wooden (or PVC) planks to solve a variety of spatial problems, from covering uneven drywall to visually expanding a cramped powder room. It offers a clean, linear aesthetic that works just as well in a coastal cottage as it does in a moody, contemporary master bath.
However, using shiplap in a bathroom requires a different approach than installing it in a living room or hallway due to humidity and plumbing fixtures. If you are looking for visual inspiration to go along with this advice, be sure to check out the Picture Gallery at the end of the blog post. Understanding the nuances of material selection and installation height will ensure your design remains pristine for years, rather than warping after a few months of hot showers.
This guide will walk you through the practicalities and styling opportunities of shiplap in wet zones. We will cover everything from material durability to the specific measurements that make a wall look professionally designed.
1. Choosing the Right Orientation and Board Width
The direction you run your shiplap boards changes the entire perception of the bathroom’s size. In interior design, we use lines to manipulate the eye, and shiplap is essentially a series of strong, repeating lines.
Vertical Shiplap for Height
If your bathroom has low ceilings (standard 8-foot or lower), I almost always recommend running shiplap vertically. Vertical lines draw the eye upward, creating an illusion of loftiness that is invaluable in small spaces like powder rooms. This application also feels slightly more modern and less “farmhouse” than the traditional horizontal application.
Horizontal Shiplap for Width
Horizontal installation is the classic choice and is excellent for making a narrow room feel wider. If you have a long, narrow bathroom, running boards horizontally on the short end walls can visually square off the room. This orientation is also easier to align with backsplashes and vanity countertops.
Selecting the Board Width
The width of the plank, often called the “face,” dictates the style. Standard shiplap usually has a 5-inch to 6-inch exposure.
- For a modern look: Go wider. An 8-inch or even 10-inch plank looks cleaner and less busy, which is preferable in a minimalist spa bathroom.
- For a vintage look: Narrow beadboard or 4-inch planks feel more historic and cottage-like.
Designer’s Note: The Nickel Gap
The space between the boards is just as important as the board itself. This is called the “nickel gap” because a nickel should fit perfectly in the slot. For bathrooms, I prefer a slightly tighter gap (about 1/8 inch) to minimize places where moisture or dust can settle, but make sure the gap is distinct enough to read as a texture.
2. Material Matters: Surviving the Humidity
The biggest mistake homeowners make is using standard pine or untreated MDF (Medium Density Fiberboard) in a full bathroom with a shower. Wood is hygroscopic, meaning it absorbs moisture from the air. In a bathroom, this leads to warping, swelling, and paint cracking.
The Case for PVC and Composite
For any bathroom with a shower or tub, I highly recommend using PVC or exterior-grade composite shiplap. It looks exactly like wood once painted but is completely impervious to moisture. You can install it right up to a shower curb or behind a freestanding tub without worrying about rot.
Using Wood in Powder Rooms
In a powder room (toilet and sink only), you have more flexibility. You can safely use MDF or real wood here since the humidity levels stay relatively normal. However, even in powder rooms, I advise against letting raw MDF touch the floor where mopping water could soak in.
Common Mistakes + Fixes
- Mistake: Installing wood shiplap directly against the floor tile.
- Fix: Always leave a 1/4-inch to 1/2-inch gap between the bottom board and the floor. Cover this gap with a PVC baseboard or shoe molding. This prevents water from wicking up the wall.
3. Color Blocking and Paint Finishes
Bathrooms are excellent places to take risks with color because they are enclosed spaces. While white shiplap is timeless, “drenching” the room in color is currently a major design movement.
The Power of Monochromatic Paint
Color drenching involves painting the shiplap, the baseboards, the door trim, and even the ceiling in the same color. In a small bathroom, this blurs the boundaries of the room and makes it feel infinite rather than small. Deep charcoal, navy, or forest green shiplap creates a moody, high-end hotel vibe.
Selecting the Sheen
The sheen of your paint affects both durability and how the shiplap texture is perceived.
- Satin: This is my go-to for bathroom walls. It has enough gloss to be wipeable and moisture-resistant but isn’t so shiny that it highlights every imperfection in the installation.
- Semi-Gloss: Use this for baseboards and trim. It is highly durable against scuffs.
- Flat/Matte: Avoid this in bathrooms. It absorbs moisture and is nearly impossible to clean without burnishing the paint.
What I’d Do in a Real Project
If I were designing a guest bath today, I would choose a 6-inch vertical shiplap. I would paint it a soft “greige” (like a warm putty color) in a satin finish. I would keep the ceiling white to maintain brightness but paint the baseboards the same greige as the walls for a seamless, built-in look.
4. Shiplap Heights and Wainscoting
You do not have to cover the entire wall from floor to ceiling. Using shiplap as wainscoting is a practical way to protect the lower half of your walls while adding character.
The Rule of Thirds
When determining how high to run your wainscoting, rely on the rule of thirds.
- Standard Wainscoting: This typically sits at roughly 36 to 42 inches high (about one-third up the wall). This keeps the wood well above the splash zone of a standard vanity.
- High Wainscoting: For a dramatic effect, run the shiplap up to 60 or 72 inches (two-thirds up the wall). This creates a cozy enclosure and leaves just enough drywall at the top for a contrasting paint color or wallpaper.
Capping the Shiplap
If you stop the shiplap partway up the wall, you must finish the top edge with a cap molding or a small shelf.
- Design Tip: Use a slightly deeper ledge (about 2-3 inches deep) as the cap. This creates a perfect spot to lean small framed art, place a candle, or rest a spare hand towel.
Common Mistakes + Fixes
- Mistake: Ending the wainscoting at an awkward height that conflicts with the mirror or vanity backsplash.
- Fix: Measure your vanity backsplash height (usually 4 inches) and your mirror placement before installing. Ensure the shiplap cap clears the backsplash by at least 2 inches or runs seamlessly behind the mirror.
5. Styling and Accessorizing Shiplap Walls
Once the boards are up, the way you layer accessories over them defines the final look. The linear texture of shiplap interacts with mirrors, lighting, and hardware differently than a flat drywall surface.
Mirrors and Mounting
When hanging a mirror over shiplap, ensure it sits flush. If your shiplap surface is uneven, the mirror might wobble. I often use French cleats for heavy mirrors on shiplap to ensure they are secure and level.
Round or arched mirrors are fantastic on shiplap walls. The curves provide a necessary visual break from the rigid horizontal or vertical lines of the wood.
Lighting Considerations
Lighting placement is critical. Sconces installed directly on shiplap need to be planned early so the junction boxes extend past the thickness of the wood.
- Texture Warning: Downlights or sconces that wash light directly down the wall will exaggerate the shadows in the gaps. This can look dramatic, but if your carpentry is imperfect, the light will highlight every flaw. Diffused, frosted glass shades are more forgiving than clear glass or directional spotlights.
Mixing Metals
Shiplap provides a neutral backdrop that lets hardware shine. Matte black hooks and towel bars pop beautifully against white shiplap. For dark painted shiplap, unlacquered brass creates a stunning, warm contrast.
Final Checklist: Before You Start
Use this checklist to ensure your bathroom shiplap project runs smoothly.
- Moisture Check: Have you chosen PVC or exterior-grade material if there is a shower in the room?
- Plumbing Depth: Have you accounted for the thickness of the shiplap (usually 1/2 to 3/4 inch) when reinstalling the toilet and sink supply lines? You may need pipe extensions.
- Electrical Boxes: Have you bought box extenders for your outlets and switches so they sit flush with the new wall surface?
- Baseboards: Have you decided if you are removing the existing baseboards (recommended) or stacking shiplap on top?
- Acclimation: If using real wood, have you let it sit in your home for 48-72 hours to acclimate to your home’s humidity?
FAQs
Can I install shiplap inside the shower stall?
Technically, yes, but only if you use specific PVC products designed for wet environments and ensure perfect waterproofing behind it (like a Kerdi board system). However, for most homeowners, I recommend using a wood-look porcelain tile in the shower instead. It is easier to clean and carries zero risk of mold behind the planks.
How do I clean shiplap in a bathroom?
Dust tends to settle in the grooves (nickel gaps). Use a vacuum with a soft brush attachment or a microfiber duster once a week. For painted shiplap, wipe it down with a damp cloth and mild soap. Avoid harsh chemical cleaners that can dull the paint finish over time.
Is shiplap a trend that is going away?
While the “rustic farmhouse” craze has cooled, shiplap as a texture is a classic architectural element. To keep it timeless, opt for vertical installation or wider planks, and avoid distressing the wood. Clean, painted lines never go out of style.
Does shiplap make a small bathroom look smaller?
No, usually the opposite. The lines trick the eye. Vertical lines lift the ceiling, and horizontal lines push the walls out. Painting the shiplap white or a light neutral will also reflect light, making the space feel airier.
Conclusion
Adding shiplap to your bathroom is one of the most effective ways to elevate the space from “builder-grade” to custom. It provides durability against dings and dents while offering a layer of acoustic insulation. Whether you opt for a dramatic, dark vertical application or a crisp, white wainscoting, the key lies in the details—proper material selection, thoughtful lighting, and correct proportions.
By following the rules of scale and moisture management outlined above, you can create a bathroom that feels like a curated retreat. Remember to prioritize function alongside form; in a bathroom, durability is the ultimate luxury.
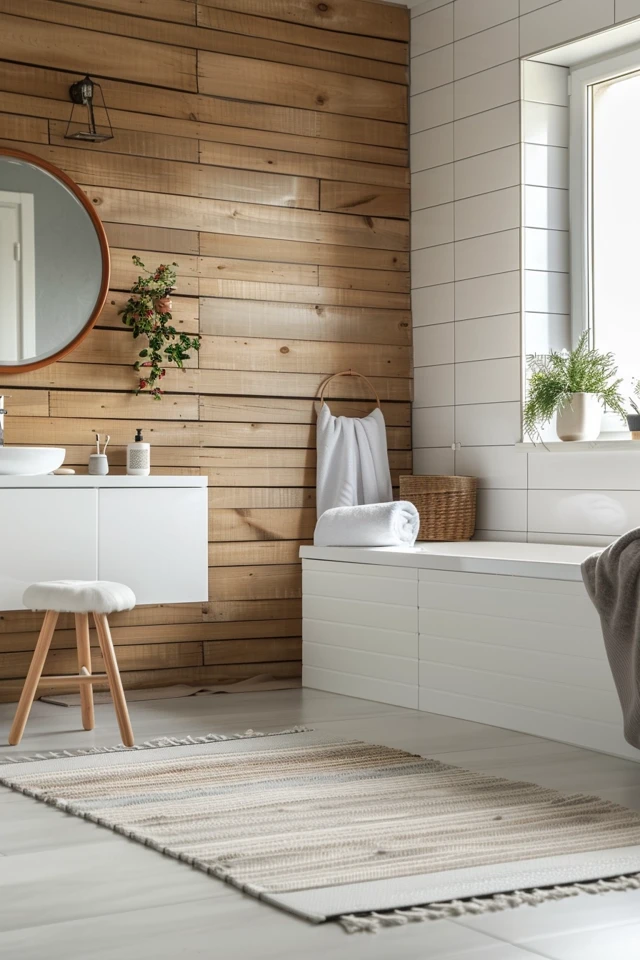
Picture Gallery


