
Title: Galley Bathroom Ideas for Stylish, Functional Spaces
Introduction
Designing a galley bathroom feels a lot like solving a complex puzzle inside a narrow corridor. You have limited width, high functional demands, and the constant challenge of preventing the room from feeling like a claustrophobic tunnel. However, some of the most stunning bathrooms I have worked on have been galleys because the constraints force you to be incredibly intentional with every inch.
The secret lies in tricking the eye while maximizing the vertical footprint. By manipulating sightlines, choosing the right fixture scale, and layering your lighting, a cramped hallway bath can transform into a spa-like retreat. For those who want to skip straight to the visuals, remember that our curated Picture Gallery is at the end of the blog post to spark your imagination.
Whether you are tearing down walls or just looking for a cosmetic refresh, the rules of proportion remain the same. We will cover everything from the ideal clearance for passing traffic to the exact height your sconces should sit. Let’s turn that narrow stretch of space into the hardest working room in your house.
1. Optimizing the Layout and Traffic Flow
The layout of a galley bathroom is usually dictated by the plumbing stack. In most cases, you are dealing with a “single wet wall” arrangement where the sink, toilet, and shower/tub are all lined up on one side.
This is actually a budget-friendly layout because you aren’t running pipes across the floor joists. However, it creates a long, heavy side to the room. If you have a width of at least 5 feet, sticking to this linear layout allows for a clear walkway.
Standard Clearance Rules
In a galley, every inch of walkway matters. You ideally need a minimum of 30 inches of clear walking space in front of the vanity and toilet. If your bathroom is extra narrow (under 5 feet wide), consider a shallower vanity. Standard depth is 21 inches, but moving to an 18-inch deep vanity can save your traffic flow.
The Door Swing Dilemma
The biggest enemy of a small galley bathroom is an inward-swinging door. It eats up precious floor space and can block the vanity or towel bars.
If you are renovating, I almost always recommend switching to a pocket door. It vanishes completely when open. If a pocket door isn’t structurally possible due to plumbing or electrical in the wall, a barn door is a solid alternative, provided you have the wall space outside the bathroom.
Zoning the Long Space
To break up the “bowling alley” effect, try to visually zone the areas. Place the vanity closest to the door, the toilet in the middle, and the shower or tub at the far end. This keeps the immediate view upon entering pleasant (a beautiful mirror and sink) rather than looking directly at a toilet.
2. Visual Tricks to Expand the Space
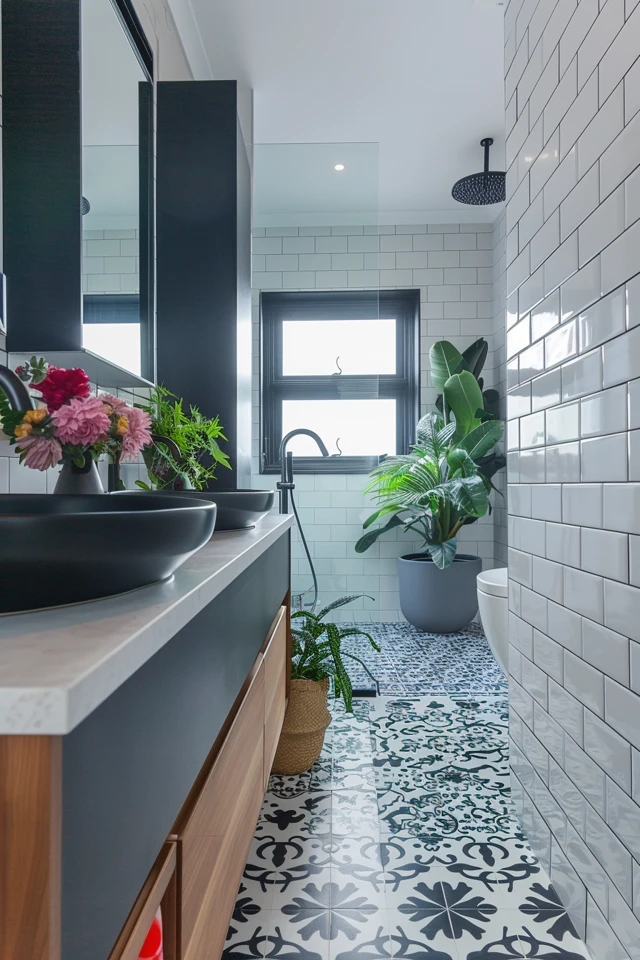
Since we can’t physically push the walls out, we have to use optical illusions. The way you lay your tile and position your mirrors changes how the brain perceives volume.
Floor Tile Direction
Many people assume large tiles make a small room look bigger, but in a narrow galley, the direction matters more than the size. Running rectangular tiles (like a 12×24 inch) perpendicular to the long walls (width-wise) makes the room feel wider.
If you prefer wood-look planks, lay them horizontally across the room rather than lengthwise down the “tunnel.” This acts like the stripes on a shirt; horizontal stripes make the object appear wider.
The Infinite Reflection
Mirrors are your best friend here. Instead of a small medicine cabinet directly over the sink, consider a massive sheet of mirror that spans the entire length of the vanity wall, or even wall-to-wall if possible.
Doubling the visual width of the room instantly cures that cramped feeling. If you can’t do a full wall, choose a large, frameless mirror or one with a very thin metal frame to minimize visual clutter.
Glass Barriers
Ditch the shower curtain. An opaque curtain creates a “third wall” that cuts the room length short.
Install a clear, frameless glass shower panel or door. This allows the eye to travel all the way to the back wall of the shower, incorporating that extra 30 to 60 inches of depth into the perceived size of the room. If you must use a curtain, install the rod as high as possible (near the ceiling) to emphasize height.
3. Storage Solutions for Narrow Footprints
Storage in a galley bathroom requires vertical thinking. You cannot rely on deep cabinets that encroach on your walkway.
Recessed Niches and Cabinets
If you are opening up walls, use the stud bays. Standard wall studs are spaced 16 inches on center, creating a cavity about 14 inches wide and 3.5 inches deep. This is perfect for a recessed medicine cabinet or a tall, skinny linen niche.
By sinking the storage into the wall, you get functionality without protruding into your 30-inch clearance zone.
The Floating Vanity
A wall-mounted (floating) vanity is a game-changer for small bathrooms. By exposing the floor underneath the cabinet, you extend the sightlines of the floor, making the room feel larger.
It also offers a practical spot to tuck a scale or a small basket for extra toilet paper. Just ensure you add blocking in the wall during framing to support the weight of the vanity and countertop.
Over-the-Toilet Storage
This space is often wasted or cluttered with cheap wire racks. For a polished look, install floating shelves or a custom cabinet that matches your vanity finish.
Mount the first shelf about 24 inches above the tank to allow for maintenance access. Keep the depth of these shelves under 9 inches so they don’t feel like they are looming over you while you use the toilet.
4. Lighting a Tunnel-Like Space
Lighting in a galley bathroom is often poor, with a single fixture in the center of the ceiling casting shadows in the corners. This creates a cave-like atmosphere.
Sconce Placement
Avoid relying solely on overhead recessed cans, which create unflattering shadows on your face. Eye-level sconces are ideal for grooming.
In a tight galley, you might not have width for sconces on the sides of the mirror. In this case, mount the sconces directly onto the mirror surface (requires a glazier to cut holes) or use a long, horizontal vanity light mounted above the mirror. Aim for 65 to 66 inches from the floor for the light center.
Layering the Light
You need at least two layers of light.
- Task Lighting: Bright light at the vanity.
- Ambient Lighting: A flush mount or recessed can in the center of the walkway.
- Accent Lighting: Consider a waterproof LED strip in the shower niche or under the floating vanity. This provides a soft nightlight effect that feels very high-end.
Color Temperature
Stick to 3000K (Kelvin) for bathroom bulbs. This is a bright, crisp white that isn’t as yellow as 2700K but not as sterile and blue as 4000K. It renders skin tones accurately, which is vital for applying makeup or shaving.
5. Selecting Finishes and Fixtures
In a small space, materials have a huge impact because they are always viewed from a close distance. Texture and scale become very important.
Monochromatic Palettes
High contrast chops up a small space. A monochromatic palette—where the floor, wall tiles, and paint are similar tones—blurs the boundaries of the room.
For example, a pale grey floor paired with white marble wall tiles and soft grey paint keeps the eye moving smoothly. If you love color, use it on the ceiling or in a singular bold wallpaper moment on the upper half of the walls.
Hardware and Fixtures
In a galley, you are constantly brushing past fixtures. Avoid cabinet pulls with sharp edges or hooks that stick out too far.
Choose “projection-friendly” hardware. I prefer recessed pulls or simple knobs for the vanity. For towel bars, consider hooks instead; they take up less visual width and are easier for kids to use.
The Feature Wall
The back wall (usually the shower wall) is your focal point. This is the place to splurge on expensive tile or a dramatic pattern.
Because it is the furthest point from the door, drawing attention to it emphasizes the length of the room in a positive way. A bold mosaic or a slab of stone here acts like artwork.
Designer’s Note: The “Curb” Lesson
I once designed a galley bathroom for a client where we forgot to account for the shower curb thickness in our floor plan. We assumed a standard 30-inch shower pan, but we built a custom tiled shower with a thick, 5-inch curb.
That 5-inch curb pushed into the already tight clearance between the toilet and the shower entrance. It was a nightmare. The lesson? Always account for the finished material dimensions, not just the rough framing. If space is incredibly tight, use a curbless (zero-entry) shower design. It requires recessing the floor slightly, but it saves precious inches and looks seamless.
Common Mistakes + Fixes
Mistake: Ignoring Ventilation
Galley bathrooms often lack windows or have very small ones. Without proper airflow, moisture gets trapped, leading to mold and peeling paint.
Fix: Install a high-quality exhaust fan vented to the exterior. Look for one with a humidity sensor that turns on automatically.
Mistake: Too Many Transitions
Changing flooring materials from the hallway to the bathroom, and then again inside the shower, chops up the floor plan.
Fix: Carry the same flooring material into the shower if possible (using a smaller format of the same stone for grip), or choose a bathroom floor that closely complements the hallway floor to reduce visual friction.
Mistake: Dark Corners
The shower at the end of the galley often ends up being a dark hole if the main light is near the vanity.
Fix: Always install a dedicated recessed light specifically rated for wet locations inside the shower area.
What I’d Do in a Real Project
If I were designing a 5′ x 9′ galley bathroom today, here is the exact checklist I would follow:
- Vanity: Custom white oak floating vanity, 18 inches deep, with a single large drawer and an integrated sink top to minimize maintenance seams.
- Mirror: Frameless mirror glued wall-to-wall above the vanity to maximize light reflection.
- Toilet: Wall-hung toilet. The tank is hidden in the wall, saving 6 to 8 inches of depth and making floor cleaning effortless.
- Shower: Curbless entry with a fixed glass panel (no moving door).
- Tile: 12×24 inch matte porcelain tile on the floor and walls, running horizontally. Warm beige or griege tone to keep it cozy.
- Lighting: LED strip lighting under the vanity for ambiance, plus two sconces mounted directly on the mirror surface.
Final Checklist for Your Renovation
Before you order materials, run through this list to ensure your galley space works efficiently.
- Check Clearance: Do you have at least 24 inches (ideally 30) of standing room in front of the toilet?
- Door Swing: Does the door hit the vanity? Switch to a pocket or barn door if yes.
- Storage Plan: Have you identified at least one spot for vertical storage (niche or tall cabinet)?
- Lighting Level: Do you have light sources at both the sink and the shower/tub area?
- Outlet Placement: Is there an outlet near the vanity but safely away from the water source? Consider one inside a drawer for hair tools to reduce cord clutter.
- Mirror Size: Is your mirror as large as the space allows?
- Ventilation: Is your fan rated for the square footage of the room?
FAQs
Can I fit two sinks in a galley bathroom?
Usually, no. A double vanity requires at least 60 inches of width to be functional. In a galley, you often sacrifice counter space and drawer storage to squeeze in a second sink. One large sink with ample counter space is almost always better for resale and daily use than two cramped sinks.
Is a tub or shower better for a galley layout?
A walk-in shower is visually superior because it removes the heavy horizontal line of the tub apron. However, if this is the only bathroom in the house, keep the tub for resale value (families with young kids need them). If you have another tub elsewhere, convert the galley to a luxury shower.
How do I make a windowless galley bathroom feel bright?
Use high-gloss tile on the walls to bounce light around. Choose a “daylight” bulb temperature (3000K-3500K). Paint the ceiling a crisp bright white, even if the walls are a color. Add a large mirror to reflect whatever light sources you do have.
Conclusion
Galley bathrooms may be small, but they are mighty when designed correctly. By focusing on uninterrupted floor space, clever vertical storage, and strategic lighting, you can banish the “hallway” feel forever.
The goal is to stop fighting the narrow shape and start embracing it. Use the length to create depth and the walls to create function. With the right finishes, your compact bathroom can easily become the most stylish room in your home.
Picture Gallery


