
Half Wall Kitchen Ideas to Transform Your Space
The debate between fully open concept floor plans and traditional closed layouts has left many homeowners feeling stuck in the middle. You want the airy, social atmosphere of an open kitchen, but you also desperately need to hide the dirty dishes from guests sitting on the living room sofa. This is where the half wall, often called a pony wall or knee wall, becomes the unsung hero of interior design.
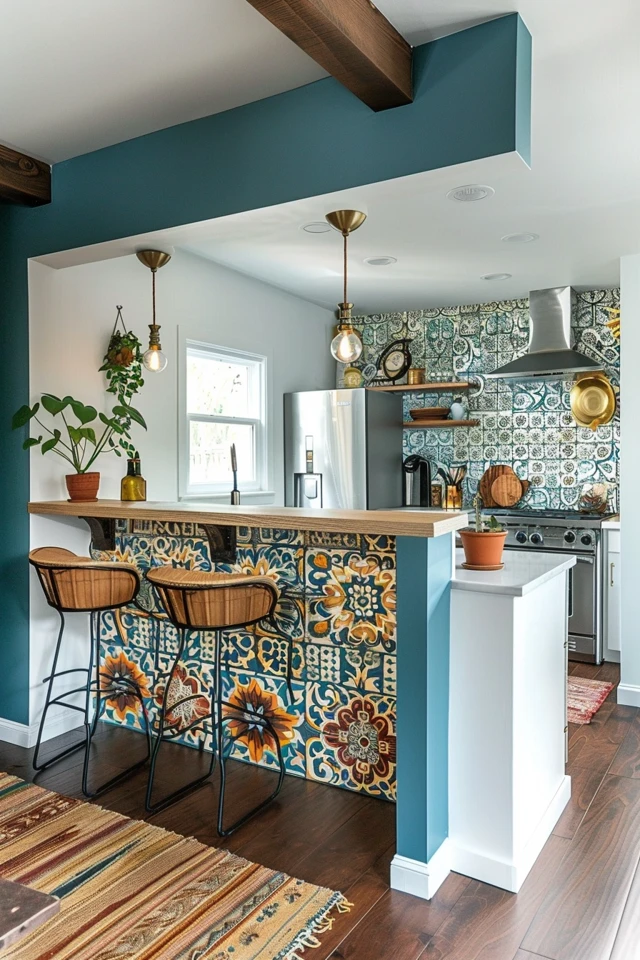
A well-designed half wall acts as a strategic zone definer, maintaining sightlines while providing physical separation and essential structure for plumbing or electrical components. It allows you to interact with family in the adjacent room without feeling like your kitchen mess is on display. To see visual examples of these layouts, scroll down to the curated Picture Gallery at the end of this blog post.
I have worked on countless renovations where clients initially wanted to sledgehammer every wall in sight, only to realize they lost valuable cabinet space and electrical outlets. By keeping or building a half wall, you retain functional boundaries without sacrificing light. Here is how to master the design, utility, and styling of kitchen half walls.
1. Creating the Ultimate Breakfast Bar and Pass-Through
The most practical application for a kitchen half wall is converting it into a breakfast bar. This bridges the gap between the kitchen and the dining or living area, creating a casual spot for coffee or homework. However, getting the dimensions right is critical for comfort.
I often see DIY renovations where the countertop overhang is too shallow. For a comfortable seating experience, you need a minimum overhang of 12 to 15 inches. Anything less than 12 inches means your knees will knock against the wall, and your guests will be uncomfortable.
You also need to decide on the height. You generally have two options: a single-level counter at 36 inches (standard kitchen height) or a raised bar at 42 inches. I usually prefer the 42-inch raised bar for half walls because it effectively hides the kitchen counter mess from the living room view.
Designer’s Note: Structural Support
Do not rely on the countertop material alone to support a 12-inch overhang, especially if you are using heavy stone like quartz or granite. You must install corbels or steel support brackets. I typically space supports every 24 to 30 inches depending on the stone’s weight. If you want a clean, modern look, use flat steel brackets hidden under the counter rather than bulky decorative corbels.
Choosing the Right Stools
Selecting the wrong stool height is a classic mistake. If your half wall counter is 36 inches high, you need “counter height” stools (seat height 24-26 inches). If your wall creates a 42-inch ledge, you need “bar height” stools (seat height 28-30 inches).
Allow for adequate horizontal space as well. I recommend allowing 24 inches of width per person. If your half wall is 6 feet long, you can comfortably fit three stools. Do not try to squeeze in a fourth; it will look cluttered and feel cramped.
2. Maximizing Storage with Built-Ins and Niches
In smaller homes or apartments, a standard 4.5-inch thick drywall partition feels like a waste of space. When we design compact kitchens, we try to make every vertical surface work harder. You can thicken the half wall to accommodate storage on either the kitchen side or the living side.
If you have the floor space, consider framing the wall out to be 12 inches deep rather than standard stud depth. This allows you to install shallow base cabinets facing the dining area. This is the perfect spot to store table linens, placemats, board games, or seasonal serving platters that you do not use every day.
On the kitchen side, we can frame out recessed niches between the studs. This creates a “cubby” for spices, cooking oils, or cookbooks without encroaching on your floor plan. It is a custom detail that looks expensive but is actually quite cheap to frame during the rough-in phase.
Common Mistakes + Fixes
- Mistake: Forgetting about electrical codes.
- Fix: The National Electrical Code (NEC) usually requires an outlet on any kitchen peninsula or island space. Do not tile or panel your half wall until you have confirmed outlet placement with your electrician. I prefer tucking them horizontally just under the countertop overhang so they aren’t visible from the living room.
- Mistake: Using standard depth cabinets on a narrow walkway.
- Fix: If the walkway behind the half wall is tight (less than 36 inches), use 12-inch deep upper cabinets installed as base units. They provide storage without blocking traffic flow.
3. Architectural Molding and Paneling Treatments
A plain sheet of drywall topped with a piece of wood can look unfinished or cheap. Treating the half wall as an architectural feature rather than a leftover barrier elevates the entire room. The facing of the wall (the side facing the living or dining room) is a prime opportunity to introduce texture.
For a traditional or transitional home, I love using picture frame molding or wainscoting. You can paint the molding the same color as the wall for a subtle shadow line effect, or paint it a contrasting white against a colored wall for a classic look.
If your style leans more towards modern farmhouse or coastal, vertical shiplap or beadboard is incredibly durable. It also stands up better to scuffs from shoe toes sitting at the bar than plain drywall does. When using wood paneling, ensure you use a semi-gloss or satin paint finish so it can be easily wiped down.
The Importance of the Cap
The “cap” is the material that sits on top of the half wall if you aren’t doing a countertop overhang. Never just wrap drywall over the top; it collects dust and creates uneven edges.
I always recommend capping the wall with a material that coordinates with the rest of the house. A stained wood board adds warmth and matches hardwood floors. Alternatively, you can use a piece of stone leftover from your kitchen slab fabrication.
Ensure the cap is slightly wider than the wall itself. If the wall is 4.5 inches thick, the cap should be at least 5.5 to 6 inches wide. This slight overhang creates a shadow line that hides imperfections in the drywall and gives the trim a professional, finished appearance.
4. Glass Partitions for Light and Sound Control
Sometimes you want the visual connection of an open plan but need to block sound or cooking smells. This is common in smaller urban homes or when the kitchen is immediately adjacent to the main TV watching area. Adding a glass partition on top of the half wall is a brilliant compromise.
Industrial-style metal and glass dividers are trending heavily right now. We install a black steel frame on top of the pony wall that extends up to the ceiling. This creates a “window” wall that physically separates the rooms but lets 100% of the light pass through.
For a bit more privacy, consider using fluted or reeded glass. This texture distorts the view slightly—blurring the dirty dishes—while still feeling open and airy. It also adds a fantastic vintage or Art Deco vibe to the space.
What I’d Do in a Real Project
If I were designing a home office nook off the kitchen, I would build a 42-inch half wall to hide the desk surface, then install a sound-dampening glass partition above it. This allows the parent cooking dinner to keep an eye on kids doing homework or watching TV, but it significantly reduces the noise of the dishwasher or blender interfering with the living room activities.
5. Managing Mechanicals: Plumbing and Venting
One of the main reasons we keep half walls during renovations, rather than removing the wall entirely, is to hide “mechanicals.” Often, your kitchen sink or stove is located on this wall. Moving plumbing drains and gas lines is expensive and sometimes impossible if you are on a concrete slab.
If your sink is in the half wall, you have to deal with the plumbing vent. Plumbing code requires a vent stack that goes up through the roof to allow sewer gases to escape and water to drain. You cannot simply chop off the top of the wall without addressing this.
In these cases, we use an “island loop vent” or an air admittance valve (AAV), depending on local building codes. An AAV is a small mechanical vent that fits inside the cabinet under the sink. This allows you to cut the wall down to half height without rerouting a pipe through the ceiling.
The Column Dilemma
Sometimes a load-bearing post is hiding inside that wall. If you open up the wall and find a structural post, you can incorporate it into the half-wall design.
I often wrap the post in the same wood finish as the kitchen cabinetry or clad it in drywall and trim to make it look like an intentional column. You can then run the half wall between the column and the exterior wall. This creates a framed opening that feels architectural and deliberate, rather than like a construction accident.
6. Lighting the Half Wall
Lighting is the jewelry of the kitchen, and a half wall offers a specific opportunity for decorative fixtures. If you are using the wall as a breakfast bar, pendant lighting is standard.
The bottom of your pendant light should generally sit 30 to 32 inches above the countertop surface. This puts the light at eye level for someone standing, but above eye level for someone sitting, preventing glare.
Rule of Thumb for Spacing
If you have a 6-foot half wall, two pendants are usually sufficient. Space them evenly. A good formula is to measure the length of the counter, divide by the number of lights plus one to find the spacing. For example, on a 72-inch counter with two lights: 72 divided by 3 (2 lights + 1) equals 24. So, place the first light 24 inches from the left edge, and the second light 24 inches from the right edge.
If you are not doing pendants, install recessed can lights directly over the edge of the counter. Make sure they are on a separate dimmer switch from the main kitchen lights. This allows you to dim the kitchen lights after dinner to hide the mess, while keeping a soft light over the half wall to serve as a nightlight or mood lighting for the adjacent living room.
Final Checklist: Planning Your Half Wall
Before you call the contractor or pick up a sledgehammer, run through this checklist to ensure your design is viable.
- Check for Load-Bearing: Have a structural engineer or qualified contractor confirm the wall isn’t holding up your second floor or roof before you cut it down.
- Verify Mechanicals: Identify where your HVAC ducts, plumbing stacks, and electrical wires are running inside the wall.
- Define the Purpose: Is this for eating (needs overhang), storage (needs depth), or just visual separation (needs height)?
- Select the Cap: Choose a material that is durable and wipeable (wood, stone, or composite).
- Plan Electrical: Ensure you have outlets planned for the kitchen side (code requirement) and potentially USB chargers on the seating side.
- Measure Seating: If adding stools, ensure you have at least 36 to 42 inches of walkway clearance behind the stools so traffic isn’t blocked when people are sitting.
FAQs
How tall should a kitchen half wall be?
Standard heights are usually 36 inches (counter height) or 42 inches (bar height). A 36-inch wall keeps the space feeling more open, while a 42-inch wall is better for hiding dirty dishes and providing a backsplash for a sink or range.
Can I put a stove in a half wall?
Yes, but safety and venting are concerns. You need sufficient clearance behind the cooktop so hot grease doesn’t splatter onto someone sitting on the other side. A raised bar (42 inches) offers good protection. For venting, you will need a downdraft vent that rises out of the counter or a ceiling-mounted island hood, which can obstruct views.
Is a half wall outdated?
Not at all. While the random “pass-through holes” of the 1980s are dated, intentional half walls with finished caps, storage, or glass partitions are very current. They solve the functional problems of open-concept living that many homeowners are starting to dislike.
How much does it cost to build a half wall?
If you are building from scratch, framing and drywalling a simple half wall is relatively inexpensive ($500-$1,000 for labor and materials). However, costs rise significantly if you add cabinetry ($1,500+), stone countertops ($80-150 per sq ft), or need to reroute plumbing and electrical ($2,000+).
Conclusion
The half wall is a powerhouse of kitchen design. It offers the best of both worlds: the sunlight and social connection of an open floor plan, with the structure and tidiness of a closed layout. Whether you utilize it for a breakfast bar, extra storage, or simply a visual buffer, the key is intentionality. Treat it as a designed element with proper trim, durable materials, and thoughtful lighting, and it will become one of the most functional features in your home.
Picture Gallery


