
Hand Painted Bench Ideas for Creative Outdoor Decor
Outdoor spaces often lack the personality we so carefully curate inside our homes. While a standard wooden or metal bench provides a place to sit, it rarely makes a statement on its own. A hand-painted bench serves as a functional piece of art, bridging the gap between the natural landscape and your personal design aesthetic. Whether you are aiming for a whimsical English garden vibe or a sharp, modern geometric look, the right application of color and pattern can transform a forgotten corner of your yard into a high-end focal point.
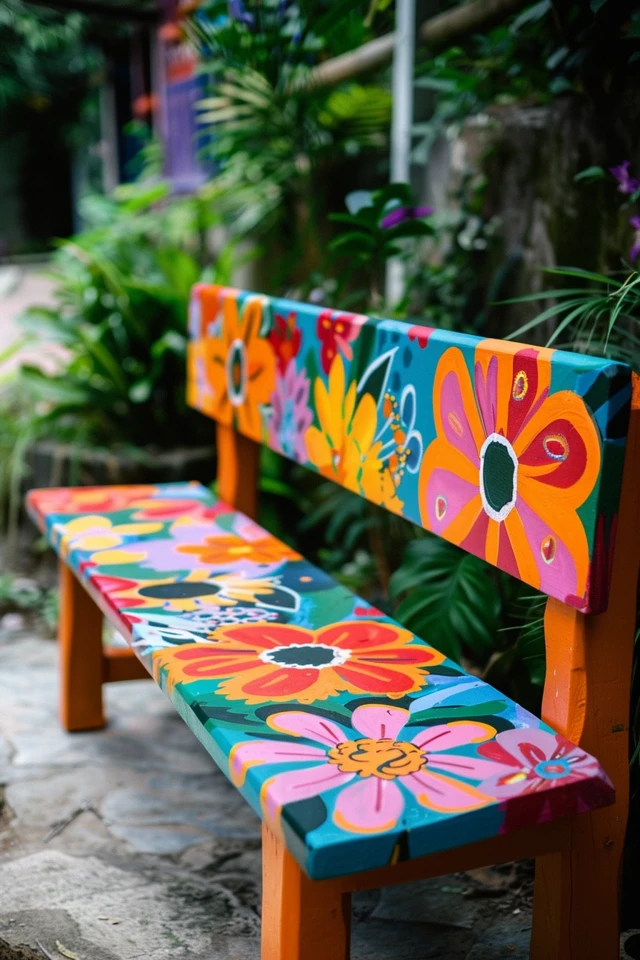
To see these concepts in action and find visual inspiration for your next weekend project, please note that our extensive Picture Gallery is at the end of the blog post. This guide will walk you through the professional standards of outdoor furniture restoration, from selecting the right wood species to mastering the ergonomics of garden seating. We will move beyond basic “DIY” and look at these projects through the lens of a professional designer who prioritizes longevity, scale, and visual harmony.
At-a-Glance: Key Takeaways
- Durability is Paramount: Always use exterior-grade primers and paints with UV inhibitors to prevent fading and cracking.
- Preparation Defines the Result: Sanding and cleaning are 70% of the job; painting is only the final 30%.
- Color Context: Choose colors that either complement your home’s exterior trim or provide a deliberate pop against the green foliage of your garden.
- Scaling for the Space: Ensure the bench size matches the surrounding landscape features; a small bench in a vast lawn looks lost, while a heavy bench on a tiny porch feels cramped.
- Moisture Management: Never skip sealing the “feet” or bottom of the bench legs, as this is where most rot begins.
What This Style/Idea Means (and Who It’s For)
Hand-painted outdoor furniture represents a shift toward “slow design.” It is for the homeowner who values customization over the convenience of mass-produced, big-box store items. By painting a bench, you are asserting that your outdoor space is an extension of your living room, deserving of the same detail and care you give to your indoor upholstery or cabinetry.
This approach is ideal for those who enjoy the “collected” look. If your garden feels a bit too “store-bought,” a custom-painted bench adds a layer of history and intention. It is also a brilliant solution for renters or those on a budget who may have inherited an old, weathered bench that has seen better days. Instead of sending it to the landfill, you are using a designer’s eye to give it a second life as a sculptural element.
The Signature Look: Ingredients That Make It Work
To achieve a professional “designer” look rather than a craft-store appearance, you must focus on the ingredients of the design. This starts with a cohesive color palette. Designers rarely use “primary” colors straight from the can. Instead, we look for complex tones—a “dusty” navy, a “sage-heavy” eucalyptus, or a “warm” terracotta. These shades mimic the nuances found in nature and look more expensive in outdoor lighting.
Texture and sheen also play a critical role. For most outdoor projects, a satin or semi-gloss finish is the gold standard. High gloss can look too “plastic” and shows every brushstroke or imperfection in the wood, while flat/matte finishes are difficult to clean and tend to hold onto pollen and dirt. A satin finish provides enough glow to make the color “pop” without creating harsh glare in the midday sun.
Finally, consider the motif. If your house has a lot of architectural detail, a solid, bold color might be best to avoid visual clutter. If your house is a simple modern box, a bench with a sophisticated geometric stencil or a hand-painted floral detail can provide the “soul” the architecture lacks. The signature look is always about balance: high-quality paint, a thoughtful color choice, and a finish that stands up to the elements.
Layout & Proportions (Designer Rules of Thumb)
In the world of interior and exterior design, layout is everything. You can have the most beautiful bench in the world, but if it is placed incorrectly, it will never be used. When planning your bench placement, follow these specific measurements and guidelines:
- The 18-Inch Rule: The standard seat height for a comfortable bench is 18 inches. If you are building a custom bench or adding a thick cushion to a painted one, ensure the final height remains between 17 and 19 inches for ergonomic comfort.
- The Clearance Zone: Leave at least 3 feet (36 inches) of clear space in front of the bench. This allows people to walk past without tripping over the feet of those sitting down.
- Back-to-Wall Spacing: If placing a bench against a wall or hedge, leave a 2-inch gap. This prevents moisture from being trapped between the bench and the wall, which can lead to mold or paint peeling on both surfaces.
- Grounding the Piece: For a bench to feel “grounded” in a garden, it should ideally be placed on a hard surface like flagstone, gravel, or a small concrete pad. If it sits directly on the grass, it often looks like it was just dropped there by accident.
- Scale and Proportion: A standard 4-foot bench is perfect for a small porch or an intimate “secret garden” nook. For larger patios or under big shade trees, look for 5-foot or 6-foot versions. In a large landscape, anything smaller than 4 feet will look like dollhouse furniture.
Designer’s Note: One of the biggest mistakes I see in professional projects is ignoring the “sightline.” Before you decide where to place your painted bench, sit in that spot on a folding chair. What do you see? If you’re looking at a trash can or a fence line, move the bench. Your bench should provide a view of your best landscaping features, such as a rose bush, a water feature, or the sunset.
Step-by-Step: How to Recreate This Look
Achieving a factory-smooth finish on a hand-painted bench requires a systematic approach. Do not rush the drying times, especially in humid climates.
- Deep Clean: Use a solution of water and TSP (Trisodium Phosphate) or a specialized wood cleaner to remove years of dirt, oils, and graying wood fibers. If the bench has mold or mildew, use a mixture of one part bleach to four parts water. Let it dry for 48 hours.
- Structural Assessment: Tighten all screws and bolts. If there are cracks in the wood, fill them with an exterior-grade wood filler. For large holes, use a two-part wood epoxy which is much more durable for outdoor use.
- The Three-Grit Sanding Process: Start with 80-grit sandpaper to remove old finish or smooth out rough wood. Move to 120-grit to remove the scratches from the 80-grit. Finish with 220-grit for a buttery smooth surface. Always sand in the direction of the wood grain.
- Tack Cloth: This is the step most people skip. Use a tack cloth (a sticky cheesecloth) to remove every single speck of dust. If you paint over dust, you will get a “gritty” finish that feels like sandpaper to the touch.
- Primer Selection: If you are painting a “tannin-heavy” wood like Cedar or Redwood, you MUST use an oil-based, stain-blocking primer. If you use water-based primer on these woods, the brown/pink tannins will bleed through your paint forever. For other woods, a high-quality exterior latex primer is fine.
- The Paint Application: Use a high-quality synthetic brush for water-based paints or a natural bristle brush for oil-based. Apply thin coats. Three thin coats are always better than one thick coat. Thick coats lead to drips and a “gummy” finish that never fully cures.
- Detailing/Stenciling: Once the base coat is dry (at least 24 hours), apply your decorative patterns. Use painter’s tape for crisp stripes or high-quality stencils for intricate designs. Use a “dry brush” technique here to prevent paint from bleeding under the tape.
- The Final Seal: While some exterior paints don’t technically require a topcoat, I always recommend an exterior-grade Spar Urethane in a satin finish. This provides an extra layer of UV protection and makes the bench much easier to wipe down.
Budget Breakdown: Low / Mid / Splurge
Low Budget ($50 – $100): The “Rescue” Project
This involves sourcing a free or cheap bench from a garage sale or Facebook Marketplace. You likely already have some sandpaper and brushes. Your main cost is a single quart of high-quality exterior paint (approx. $30) and a small can of primer ($20). This is the “sweat equity” route where your labor provides all the value.
Mid Budget ($150 – $400): The “Quality Kit”
At this level, you are likely buying a new, unfinished Acacia or Eucalyptus wood bench (approx. $150-$250). You are purchasing professional-grade supplies: a high-end Wooster or Purdy brush, a gallon of premium exterior paint with a lifetime warranty, and perhaps a designer stencil. This budget ensures the bench will last 5–7 years before needing a refresh.
Splurge ($600 – $1,200+): The “Designer Statement”
This budget involves a high-end teak bench or a heavy-duty wrought iron piece. Teak is the gold standard for outdoor wood due to its high oil content, though it requires specific primers to paint successfully. You might hire a local artist to hand-paint a custom mural or intricate folk-art patterns on the backrest. This is not just a bench; it is a permanent piece of your home’s architecture.
Common Mistakes (and How to Fix Them)
Mistake 1: Painting over damp wood.
The Fix: If you paint wood that has a high moisture content, the paint will bubble and peel within weeks as the water tries to evaporate. Use a moisture meter (available for $20) to ensure the wood is below 12% moisture before you begin. If it’s too high, let the bench sit in a dry garage for a week.
Mistake 2: Forgetting the underside.
The Fix: People often only paint what they see. However, moisture gets trapped on the bottom of the slats and the underside of the seat. If these aren’t sealed, the wood will expand and contract at a different rate than the top, causing the paint on top to crack. Paint every single square inch of the wood.
Mistake 3: Choosing the wrong sheen.
The Fix: Using a “flat” or “matte” paint for an outdoor bench is a recipe for disaster. It absorbs stains from bird droppings, leaves, and wine spills. If you’ve already used flat paint, apply two coats of a satin exterior clear coat over the top to provide a wipeable surface.
Mistake 4: Ignoring the “feet.”
The Fix: The end grain at the bottom of the legs acts like a straw, sucking up water from the ground. This causes “bottom-up rot.” The fix is to apply an extra 3–4 coats of sealer or paint to the very bottom of the legs, or better yet, add small rubber furniture glides to keep the wood off the wet ground.
Room-by-Room Variations
While we are talking about outdoor decor, “rooms” in a landscape are defined by their function and lighting. Here is how to adapt your hand-painted bench for different zones:
- The Front Porch (The Greeting): This bench is all about curb appeal. I recommend a classic, sophisticated color that matches your front door or shutters. A solid color with a subtle pinstripe along the arms looks intentional and welcoming. Keep the styling simple with a single outdoor lumbar pillow.
- The Secret Garden (The Escape): Here, you can be more whimsical. This is the place for soft pastels, floral stencils, or even an “ombre” effect where the color fades from dark at the bottom to light at the top. Because this area is usually shadier, lighter colors will help “lift” the dark corners of the garden.
- The Poolside or Patio (The Social Hub): This area usually has high sun exposure and a lot of activity. Choose vibrant, high-energy colors like turquoise, coral, or sunny yellow. Use a high-gloss finish here because it reflects the blue of the water and stands up better to the chemicals (like chlorine) that might be splashed on it.
- The Mudroom Entry (The Transition): If you have a bench just outside the back door where people take off muddy boots, durability is the only thing that matters. Use a “porch and floor” paint, which is designed to be walked on and can withstand heavy scrubbing. Stick to darker colors like charcoal or forest green to hide dirt.
Finish & Styling Checklist
Before you call the project finished, go through this “What I’d do in a real project” checklist to ensure it meets professional standards:
- Check for “ghosting”: Can you see the wood grain or the old color through the new paint? If so, apply one more coat.
- Run your hand along the underside of the arms. It should be as smooth as the top. If not, sand lightly with 400-grit and touch up.
- Apply a bead of clear exterior caulk to any deep joints where water might sit and pool.
- Ensure the bench is level. If your patio or garden is sloped, use outdoor-rated shims or adjustable furniture feet to prevent wobbling.
- Add a “pop” of texture: A painted bench looks best when paired with a contrasting material. Try a chunky knit outdoor throw or a pair of patterned pillows in a sun-resistant fabric like Sunbrella.
- Place a potted plant next to the bench. A tall, architectural plant like a Sansevieria (Snake Plant) or a soft, flowing Fern provides a beautiful contrast to the hard lines of a bench.
FAQs
How long will a hand-painted bench last outdoors?
With proper preparation and high-quality exterior paint, a bench should look great for 5 to 7 years. Benches in full sun or direct rain will need a refresh sooner than those on a covered porch. A light sanding and a fresh topcoat every 3 years can extend the life of the paint indefinitely.
Can I paint a plastic or resin bench?
Yes, but you must use a primer specifically designed for plastics, such as a “bonding primer.” Regular wood primer will peel off plastic almost immediately. Additionally, choose a paint that is labeled “Krylon Fusion” or similar, which is designed to flex with the plastic.
Should I use chalk paint for my garden bench?
Chalk paint is popular for its “shabby chic” look, but it is naturally very porous. If you use it outdoors, you cannot use the standard wax finish used indoors (wax will melt in the sun). You must seal chalk paint with several coats of a water-based exterior polycrylic or urethane.
What is the best wood for a bench if I plan to paint it?
Acacia and Eucalyptus are the best “budget” woods for painting because they are naturally rot-resistant but don’t have as much oily resin as Teak. Pine is the easiest to paint but the most likely to rot, so it should only be used on covered porches.
Conclusion
A hand-painted bench is more than just a place to sit; it is a declaration of style and a testament to the idea that our outdoor environments are worth our creative energy. By applying professional design principles—focusing on ergonomics, moisture protection, and color theory—you can create a piece that rivals anything found in a high-end showroom. Whether you choose a bold, monochromatic statement or a detailed, stenciled masterpiece, the key lies in the preparation and the willingness to treat a piece of garden furniture as a work of art.
Remember that the beauty of paint is its impermanence. As your garden grows and your style evolves, you can always sand it down and start again, reflecting the changing seasons of your home. Take your time, enjoy the process, and let your outdoor decor tell a story that is uniquely yours.
Picture Gallery


