How To Arrange 3 Circle Mirrors On Wall: Decorative Layout
Introduction
There is something inherently magical about the circle. In interior design, we often deal with squares and rectangles—windows, rugs, sofas, and tables all tend to have sharp corners. Introducing round shapes softens those hard edges and brings a sense of flow to a room. When you combine this shape with the functionality of a mirror, you get a design powerhouse. However, knowing exactly how to position a trio of mirrors can be tricky.
I remember one specific project where a client had a long, dark hallway that felt more like a tunnel than an entryway. We tried a single large rectangular mirror, but it felt static and heavy. The moment we swapped it for three medium-sized round mirrors arranged in a playful horizontal line, the energy of the space shifted completely. It bounced light around the corridor and created a sense of rhythm that guided the eye forward.
If you are staring at a blank wall and holding three round mirrors, don’t worry. This guide covers everything from the math of spacing to the art of composition. For plenty of visual inspiration and real-life examples, be sure to check out the Picture Gallery at the end of this blog post.
Understanding the “Rule of Three” in Design
Before we start drilling holes, it is helpful to understand why three is the magic number. In design, odd numbers create a harmonious visual balance that the human eye finds naturally appealing.
An arrangement of two mirrors can often feel like a pair of eyes staring at you, which creates subconscious tension. A single mirror creates a focal point, but it can sometimes feel lonely on a large wall.
Three items force the eye to move around the display, creating a dynamic visual experience. This movement prevents the design from feeling stagnant or stiff.
Creating the Visual Triangle
When you arrange three objects, your brain automatically connects them to form a triangle. This shape represents stability and energy simultaneously.
Whether you hang them in a straight line or a cluster, you are playing with this triangulation. It allows you to fill a wall space effectively without it looking cluttered.
Breaking the Grid
Most homes are built on a grid system. You have vertical studs, horizontal floorboards, and squared-off door frames.
Using three circles disrupts this grid. It adds an organic element that makes a room feel more curated and less like a builder-grade box.
Essential Spacing and Sizing Rules
The success of your layout depends heavily on scale and spacing. Even beautiful mirrors will look awkward if they are floating too far apart or crowded too close together.
As a practicing designer, I rely on a few specific measurements to ensure the composition looks intentional.
The Gap Rule
A general rule of thumb for spacing smaller mirrors (10 to 18 inches in diameter) is to leave 2 to 4 inches between frames. This proximity allows them to read as one cohesive art installation rather than three separate floating objects.
If your mirrors are larger (20 inches or more), you can increase that gap to 5 or 6 inches. However, be careful not to exceed 8 inches of spacing unless you are covering a massive wall. Too much space breaks the visual connection between the items.
Height from the Floor
The center of your arrangement should generally sit at eye level. For most standard ceilings (8 to 9 feet), this means the center point of the grouping should be roughly 57 to 60 inches from the floor.
If you are hanging them above furniture, the rules change slightly. The bottom of the lowest mirror should sit 6 to 10 inches above the top of the furniture piece.
Relation to Furniture Width
If you are hanging your trio above a console table, sofa, or buffet, pay attention to width. The total width of your mirror arrangement (including the spaces between them) should span about two-thirds to three-quarters of the furniture’s width.
If the mirrors extend beyond the edges of the furniture below, the arrangement will look top-heavy and unstable.
Designer’s Note: The “Floating” Mistake
The most common issue I see in DIY projects is mirrors hanging too high. People often center the mirrors on the vertical wall space rather than relating them to the furniture or human scale.
The Lesson: If you are hanging mirrors above a sofa, do not center them between the top of the sofa and the ceiling. Anchor them to the sofa. A 10-inch gap feels connected; a 30-inch gap makes the mirrors look like they are floating away like helium balloons.
Top Layout Configurations
There isn’t just one way to hang three mirrors. The layout you choose should depend on the shape of your wall and the vibe you want to create.
Here are the four most effective configurations I use in residential projects.
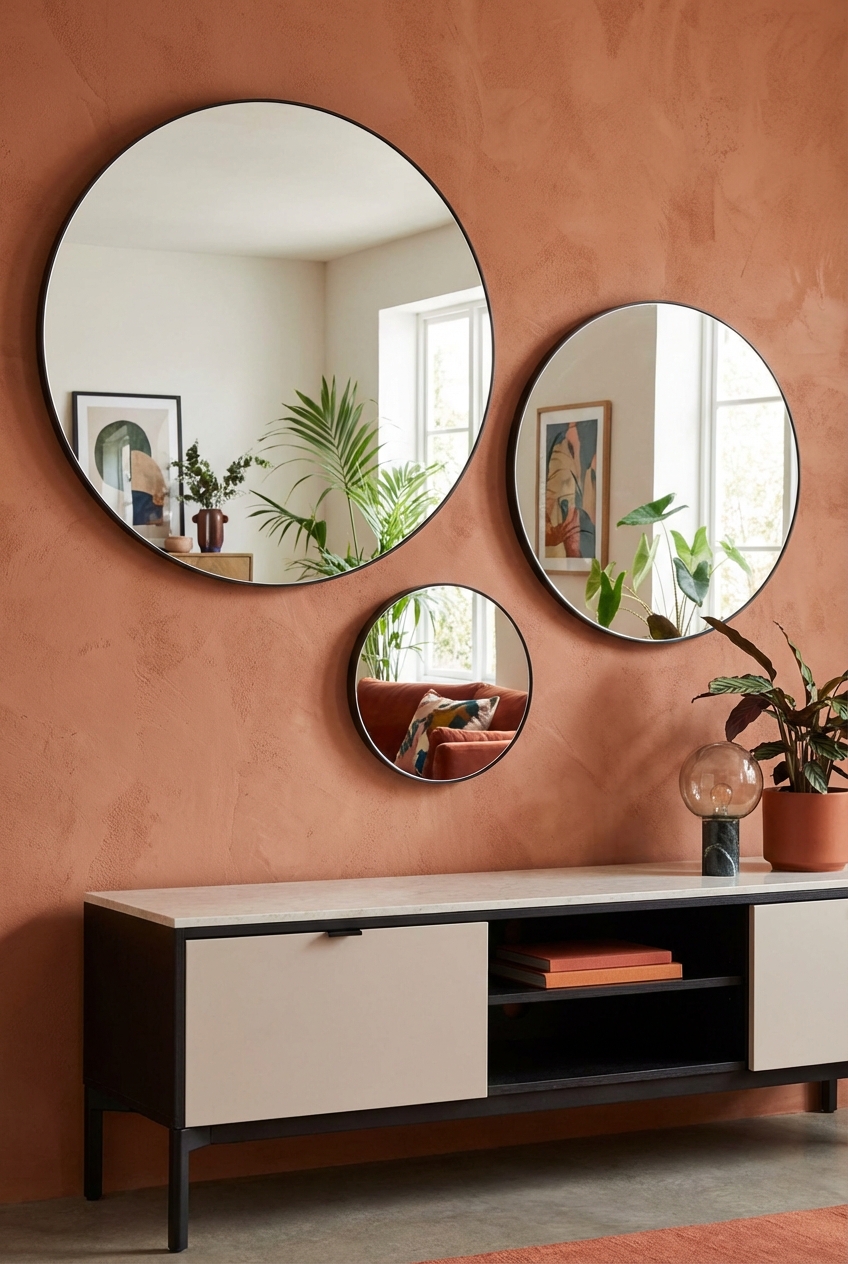
1. The Horizontal Line
This is the most traditional and orderly layout. It involves hanging all three mirrors side-by-side at the exact same height.
Best for: Long walls, hallways, or above wide furniture like sofas, sideboards, or king-size headboards.
Vibe: Clean, minimal, and structured. It expands the perceived width of the room.
Tip: Use a long level to ensure they are perfectly aligned. Even a quarter-inch drop on one mirror will be noticeable.
2. The Vertical Stack
This layout stacks the three mirrors on top of one another.
Best for: Narrow walls between windows, beside a tall cabinet, or in a narrow entryway.
Vibe: Elegant and uplifting. It draws the eye upward, making low ceilings feel higher.
Tip: Ensure the gap between mirrors is consistent. I usually use a wood spacer block during installation to guarantee the distance is identical for all three.
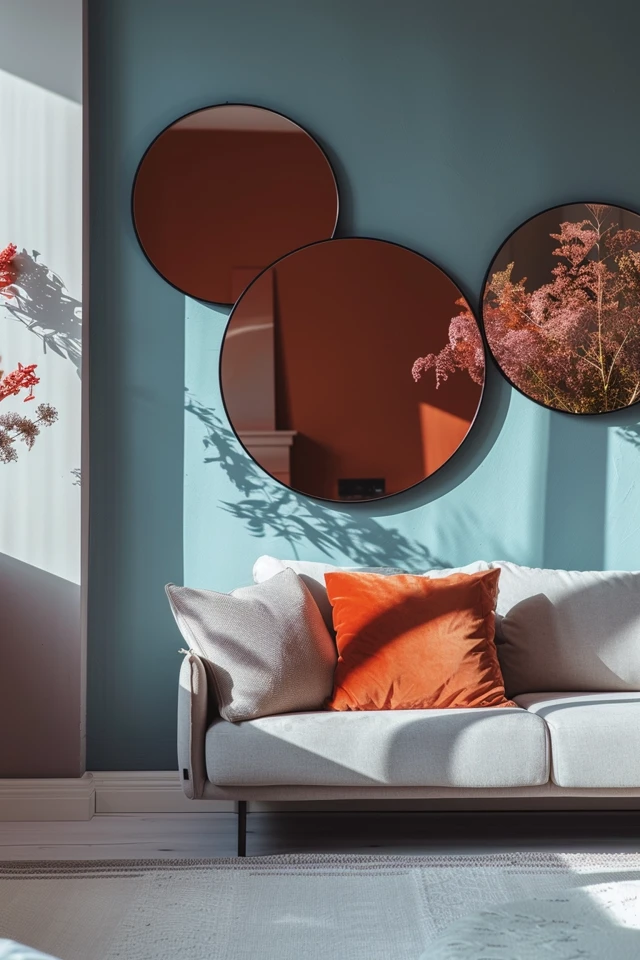
3. The Organic Cluster (Triangle)
Here, you arrange the mirrors with two on one level (slightly spaced apart) and the third centered above or below them.
Best for: Large, empty walls that need a focal point but don’t have furniture anchoring them. It also works well in stairwells.
Vibe: Playful and artistic. This breaks up rigid lines and feels less formal than a straight row.
Tip: Keep the spacing tight. The mirrors should feel like a family huddled together, not strangers standing apart.
4. The Asymmetrical Scatter
This is a more modern approach where the mirrors are “scattered” across the wall without perfect alignment. Usually, one is higher, one is lower, and the spacing varies slightly.
Best for: Eclectic, bohemian, or mid-century modern interiors.
Vibe: Relaxed and dynamic. It suggests movement, like bubbles floating in the air.
Tip: This is the hardest to get right. Cut paper templates of your mirrors and tape them to the wall first. Move them around until the balance feels right before putting any nails in the wall.
Installation: Getting It Right the First Time
Hanging a single picture is easy. Hanging three mirrors in relation to each other requires patience and the right tools.
Mirrors are heavy and unforgiving. If one falls, it is dangerous. If they are misaligned, it ruins the effect.
Step 1: Make Templates
Never start by drilling holes. Trace your mirrors onto kraft paper or old newspaper and cut out the circles.
Mark the hanging hardware location on the paper template. This is crucial because the hook on the back of the mirror is rarely in the exact center.
Step 2: Tape and visualize
Use painter’s tape to stick your paper circles on the wall. This allows you to step back and check the spacing from across the room.
Check the reflection. Stand where you normally would in the room. Are the paper templates covering a spot that would reflect a glare from a window or a messy closet?
Step 3: Choose the Right Hardware
Do not rely on standard nails. Even small mirrors can be surprisingly heavy.
For drywall without studs, I recommend using threaded drywall anchors (often called “EZ Ancors”) or toggle bolts for very heavy pieces. These expand behind the wall and provide a secure hold.
If you are renting, be wary of adhesive strips. Most are not rated for the weight of glass mirrors and can fail in humid conditions. Small nail holes are easier to patch and safer for the mirror.
Step 4: The Leveling Trick
For horizontal layouts, place a long strip of painter’s tape across the wall at your desired height.
Use a level on the tape itself to ensure it is perfectly straight. Then, mark your drill holes directly on the tape. This guarantees alignment better than measuring up from the floor multiple times.
Room-Specific Styling Tips
Context is everything. A layout that works in a bathroom might feel chaotic in a dining room. Here is how I approach specific rooms.
The Entryway
In an entryway, mirrors are functional. You want to check your look before you leave.
I prefer a vertical stack or a tight triangular cluster here. Ensure the lowest mirror is high enough to reflect your face, or low enough to check your outfit, depending on the size.
Pair this arrangement with a narrow console table. Place a tall vase or lamp on one side of the console to bridge the gap between the furniture and the mirrors.
The Living Room
Above the sofa is prime real estate for a horizontal row of three.
If your mirrors have thick, dark frames, they will act like artwork. If they are frameless or have thin metallic edges, they will act more like architectural windows.
Be mindful of lighting. If you have recessed can lights, make sure the mirrors aren’t positioned directly under a beam, which can cast harsh shadows on the glass.
The Dining Room
Dining rooms often suffer from being too boxy. A dining table is a rectangle; the rug is a rectangle; the buffet is a rectangle.
Three round mirrors above the buffet break this geometry beautifully.
This is a great place to use antique or beveled mirrors. The goal here is often ambiance rather than checking your reflection. The mirrors will reflect the sparkle of a chandelier or candlelight, adding warmth to dinner parties.
The Bedroom
Safety is the priority here. If you hang mirrors above the bed, they must be anchored into studs or secured with toggle bolts.
I often use three smaller mirrors above a headboard to replace traditional artwork. It reflects natural light from adjacent windows, making small bedrooms feel airier.
Avoid placing mirrors where they will reflect the bed directly if that makes you uncomfortable. Angling them to reflect a piece of art or a window is usually a better choice for a restful vibe.
Common Mistakes and Concrete Fixes
Even with the best intentions, things can go wrong. Here are three issues I encounter frequently and how to fix them.
Mistake 1: The “Funhouse” Effect
The Problem: You hung three mirrors on a wall that faces a cluttered kitchen, a bathroom door, or a television.
The Fix: Before hanging, hold a hand mirror flat against the wall at the intended height. Look at what it reflects. If the view isn’t pretty, move the arrangement or choose a different wall. Mirrors amplify what they face.
Mistake 2: The Tiny Trio
The Problem: You bought three 10-inch mirrors for a huge 12-foot wall. They look like polka dots.
The Fix: You don’t necessarily need to buy new mirrors. You can visually expand the arrangement by adding wall sconces on either side or painting a color block on the wall behind the mirrors to group them. Alternatively, group them tighter together and place them off-center above a smaller chair rather than centered on the main wall.
Mistake 3: Mismatched Hardware
The Problem: You used wire on the back of one mirror and a D-ring on another. They hang at different angles away from the wall.
The Fix: Consistency is key. Ensure all three mirrors have the same hanging mechanism. If one mirror tilts forward because of a slack wire, add adhesive felt pads to the bottom back corners of all three mirrors. This pushes the bottom out slightly and ensures they all sit on the same vertical plane.
Final Checklist: What I’d Do in Your Home
If I were standing in your living room right now, this is the checklist I would run through before considering the job done.
Check the Scale: Do the mirrors span at least 2/3 the width of the furniture below them?
Check the Reflection: Are we reflecting a window, art, or light? (Good). Are we reflecting a ceiling fan or a laundry pile? (Bad).
Check the Level: Put a level on top of the frames, not just the wall.
Check the Light: Turn on the room lights. Is there glare blinding you in a specific spot?
* Check the Security: Give each mirror a gentle tug. Does it feel solid?
FAQs
Can I mix different sizes of round mirrors?
Absolutely. This creates a very organic, bubble-like effect. If you do this, I recommend the “Asymmetrical Scatter” layout. Place the largest mirror slightly off-center and balance it with the two smaller ones.
Do the frames have to match?
Not necessarily, but they should share a common language. For example, you can mix a thick brass frame with a thin brass frame. Or you can mix black metal with wood if other elements in the room tie them together. However, keeping the frames identical is the safest bet for a cohesive look.
How do I clean them without moving them?
Spray glass cleaner onto your microfiber cloth, not directly onto the mirror. Spraying the mirror can cause liquid to seep behind the frame, which damages the silver backing over time. Hold the frame steady with one hand while wiping with the other to prevent knocking it off level.
What if my wall is textured?
Textured walls can make adhesive mounting impossible, so you must use nails or anchors. Also, heavy texture can make mirrors sit unevenly. Use thick felt or rubber bumpers on the back of the mirrors to help them float slightly off the jagged surface.
Conclusion
Arranging three circle mirrors is one of the most effective, high-impact design moves you can make. It is relatively affordable compared to large-scale art, yet it brings light, depth, and architectural interest to a room.
The secret lies in the preparation. Don’t rush the process. Take the time to cut out paper templates and live with the layout for a day or two. Adjust the height, play with the spacing, and wait until it feels “right.” When you finally hang them, you will have created a focal point that transforms the entire feeling of your home.
Picture Gallery