
How to Create an Indoor Water Garden
Bringing the soothing sound of trickling water and the vibrant green of aquatic life into your home is one of the most effective ways to embrace biophilic design. An indoor water garden acts as a living piece of art that purifies the air, increases humidity, and provides a focal point that ground-based houseplants simply cannot match.
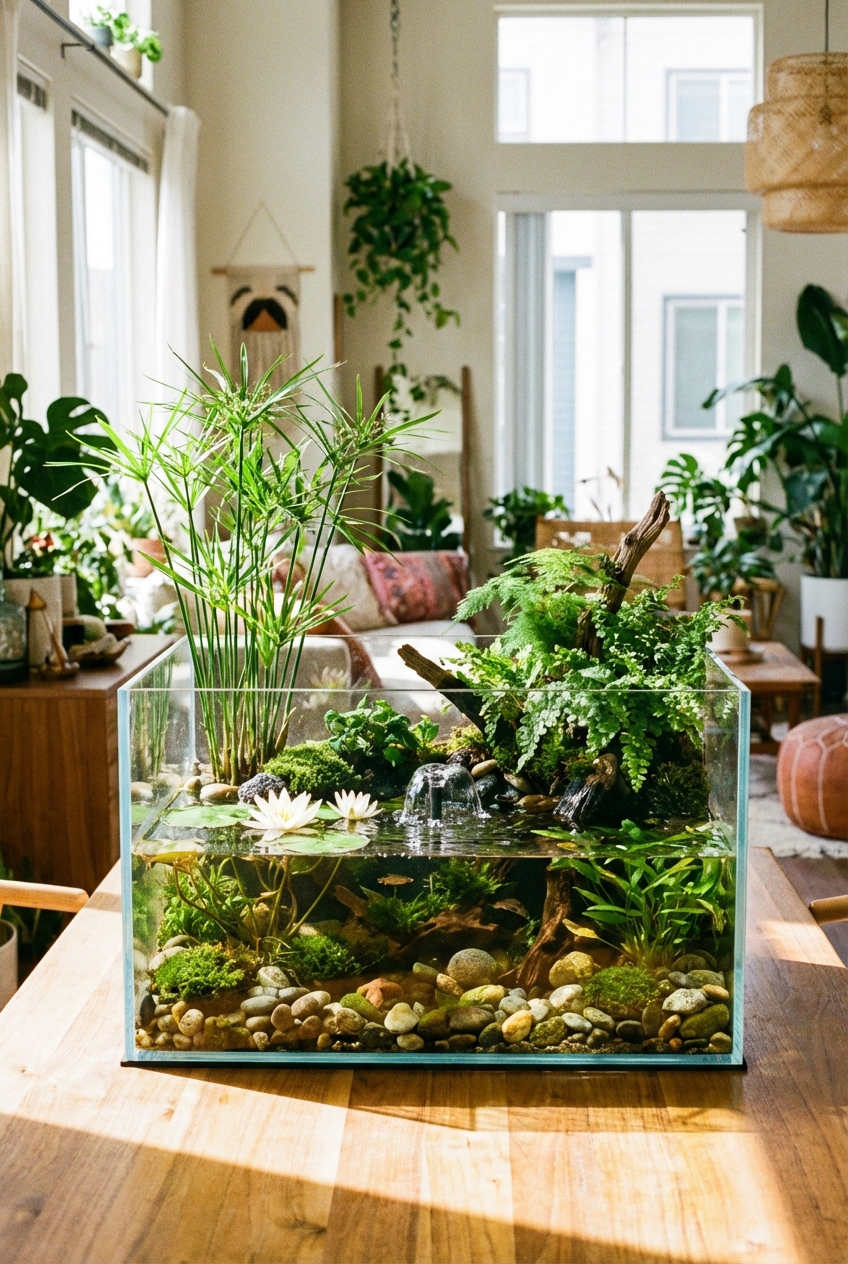
To help you visualize how these fluid landscapes can transform various rooms in your home, I have curated a stunning picture gallery at the end of the blog post for your inspiration. Whether you are working with a small apartment or a sprawling estate, an aquatic feature can be scaled to fit your specific spatial constraints while adding a layer of sophisticated texture to your interior.
At-a-Glance: Key Takeaways
- Maintenance Level: Moderate. Expect 20 to 30 minutes of weekly care to maintain water clarity and plant health.
- Primary Benefits: Natural humidification, stress reduction, and a unique design element that differentiates your space.
- Spatial Requirement: Can range from a 6-inch desktop bowl to a 4-foot floor-standing trough.
- Lighting Needs: High. Most aquatic plants require 8 to 10 hours of dedicated full-spectrum light.
- Structural Concern: Always account for weight; water weighs approximately 8.34 pounds per gallon, plus the weight of the container and substrate.
What This Style Means (and Who It Is For)
In the world of interior design, an indoor water garden is the ultimate expression of biophilia—the innate human tendency to seek connections with nature. Unlike a traditional aquarium which focuses primarily on fish, a water garden prioritizes the “aquascape” or the architectural arrangement of plants, wood, and stones. This style is for the homeowner who finds traditional gardening a bit too messy or for the urban dweller who lacks outdoor space but craves a lush, verdant environment.
This design choice is particularly effective for people who live in dry climates. The constant evaporation from an open water surface acts as a natural humidifier, which benefits both your respiratory health and your other tropical houseplants. It is also an ideal project for those who enjoy the “slow decor” movement, as aquatic gardens evolve and fill in over months, rewarding patience with a miniature ecosystem that feels truly alive.
The Signature Look: Ingredients That Make It Work
To achieve a professional-looking water garden, you must move beyond the “plant in a jar” concept. A designer-quality installation relies on a specific set of materials and textures that create depth and visual interest.
- The Vessel: Opt for high-clarity low-iron glass for a “disappearing” edge look, or use organic materials like heavy glazed ceramic or carved stone for a more grounded, earthy feel.
- Substrate Layers: I recommend a “sandwich” method. Start with a base of nutrient-rich volcanic soil for the plants, topped with a layer of decorative cosmetic sand or smooth river pebbles to keep the water clear.
- Hardscape Elements: Use “Dragon Stone,” “Seiryu Stone,” or spider wood branches to create height and structure. These elements should take up about 30 percent of the visual volume.
- Plant Palette: Mix textures by using broad-leafed species like Anubias, feathery textures like Hornwort, and floating accents like Red Root Floaters or Amazon Frogbit.
- Lighting: A sleek, slim-profile LED fixture with a color temperature of 6500K will mimic natural daylight and make the greens of your plants pop against the water.
Layout & Proportions (Designer Rules of Thumb)
When I am placing a water feature in a client’s home, the first thing I look at is the scale of the room versus the volume of the container. A common mistake is choosing a vessel that is too small for the furniture it sits on, making it look like an afterthought rather than a deliberate design choice.
The 1:3 Rule of Scale: Your water garden container should ideally occupy about one-third of the surface area of the table or shelf it sits on. If you have a 60-inch sideboard, a 20-inch wide vessel creates a balanced, harmonious look. Anything smaller gets lost in the surrounding decor.
Vertical Spacing: If you are placing a water garden on a bookshelf or within a niche, ensure you have at least 12 to 15 inches of clearance above the water’s surface. This provides enough room for “emergent” plants (plants that grow out of the water) and allows for proper heat dissipation from your lighting fixture.
The Rule of Threes for Textures: To create a professional “aquascape,” use three distinct heights of plants. Use “carpeting” plants like Monte Carlo for the foreground, mid-height plants like Cryptocoryne in the center, and tall, vertical plants like Vallisneria in the background. This creates a sense of infinite depth even in a shallow container.
Weight Management: Before you fill a 10-gallon vessel, remember that it will weigh nearly 100 pounds once you add the rocks and water. Ensure your furniture is solid wood or metal-framed. Avoid placing large water gardens on “ready-to-assemble” particle board furniture, which can sag or collapse under sustained moisture and weight.
Step-by-Step: How to Recreate This Look
- Sanitize and Prep: Clean your chosen vessel with white vinegar and water only. Never use soap, as residues can be toxic to aquatic plants.
- Position Your Hardscape: Place your stones and driftwood into the dry vessel first. This is where you set the “bones” of your garden. Tilt stones at a 45-degree angle to create a sense of movement.
- Add Substrate: Carefully pour your aquatic soil around the base of your stones. Slope the soil so it is higher in the back and lower in the front; this “forced perspective” makes the garden look much larger than it is.
- Moisten and Plant: Use a spray bottle to dampen the soil. Use long tweezers (aquascaping pinsettes) to tuck the roots of your plants into the soil. Planting in a dry-ish environment is much easier than trying to plant once the vessel is full of water.
- The Slow Fill: Place a piece of bubble wrap or a small plate on top of your plants and stones. Slowly pour room-temperature, dechlorinated water over the plate. This prevents the water flow from uprooting your hard work or clouding the water with soil.
- Condition the Water: Even if you are not keeping fish, use a water conditioner to remove chlorine and chloramines. This protects the delicate tissues of your aquatic plants.
- Set the Light: Position your LED light approximately 6 to 10 inches above the water surface. Connect it to a digital timer set for 8 hours. Consistency is key to preventing algae blooms.
- The “Cycle” Phase: For the first two weeks, the water may look slightly cloudy. This is normal. Change 30 percent of the water every three days during this period to remove excess nutrients as the plants settle in.
Budget Breakdown: Low / Mid / Splurge
The Low-Budget Option ($50 – $100): Use a large glass apothecary jar or a wide-mouth mason jar. Focus on “low-tech” plants like Marimo moss balls and Java fern which do not require specialized soil or high-intensity lighting. A simple clip-on desk lamp with a daylight bulb works perfectly here.
The Mid-Range Option ($200 – $500): This involves a dedicated “rimless” glass tank (5 to 10 gallons) and a specialized LED aquarium light. You can incorporate a small, silent “sponge filter” hidden behind a piece of driftwood. This budget allows for a wider variety of plants and more intricate stone layouts.
The Splurge Option ($1,000+): At this level, you are looking at custom-integrated cabinetry, a large-scale trough or an “ADA style” ultra-clear glass tank. This setup would include a pressurized CO2 system to grow lush, difficult “carpet” plants and a high-end canister filter hidden within the furniture to keep the water crystal clear without any visible equipment.
Designer’s Note: A Real-World Lesson
In my early projects, I once placed a beautiful open-top water garden directly under an HVAC vent. Within a week, the evaporation rate was so high that the client had to refill it daily, and the constant air movement caused a massive dust buildup on the water’s surface. The Lesson: Always place your water garden in a “dead air” zone, away from heaters, AC vents, or drafty windows. This stabilizes the temperature and keeps the water surface looking like glass rather than a dusty pond.
Common Mistakes (and How to Fix Them)
- The Mistake: Over-lighting. Leaving the light on for 14 hours because “it looks pretty” will result in a tank full of green hair algae.
The Fix: Use a timer. Limit light to 8 hours and reduce the intensity if you see algae forming on the glass.
- The Mistake: Using Tap Water Directly. Chlorine in city water will “burn” the leaves of sensitive aquatic plants like Vallisneria.
The Fix: Always use a liquid dechlorinator or let your water sit in an open bucket for 24 hours before adding it to the garden.
- The Mistake: Ignoring “Emergent” Potential. Many people keep all their plants underwater.
The Fix: Let plants like Peace Lilies or Pothos grow with their roots in the water and their leaves in the air. This creates a much more lush, 3D effect.
- The Mistake: Crowding the Vessel. Putting too many plants in at once can lead to die-off as they compete for CO2.
The Fix: Plant about 50 percent of the area and allow the garden to “grow in” over two months.
Room-by-Room Variations
The Entryway: A water garden here sets a tone of immediate calm. Since entryways are often darker, I recommend focusing on “low-light” species like Anubias and using a vessel with a wide surface area to maximize the reflective quality of the water.
The Kitchen: This is the most practical place for a water garden because you are steps away from a water source for maintenance. A long, narrow rectangular vessel along a window sill (if not in direct hot sun) can hold “water herbs” like mint or watercress, which thrive in aquatic environments.
The Home Office: Research shows that the sound and sight of water can improve cognitive function and reduce cortisol. Use a small, silent “bubbler” or a tiny fountain pump to create a gentle white noise that masks household distractions.
The Bathroom: The naturally high humidity of a bathroom makes it an ideal spot for an “open” water garden. You can use a beautiful ceramic bowl on the vanity and fill it with floating plants. The steam from your shower will actually help keep the floating plants hydrated.
Finish & Styling Checklist: What I’d Do in a Real Project
- Select a “Hero” stone: One large, interesting rock that serves as the visual anchor.
- Check the “Sightlines”: Sit in your favorite chair and ensure the water line is either hidden or perfectly level from your seated perspective.
- Hide the cords: Use adhesive cable clips to run power cords down the back of the furniture legs.
- Add “Life” (Optional): If the garden is large enough (over 5 gallons), consider adding three to five Neocaridina shrimp. They are colorful, fascinating to watch, and act as a “clean-up crew” by eating algae.
- Wipe the glass: Use a microfiber cloth daily to remove fingerprints or water spots from the exterior.
- The “Final Touch”: Add a small piece of “cattails” or a single stalk of Lucky Bamboo that breaks the water’s surface for architectural height.
FAQs
Will an indoor water garden attract mosquitoes?
No, not if the water is healthy. Mosquitoes require stagnant, dirty water to breed. As long as you are performing regular water changes or have a small pump creating surface agitation, mosquitoes will not be an issue. For extra peace of mind, you can add “Mosquito Bits” (a biological control) which is safe for plants and pets.
Does the water get smelly?
A healthy water garden should smell like a fresh forest after rain, or have no smell at all. If it smells “swampy” or like sulfur, it means there is decaying organic matter or a lack of oxygen. This is usually fixed by removing dead leaves and increasing water changes.
How do I prevent algae?
Algae is a balance of light and nutrients. If you have too much of either, algae wins. Start with a shorter light cycle (6 hours) and gradually increase it. Also, avoid placing your garden in direct sunlight from a window, as the UV rays will cause rapid green water blooms.
Can I use regular potting soil?
Absolutely not. Regular potting soil contains peat moss and perlite which will float to the surface and create a muddy mess. It also contains fertilizers that are too concentrated for aquatic environments, which will lead to a massive algae explosion. Use soil specifically labeled for “aquatic plants” or “aquarium substrate.”
What happens when I go on vacation?
If your lights are on a timer, a water garden can easily survive for two weeks without intervention. Just top off the water level before you leave to account for evaporation. Since there are no fish to feed, the plants will be perfectly fine.
Conclusion
Creating an indoor water garden is a rewarding intersection of interior design and horticulture. It challenges you to think about space, light, and biology in a way that standard decorating does not. By following the rules of scale and maintaining a consistent care routine, you can turn a corner of your home into a tranquil sanctuary that changes every single day.
Remember that the best gardens are those that reflect the personality of the home. Don’t be afraid to experiment with different stone types or plant combinations. Start small, master the balance of the ecosystem, and soon you will find that the gentle hum of your water garden becomes the most cherished part of your living space.
Picture Gallery


