
How To Decorate A Kitchen With Brown Cabinets: Style Integration
Brown cabinets are experiencing a massive resurgence in interior design, shifting away from the sterile all-white kitchens of the last decade toward spaces filled with warmth and texture. Whether you are working with existing honey oak millwork in a rental or designing a custom kitchen with rich walnut cabinetry, the goal is balance. You want to honor the wood grain while ensuring the space feels curated and intentional, rather than dated or dark.
I recently worked with a client who was convinced she needed to spend $15,000 painting her cherry cabinets white to make her home sellable. Instead, we swapped the backsplash, updated the lighting, and changed the wall color, saving her thousands and creating a stunning, high-contrast space that sold immediately. For plenty of visual inspiration regarding these transformations, don’t miss our curated Picture Gallery at the end of this article.
Decorating around brown cabinets requires a specific understanding of color theory and texture. You cannot treat wood cabinets the same way you treat painted ones because wood has inherent movement and undertones that dictate your palette. This guide will walk you through the practical steps of styling a kitchen with wood-stained cabinetry.
1. Identifying and Working With Wood Undertones
Before you buy a single paint sample or hardware knob, you must identify the undertone of your cabinets. Wood is rarely just “brown.” It usually leans toward yellow (honey oak), orange (cherry or darker oak), red (mahogany), or ash/grey (driftwood or walnut).
If you ignore the undertone, your wall colors and decor will always feel slightly “off.” To find the undertone, hold a piece of pure white printer paper up against a cabinet door in natural light. The white contrast will immediately reveal if the wood looks more orange, pink, or yellow.
Once you know the undertone, you have two choices for your color palette:
- Harmonize (Analogous): Use warm colors that sit next to the wood tone on the color wheel. For example, creamy whites and terracottas look beautiful with orange-toned oak.
- Contrast (Complementary): Use colors opposite the undertone to make the wood pop. Blue-greys look incredible against orange wood, while greens stabilize red tones.
Designer’s Note: The “Grey” Trap
The most common issue I see is homeowners painting their walls “cool grey” to modernize honey oak cabinets. This usually backfires. The blue undertones in cool grey clash with the yellow/orange in the wood, making the cabinets look even more orange and dated. If you want grey walls, choose a “greige” (grey-beige) with warm undertones, such as Benjamin Moore’s Revere Pewter or Sherwin Williams’ Accessible Beige.
2. Selecting Countertops and Backsplashes
When you have brown cabinets, your countertops and backsplash are your best opportunity to inject brightness. Because wood absorbs light, you generally want horizontal surfaces that reflect it.
For a modern look, avoid busy granite patterns if your wood grain is heavy. Wood grain acts as a pattern; if you pair it with a speckled, high-movement granite, the eye has nowhere to rest.
My “Safe Bet” Combinations:
- For Cherry or Red-Toned Wood: Go for a creamy off-white quartz or a quartzite like Taj Mahal. The soft, warm veins in Taj Mahal bridge the gap between the red wood and a lighter room aesthetic.
- For Walnut or Ash Wood: You can get away with starker whites or even marble with grey veining, as walnut is naturally cooler than oak or cherry.
- For Honey Oak: Stick to solid colors or very subtle patterns in warm white or slate grey. Avoid beige stone, which often blends too much with the oak, creating a “muddy” look.
Backsplash Rules of Thumb
If your counters are solid, you can have fun with a textured tile backsplash. If your counters have movement, keep the backsplash simple. For a standard kitchen, a 3×12 inch subway tile is often more elegant than the traditional 3×6 inch size.
What I’d do in a real project:
1. Install a creamy white quartz countertop with very subtle warm grey veining.
2. Select a handmade ceramic tile for the backsplash in a “Zellige” style (glossy, imperfect finish). The gloss reflects light, offsetting the matte finish of the wood.
3. Use a grout color that matches the tile, rather than a contrasting grout. This keeps the visual clutter low.
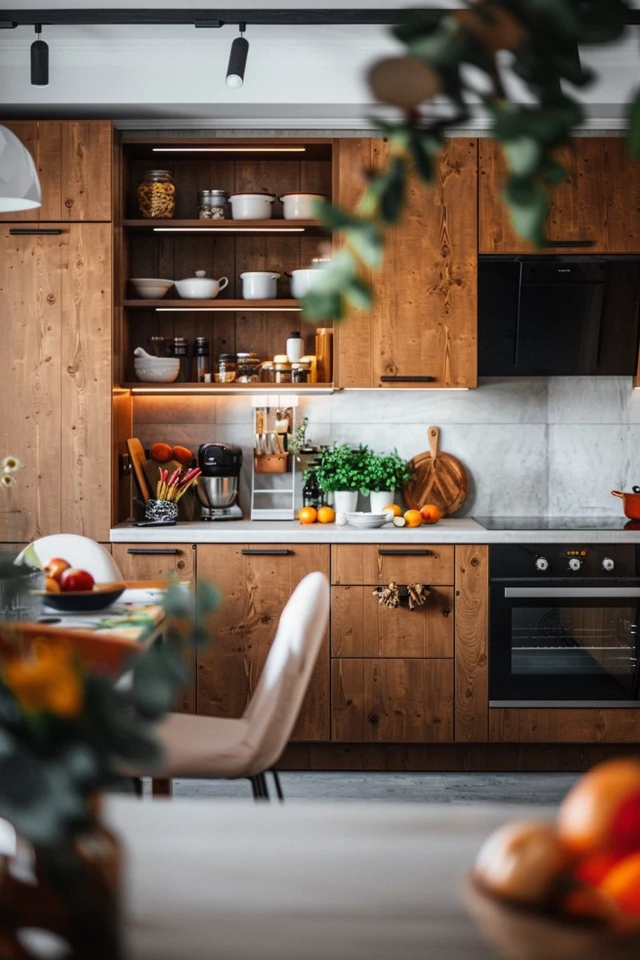
3. Hardware: The Jewelry of the Kitchen
Hardware is the fastest, most cost-effective way to change the style genre of a brown kitchen. Old, tarnished hinges or dated ceramic knobs can make quality wood look cheap.
When selecting finishes for brown cabinets, you want contrast.
- Matte Black: Creates a modern, industrial, or farmhouse look. It grounds the space and looks especially sharp on lighter oak or pine.
- Polished Nickel: Offers a high-contrast sparkle that works well with traditional or transitional styles. It is warmer than chrome and feels more luxurious.
- Unlacquered Brass or Gold: Adds immense warmth. This is currently very trendy with walnut and dark stained cabinets. However, be careful with orange oak; sometimes brass can get lost visually if the tone matches too closely.
Sizing Guidelines
A common mistake is buying hardware that is too small, which makes the cabinetry look inexpensive.
- Knobs: Standard 1 1/4 inch diameter is fine, but consider 1 3/8 inch for a more substantial feel.
- Pulls: Follow the “Rule of Thirds.” The pull should be roughly one-third the length of the drawer. For a standard 18-inch drawer, a 5 to 6-inch pull looks much better than a standard 3-inch pull.
Common Mistakes + Fixes
Mistake: Using a center-mount knob on a shaker style door.
Fix: Place the knob on the stile (the vertical frame piece), aligned with the top of the bottom rail. This is the classic joinery placement and looks structurally correct.
4. Lighting Strategy: Temperature and Layers
Brown cabinets are dark objects. To make them feel inviting rather than heavy, you need a robust lighting plan. The most critical technical aspect here is color temperature, measured in Kelvins (K).
The Golden Rule for Wood: Use 3000K LED bulbs.
- 2700K: Too yellow. It will make your wood cabinets look muddy or intensely orange.
- 4000K-5000K: Too blue/daylight. This makes wood look clinical and can cast a greenish hue on natural grain.
- 3000K: The sweet spot. It is a crisp, soft white that highlights the grain warmth without distorting the color.
You also need to layer your lighting sources. Relying solely on recessed “can” lights causes shadows under the upper cabinets, making the workspace feel gloomy.
Under-Cabinet Lighting
This is non-negotiable for brown kitchens. LED tape light installed behind the face frame of your upper cabinets illuminates the backsplash and countertop. This breaks up the visual “block” of wood and adds functionality.
Pendants and Sconces
If you have an island, use pendants to introduce a new material. If your hardware is brass, you might choose glass pendants with brass fittings. If you have a window above the sink, a gooseneck sconce adds a design focal point that draws the eye up.
Spacing Standards:
- Hang pendants 30 to 36 inches above the countertop surface.
- Space pendants 30 inches apart from bulb to bulb.
- Leave at least 6 inches of clearance from the edge of the island to the side of the pendant.
5. Flooring and Rug Integration
One of the most difficult challenges in a kitchen with brown cabinets is dealing with wood flooring. The “wood-on-wood” look can be overwhelming if not managed correctly.
Creating Contrast
If you are installing new floors, aim for a minimum of two shades difference between the floor and the cabinets.
- Light Cabinets + Dark Floors: This anchors the room and feels traditional.
- Dark Cabinets + Light Floors: This creates an airy, Scandinavian or modern aesthetic.
Avoid matching the stain exactly. It creates a “cigar box” effect where the floor and walls blend together, making the room feel smaller and enclosed.
Using Rugs to Break the Visual Plane
If you are renting or stuck with floors that match the cabinets too closely, a runner rug is your best tool. It provides a visual buffer between the vertical wood of the cabinets and the horizontal wood of the floor.
Rug Sizing and Placement
For a galley kitchen or an island walkway, use a runner.
- Width: Leave 4 to 6 inches of floor visible on either side of the rug. If your walkway is 48 inches wide, look for a runner that is roughly 36 inches wide.
- Length: The rug should extend the length of the cabinetry but stop 6 to 12 inches before the cabinets end.
Designer’s Note on Materials
Kitchens are high-mess zones. I always recommend vintage wool rugs or high-quality performace polyester (washable) runners. Wool is naturally stain-resistant due to lanolin, while washable synthetics are practical for homes with pets and kids. Vintage Persian-style rugs with deep reds and blues look particularly stunning against brown wood cabinets.
Final Checklist
Before you finalize your decor plan for your kitchen, run through this list to ensure you have hit all the functional and aesthetic marks.
- Undertone Check: Have you identified if your wood is warm (orange/red/yellow) or cool (ash/walnut)?
- Paint Sample Test: Did you test paint samples vertically next to the wood, observing them at different times of day?
- Lighting Audit: Are all your bulbs 3000K? Have you added under-cabinet lighting?
- Hardware Scale: Is your new hardware substantial enough? Did you measure the drill centers to ensure they fit existing holes?
- Texture Balance: Do you have a mix of materials (wood, stone, metal, glass, textiles) to prevent the room from looking flat?
- Rug Safety: Does your kitchen runner have a non-slip pad underneath?
FAQs
Can I mix metal finishes in a kitchen with brown cabinets?
Yes, absolutely. Mixing metals adds depth. A foolproof combo is matte black for lower cabinet pulls and polished nickel for faucets and pendants. Just keep the black as the grounding element. Avoid mixing more than two distinct metal finishes.
Are brown cabinets considered outdated?
No. While “builder-grade” orange oak from the 90s is often considered dated, natural wood cabinetry is a timeless staple of high-end design. The trend has moved away from high-gloss lacquers toward matte, natural finishes that show the grain.
What color appliances work best with brown cabinets?
Stainless steel is the universal standard and works well because it reflects light. However, “panel-ready” appliances (where the appliance is covered in matching wood) are the luxury standard. Avoid black appliances with dark brown cabinets unless you have immense natural light, as it creates a “black hole” effect.
How do I make my small kitchen with brown cabinets look bigger?
Focus on the walls and backsplash. Keep the backsplash light and reflective (glossy tile). Keep wall colors light but warm. Minimize countertop clutter to keep sightlines open. Use glass-front doors on upper cabinets if possible to add depth.
Conclusion
Decorating a kitchen with brown cabinets is about embracing the natural beauty of the material while curating the environment around it. You do not need to paint over quality wood to have a stylish home. By managing the lighting temperature, choosing the right contrasting metals, and selecting a countertop that bridges the gap between old and new, you can create a space that feels grounded and sophisticated.
Remember that wood brings a warmth that painted cabinets can rarely emulate. Whether your style is rustic, mid-century modern, or transitional, your brown cabinets are a versatile foundation. Trust your eye, test your materials in your specific lighting, and enjoy the process of bringing your kitchen to life.
Picture Gallery
(LEAVE EMPTY, DO NOT ADD ANY TEXT HERE WHATSOEVER)


