
How To Make A Pottery Barn Bed: Luxury Bedding DIY
Introduction
There is a distinct feeling you get when you walk into a high-end home store or flip through a seasonal catalog. The beds look impossibly inviting, like fluffy clouds that have been sculpted specifically for relaxation. For years, my clients have asked me why their bedrooms don’t look quite “finished” despite buying expensive furniture.
The secret isn’t usually the bed frame itself; it is entirely in the styling, the layering, and the specific volume of the soft goods. I recall a project in a San Francisco apartment where the client had a simple metal frame and a modest budget. By investing in the right inserts and mastering the “fold and tuck,” we transformed that basic frame into the focal point of the room.
It comes down to a formula of texture, scale, and very specific layering techniques that anyone can replicate at home. For a visual guide on these layering techniques, be sure to check out the Picture Gallery at the end of this blog post.
Step 1: The Foundation and The Loft
The biggest mistake I see homeowners make is assuming the “fluffiness” comes solely from the top comforter. In reality, a luxury bed starts immediately on top of the mattress. In my designs, I always specify a high-loft mattress pad or a featherbed topper.
A standard mattress protector is thin and purely functional, designed only to stop spills. To achieve the catalog look, you need a topper that adds about two to three inches of crown to the mattress. This ensures that when you pull your fitted sheet tight, the bed looks domed and plush rather than flat and rectangular.
When selecting your sheets, fit is paramount. If you have a deep mattress (over 14 inches) plus a 3-inch topper, standard sheets will pop off the corners. Always check the pocket depth on the packaging. You generally want a fitted sheet that is at least two inches deeper than your combined mattress and topper height to ensure a smooth, drum-tight foundation.
Choosing Your Sheet Material
- Percale: This is a plain weave that feels crisp and cool, like a classic hotel sheet. It has a matte finish and wrinkles easily, which contributes to a relaxed, casual aesthetic.
- Sateen: This weave places more threads on the surface, resulting in a silky feel and a slight sheen. It drapes heavily and resists wrinkles better than percale, giving a more polished, formal look.
- Belgian Linen: The quintessential “Pottery Barn” look usually involves linen. It has a distinctive texture that looks better with age. It is naturally temperature-regulating but requires you to embrace a bit of rumpled imperfection.
Step 2: The Duvet “Double Stuff” Technique
If there is one takeaway you get from this guide, let it be this section. The flat, sad-looking bed is almost always the result of a duvet insert that is too small or too thin for the cover. Retail photos often use a technique we call “double stuffing.”
This simply means putting two medium-weight duvet inserts inside a single duvet cover. This creates that massive, marshmallow-like loft that looks incredibly luxurious. If two inserts feel too hot for your climate, the alternative is sizing up.
The Sizing Rule
Always buy a duvet insert that is at least two to four inches larger in both dimensions than your duvet cover. If your duvet cover is 90″ x 92″, you want an insert that is 94″ x 96″ or larger. This forces the insert to compress slightly inside the cover, pushing out the corners and preventing those floppy, empty edges.
Fill Power Matters
When shopping for inserts, look at “fill power,” which measures the fluffiness of the down.
- 500-600 Fill Power: Good for guest rooms or warmer climates; less lofty.
- 700+ Fill Power: This is where you get the luxury look. It traps more air and creates a higher puff without necessarily adding heavy weight.
Step 3: Calculating Pillow Arrangements by Bed Size
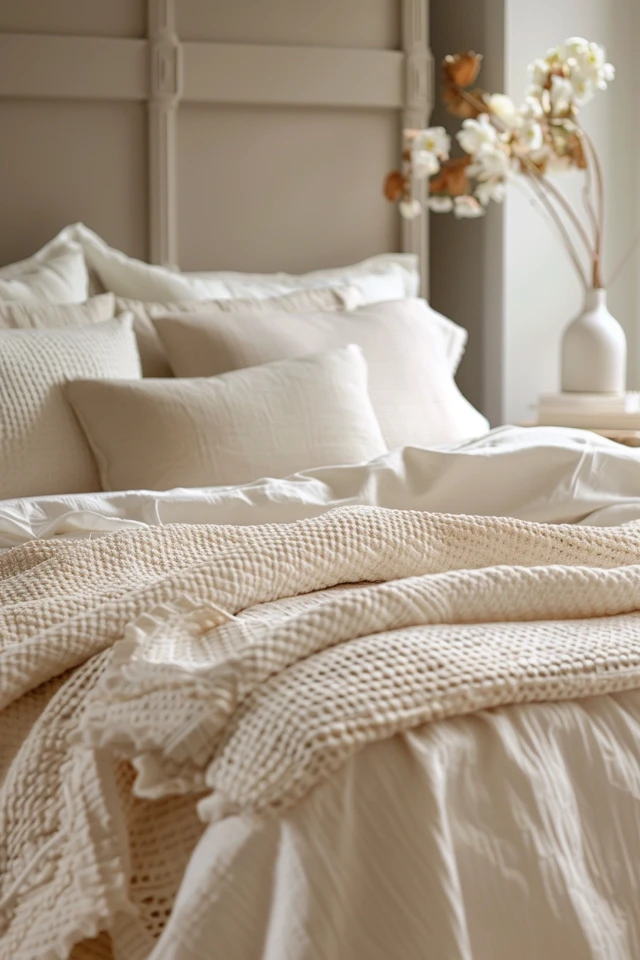
Scale is critical in interior design. A common issue is using standard pillows on a King bed, which leaves too much empty space and makes the furniture look cheap. You need to build a vertical hierarchy against your headboard.
We start with the “reading layer,” usually Euro Shams (26″ x 26″ squares). These provide height and hide the sleeping pillows during the day. They should lean against the headboard, standing almost completely vertical.
The Formula for King Beds
- Back Layer: Three Euro Shams (26×26). Three fits perfectly across a standard Eastern King (76″ wide).
- Middle Layer: Two King-sized sleeping pillows (20×36) in shams that match the sheets or duvet.
- Front Layer: One to three decorative throw pillows. A single extra-long lumbar (14×36 or longer) creates a modern, clean look.
The Formula for Queen Beds
- Back Layer: Two Euro Shams (26×26). Do not try to squeeze three here; it will look cluttered.
- Middle Layer: Two Standard or Queen sleeping pillows (20×30).
- Front Layer: Two smaller 20-inch decorative squares or one medium lumbar.
Designer’s Note: The Karate Chop
You have likely seen the “chop” in the center of throw pillows. This is done to prove the pillow has a feather or down insert rather than a stiff poly-fill. However, don’t overdo it. A soft, gentle indentation looks high-end. A violent, deep V-shape looks forced and dated.
Step 4: The Art of the Fold
A catalog bed is never pulled all the way up to the headboard. That looks stiff and hides the layers you just invested in. We style beds to look “unmade-made,” suggesting that someone just hopped out or is about to hop in.
First, pull your flat sheet all the way to the head of the bed (pattern side down, if there is a pattern). Then, place your duvet on top. Now, fold both the duvet and the flat sheet back about one-third of the way down the bed. This exposes the beautiful fitted sheet and creates a thick, fluffy roll at the turnover.
The Accordion Fold
For the duvet specifically, I often use an accordion fold at the foot of the bed. Instead of just pulling it flat, fold the duvet in a “Z” shape at the bottom third. This triples the thickness of the duvet at the foot of the bed, creating a substantial visual anchor.
This technique is excellent for breaking up large blocks of color. If you have a white duvet and white sheets, the shadows created by these deep folds add necessary visual interest so the bed doesn’t look like a sterile white block.
Step 5: Texture and the “Third Piece”
Interior design relies heavily on the “rule of three” and contrast. If your sheets are smooth cotton and your duvet is smooth cotton, the bed will look flat. You need a third texture to introduce warmth and dimension.
This is usually achieved with a quilt, coverlet, or chunky knit throw. This layer serves a functional purpose for naps but is primarily aesthetic. I like to use a material that contrasts with the main bedding.
Material Combinations That Work
- Crisp Percale Sheets + Linen Duvet + Velvet Quilt: This offers a mix of matte, textured, and shiny finishes.
- Sateen Sheets + Cotton Waffle Weave Duvet + Faux Fur Throw: Great for winter; the fur adds organic softness against the geometric waffle pattern.
- Linen Sheets + Linen Duvet + Chunky Wool Knit: A monochromatic textural look that feels very organic and coastal.
Placement Rules
Drape your throw blanket casually across the corner of the foot of the bed. Avoid folding it into a perfect square; that looks too military. Pick it up by the center, drop it on the corner, and gently arrange the edges so they cascade naturally.
Designer’s Note: Real World Lessons
In my practice, the most common complaint I get after styling a bed is, “It takes too long to make in the morning.” This is a valid concern. The setup I described above is the “full dress” version.
What usually goes wrong: Clients buy too many decorative throw pillows (5+), get annoyed moving them every night, and eventually stack them in a corner on the floor where they collect dust.
How to prevent it: Be realistic about your lifestyle. If you are a busy parent, skip the decorative throw pillows entirely. Rely on two beautiful Euro shams and a high-quality textured duvet. The bed will still look luxurious because of the materials, but you only have to fluff two large pillows in the morning.
Common Mistakes + Fixes
Mistake 1: Matching Everything
The Issue: Buying a “bed in a bag” set where the sheets, shams, duvet, and skirt all have the exact same print or color.
The Fix: Break it up. If your duvet is patterned, keep the sheets solid. If your sheets are dark, keep the duvet light. A collected look feels more expensive than a matched set.
Mistake 2: The “Pancake” Pillow
The Issue: Using old, flat sleeping pillows inside decorative shams. The fabric hangs loose and looks messy.
The Fix: Use dedicated pillow inserts for your shams, not the pillows you sleep on. Buy inserts that are one size larger than the sham (e.g., a 22″ insert for a 20″ cover).
Mistake 3: Ignoring the Bed Skirt
The Issue: Seeing the metal frame or under-bed storage boxes ruins the illusion of luxury.
The Fix: If you don’t have an upholstered bed frame with side rails, a bed skirt is mandatory. Choose a tailored box-pleat style rather than a ruffled style for a cleaner, modern look. Ensure it just grazes the floor—it shouldn’t pool, and it shouldn’t hover two inches above the carpet.
What I’d Do in a Real Project
If I were walking into your home today with a budget of $800 to makeover your bed, here is exactly how I would spend it, in order of priority:
- The Inserts ($300): I would spend the most here. A high-quality down or down-alternative duvet insert and heavy euro sham inserts are the engine of the bed. You cannot fake this volume.
- The Touch Points ($250): I would buy 100% linen or long-staple cotton sheets. You feel these against your skin every night. White or off-white is the most versatile choice.
- The Euro Shams ($150): I would choose a heavy texture like velvet or a thick linen weave in a grounding color (navy, charcoal, or camel).
- The Throw ($100): I would find a large, textured blanket for the foot of the bed to hide any imperfections in the duvet folding.
Final Checklist
Use this daily checklist to maintain the look:
- Shake the duvet: Hold it by the bottom corners and give it a hard shake to redistribute the down.
- Pull tight: Ensure the bottom sheet is smooth.
- Vertical Euros: Stand the back pillows up straight; do not lean them back too far.
- The Fold: Fold the top third of the duvet back to expose the sheets.
- The Chop: Give the front decorative pillows a gentle chop.
FAQs
Does thread count actually matter?
Not as much as marketing suggests. A 300-thread count sheet made of high-quality “long-staple” cotton will feel softer and last longer than a 1,000-thread count sheet made of cheap short fibers twisted together. Focus on the fiber quality (Egyptian, Pima, or Supima cotton) rather than just the number.
How do I keep the duvet insert from shifting inside the cover?
Most quality duvet covers have ties in the interior corners. You must tie these to the loops on your duvet insert. If your insert doesn’t have loops, you can buy simple magnetic clips or padded duvet clips online that hold the corners in place from the inside.
Can I get this look with a platform bed?
Absolutely. Platform beds are actually easier to style because you don’t need a bed skirt. However, because the mattress sits lower, you must be careful not to use Euro shams that are too tall, or they might cover your entire headboard. If you have a low, modern headboard, consider using standard shams as your back layer instead of Euros.
How do I get wrinkles out of linen without ironing?
I never iron sheets; life is too short. Instead, I use a handheld steamer. Make the bed completely, then run the steamer over the top layer of the duvet and the pillowcases. The tension of the fabric on the bed makes the wrinkles fall out quickly. Alternatively, spray a fine mist of tap water over the bed and pull it taut; as it dries, it will smooth out.
Conclusion
Creating a Pottery Barn-style bed is less about buying the most expensive items and more about understanding the mechanics of comfort. It is about layering varying weights, mixing textures, and ensuring your inserts are large enough to fill out the fabrics.
Start with a solid foundation, invest in good inserts, and don’t be afraid to mix linen with velvet or cotton with fur. Your bedroom is the sanctuary where you start and end your day; it deserves to be the most comfortable spot in your home. By following these steps, you achieve that perfect balance of polished and inviting—a bed that looks beautiful but, more importantly, feels incredible to sleep in.
Picture Gallery


