
How To Organize A Deep Bathroom Drawer: Efficient Storage Tricks
Deep bathroom drawers are often viewed as a luxury until you actually have to use one. Without a proper system, these cavernous spaces quickly turn into a cluttered “black hole” where hair ties, half-used lotion bottles, and spare toothpaste disappear into the abyss. Most homeowners struggle to find a balance between maximizing the cubic volume of the drawer and maintaining easy access to daily essentials.
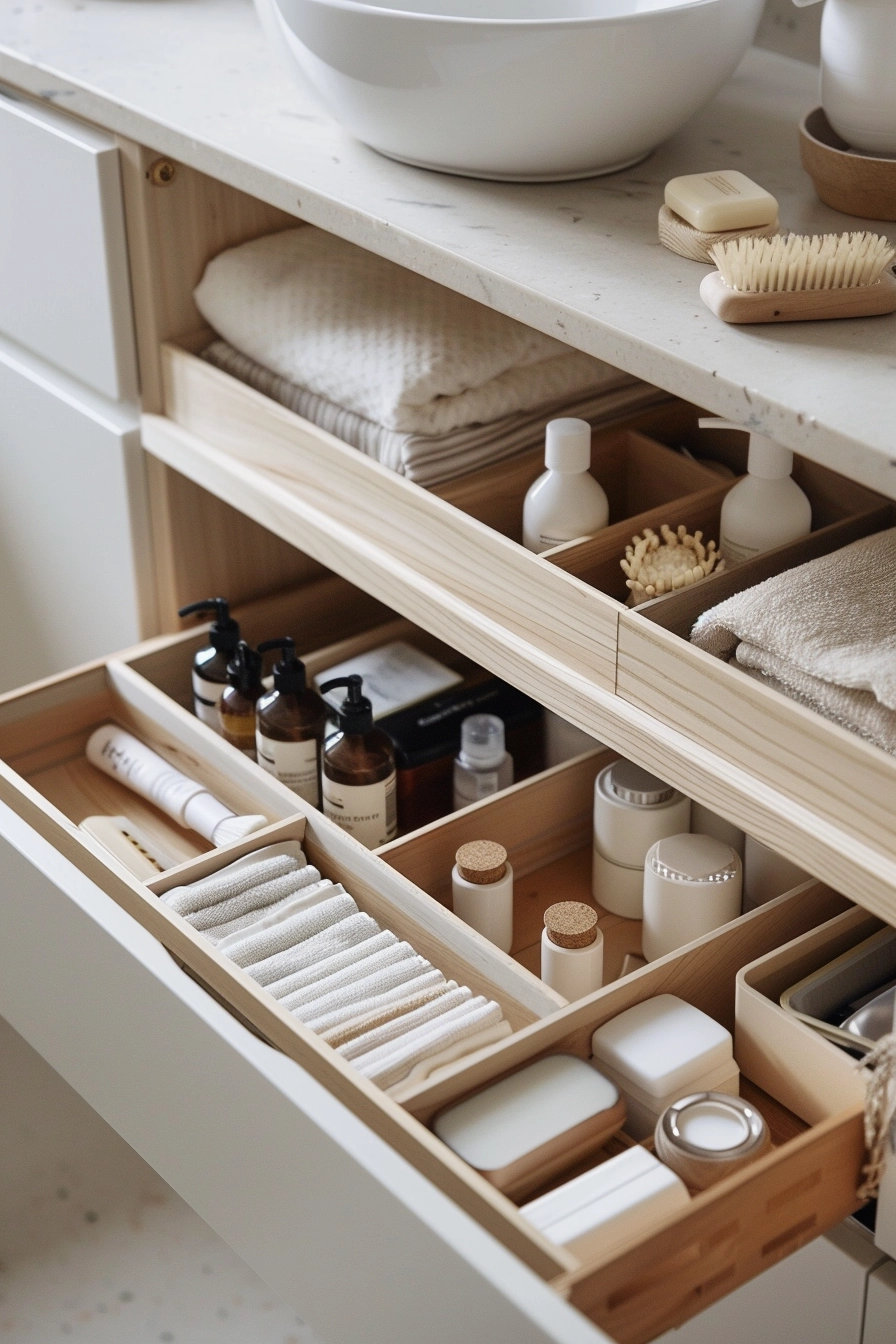
The secret to mastering these oversized spaces is to stop thinking about the drawer as a flat surface and start treating it like a vertical storage unit. If you are looking for visual inspiration to transform your chaotic vanity, you will find a curated Picture Gallery at the end of this blog post. By implementing a few designer-level strategies, you can turn a frustrating pit into a highly functional, tiered organization system that saves you time every single morning.
At-a-Glance: Key Takeaways
- Embrace Verticality: Deep drawers require stacking or tiered systems to utilize the empty air space effectively.
- Measure Twice: Always measure the interior height, width, and depth, accounting for the drawer glides and the cabinet frame.
- Prioritize Access: Place items you use every day in the top layer or front section, reserving the bottom for backstock.
- Transparency is Key: Use clear acrylic or mesh bins so you can see what is at the bottom of a stack without digging.
- Non-Slip Solutions: Line your drawers to prevent bins from sliding every time you open and close the vanity.
What This Style/Idea Means (and Who It’s For)
Deep drawer organization is a method of “Vertical Zoning.” In traditional interior design, we often focus on the floor plan or the “footprint” of a room, but in a small space like a bathroom, the “z-axis” (height) is where the real potential lies. This approach is less about aesthetic minimalism and more about functional efficiency. It is for anyone who feels like their current vanity is wasting space while their countertops remain cluttered.
This organizational style is particularly beneficial for renters who cannot install permanent shelving or pull-out hardware. It is also a lifesaver for families sharing a single vanity, as it allows for multiple levels of storage for different family members within one footprint. If you have “tall” items like hairspray cans, tall bottles of mouthwash, or standing hair tools, deep drawers are actually your best friend—you just need the right framework to keep them upright and accessible.
For the busy professional or the parent on the go, this system is about reducing “friction.” Friction is that extra three seconds it takes to move a pile of towels to find your razor. Over the course of a year, eliminating that friction saves hours of time and reduces morning stress. This style is for the person who values a “place for everything” and wants to maintain a clear, spa-like atmosphere on their bathroom counters.
The Signature Look: Ingredients That Make It Work
To achieve a professional, organized look in a deep drawer, you need a specific set of tools. It is not just about throwing in a few plastic bins; it is about creating a cohesive system that feels built-in. Here are the essential ingredients:
- Stackable Acrylic Bins: These are the gold standard for deep drawers. They allow you to see through the sides to the bottom layer. Look for versions with small “feet” that lock into the bin below to prevent shifting.
- Expandable Drawer Dividers: These work like tension rods for your drawers. They create long vertical channels for tall items like hairbrushes or styling tools, preventing them from falling over.
- Tiered “Stadium” Organizers: These are often used for spices, but in a bathroom drawer, they allow you to see the labels of smaller skincare jars at the back of the drawer.
- Silicone or Rubber Liners: A high-quality, non-adhesive liner provides grip. Without this, your beautifully organized bins will slam into the back of the drawer every time you open it.
- Labeling System: Whether you use a label maker or hand-written tags, labeling the front of stacked bins is crucial for knowing what is inside the bottom layer without lifting the top one.
- Uniform Color Palette: To make the drawer look “designer,” stick to one material. Use all bamboo, all clear acrylic, or all white mesh. Mixing materials often looks cluttered regardless of how organized the items are.
Layout & Proportions (Designer Rules of Thumb)
When I design a custom vanity, I follow specific rules regarding proportions to ensure the space is usable. For a deep drawer—usually defined as anything over 8 inches in height—you must consider the “Golden Ratio” of accessibility. Here are the rules of thumb I use in my projects:
The 2-Inch Clearance Rule: Never fill a drawer or a bin to the absolute top edge. Always leave at least 1.5 to 2 inches of clearance between the top of your items and the drawer opening above. This prevents “jamming” and allows you to reach in and grab things without scraping your knuckles.
The 80/20 Vertical Split: In a deep drawer, the top 20% of the space is the most valuable. This is where your daily “reach-for” items go (toothbrush, face wash, deodorant). The bottom 80% is for items used once a week or backstock items like extra rolls of toilet paper or bulk soaps.
Standard Measurements for Reference:
- Typical Deep Vanity Drawer: 9 to 12 inches high.
- Standard Acrylic Bin Heights: 2 inches, 4 inches, or 6 inches.
- Ideal Stack: One 4-inch bin on the bottom for backstock, topped with a 3-inch tray for daily items. This leaves about 2-3 inches of “air” at the top for easy movement.
Spacing and Weight: If your drawer is wider than 18 inches, place the heaviest items (large bottles of shampoo or gallon-sized refills) toward the back and the sides. This protects the drawer glides from premature wear and makes the drawer feel more balanced when you pull it out.
Designer’s Note: One of the most common mistakes I see in high-end renovations is forgetting to account for the “internal” height versus the “face” height. The wooden face of your drawer might be 10 inches tall, but the actual box inside might only be 6 inches tall. Always measure the height of the interior side-walls before buying your bins, or you’ll find that your tall organizers prevent the drawer from closing because they hit the cabinet frame!
Step-by-Step: How to Recreate This Look
Follow this systematic approach to transform your deep drawer from a chaotic mess into a designer-grade storage hub.
- The Great Purge: Empty the entire drawer. Lay everything out on the counter. If you haven’t used it in six months, or if it is an expired medication or crusty old nail polish, toss it. You cannot organize clutter; you can only manage it.
- Categorize by Height and Frequency: Group your items. Put all tall bottles together, all small makeup compacts together, and all “backstock” (extra supplies) together. This tells you what kind of bins you actually need.
- The Critical Measurement: Measure the interior width, depth, and height of the drawer box. Then, measure the clearance height (the distance from the bottom of the drawer to the top of the cabinet opening). Write these down.
- Layout Mockup: Before buying bins, use painter’s tape to mark out the dimensions of your drawer on your counter. Place your items within that tape “box” to see how they fit. This prevents you from over-buying organizers.
- Install the Liner: Wipe out the drawer with a damp cloth and a mild cleaner. Once dry, cut and install a non-slip liner. This is the foundation of your system.
- Layering the Bottom: Place your deepest bins at the very back of the drawer. Fill these with items you rarely need, like first aid supplies or travel-sized toiletries.
- Adding the “Upper Deck”: Use stackable bins or a sliding tray system. The items you use every morning should be in the most accessible spot (usually the front-right for right-handed people).
- The Tall Zone: Dedicate one side of the drawer to tall items. Use a tension divider to keep hairspray, dry shampoo, and tall lotions upright so they don’t roll around and cause a domino effect.
- Final Labeling: Add labels to the edge of the bins. Even if you think you’ll remember where the extra toothpaste is, labels help houseguests and family members maintain the system you’ve built.
Budget Breakdown: Low / Mid / Splurge
You can achieve a high-functioning drawer regardless of your budget. The key is choosing the right materials for your price point.
Low Budget ($20 – $50):
Focus on repurposed items and basic plastic bins. You can use clean shoe boxes (without lids) or sturdy cardboard boxes covered in contact paper. Discount stores often sell basic white plastic baskets in various sizes. Use “museum putty” or Blu-Tack on the bottom of the bins to keep them from sliding if you can’t afford a full liner. Focus on function over uniformity here.
Mid Budget ($60 – $150):
This is the “sweet spot” for most homeowners. Invest in a set of clear, high-quality acrylic bins from a specialized storage retailer. These often come in modular sizes that fit together like a puzzle. You can also add a few expandable bamboo dividers. This budget allows for a cohesive look where all bins match, creating a high-end feel every time you open the drawer.
Splurge ($200+):
At this level, you are looking at custom-fitted wood inserts or high-end adjustable metal systems. You might choose heavy-duty glass containers with bamboo lids or custom-milled drawer inserts that perfectly match your vanity’s wood species. This budget also allows for professional labeling and perhaps even motion-activated LED lighting strips installed inside the drawer so you can see every corner perfectly.
Common Mistakes (and How to Fix Them)
Even with the best intentions, organizing a deep drawer can go wrong. Here are the pitfalls I see most often and how to correct them.
- The Mistake: Buying a “Set” of Organizers. Pre-packaged sets rarely fit a drawer perfectly, leaving awkward gaps where items fall and get stuck.
The Fix: Buy individual bins based on your specific measurements. Aim for a “wall-to-wall” fit so the bins lock each other into place.
- The Mistake: Ignoring Humidity. Using unfinished wood or cardboard in a bathroom with a shower can lead to mold or warping.
The Fix: Use moisture-resistant materials like acrylic, treated bamboo, or powder-coated metal.
- The Mistake: Stacking Too High. If you have to move three bins to get to the one on the bottom, you will eventually stop putting things back where they belong.
The Fix: Limit stacking to two layers. If you have more stuff than that, it’s time for another purge.
- The Mistake: Forgetting the “Tall Items.” People often buy many small bins and realize they have nowhere for their 10-inch bottle of hairspray.
The Fix: Always leave a “Tall Zone” with a divider or a deep, narrow bin specifically for vertical items.
Room-by-Room Variations
While we are focusing on the bathroom, the “deep drawer” logic applies to different types of bathrooms differently.
The Primary Suite:
Here, the focus is on daily routines. Use dedicated zones for skincare, hair care, and dental hygiene. Consider a “his and hers” split if the drawer is wide enough. This is the place to use the “Upper Deck” for those expensive serums and the bottom for bulk-buy items from your favorite warehouse store.
The Kids’ Bathroom:
Durability and safety are the priorities. Avoid glass containers. Use brightly colored, unbreakable plastic bins. Label them with pictures if the children are young (e.g., a picture of a toothbrush). Keep “dangerous” items like razors or medicines in a locked bin at the very back-bottom of the drawer, out of easy reach.
The Guest Bathroom:
Guests shouldn’t have to hunt for what they need. Use open-top bins for “essentials” (new toothbrushes, travel toothpaste, extra soap). Don’t stack bins here; a guest will feel uncomfortable digging through your layers. Keep it simple, clear, and one-layered if possible, even if it means leaving some vertical space empty.
Finish & Styling Checklist
A designer drawer should look as good as it functions. Use this checklist to add the final “styling” touches to your project.
- Coordinate Hardware: If your drawer pulls are brass, consider using bins with brass accents or labels with gold lettering.
- Scent Control: Tuck a small cedar block or a scented sachet into the “backstock” layer to keep the drawer smelling fresh.
- The “Gap” Test: If there is a small 1-inch gap between your bins and the drawer wall, fill it with a rolled-up washcloth or a spare sponge to keep everything tight.
- Decant if Necessary: For a truly high-end look, move products from mismatched plastic bottles into uniform glass or high-quality plastic dispensers. (Note: Only do this for items you use frequently).
- What I’d do in a real project: I always install a piece of “heavy-duty” grip liner and then use a small amount of clear mounting tape on the corners of the bins. This ensures that even if a client pulls the drawer out aggressively, the organization remains perfectly intact.
FAQs
How do I keep tall bottles from falling over when I open the drawer?
The best solution is a tension-style drawer divider. Place it about 3 to 4 inches from the side wall of the drawer to create a “sleeve” that keeps bottles upright. Alternatively, use a heavy-duty acrylic bin that is at least half as tall as the bottles themselves.
What is the best material for bathroom organizers?
Clear acrylic (specifically high-grade PETG or Polystyrene) is the best choice. It is water-resistant, easy to clean with soap and water, and allows light to pass through, which helps you see into the depths of the drawer.
Should I use a “junk drawer” bin in the bathroom?
Ideally, no. In a bathroom, “junk” usually means expired samples or broken hair ties. Instead of a junk bin, create a “Miscellaneous” bin that is strictly for items that don’t fit elsewhere, like a thermometer or a lint roller, and audit it once a month.
How do I organize a drawer that has a pipe cutout (U-shaped)?
U-shaped drawers are common under sinks. The best approach is to use two long, narrow bins on the sides and very small, modular square bins in the front. Ignore the “back” center area where the pipe is, as it’s too difficult to reach safely without hitting the plumbing.
Can I use kitchen organizers in the bathroom?
Absolutely. Many “cutlery” trays are perfect for toothbrushes and makeup brushes. “Spice” tiers are great for nail polishes. Just ensure the material can handle the humidity of a bathroom.
Conclusion
Organizing a deep bathroom drawer is an investment in your daily peace of mind. By shifting your perspective from horizontal to vertical, you unlock a massive amount of storage potential that most people leave untapped. Remember to measure the interior clearance, prioritize your daily items in the “hot zone” at the top-front, and use transparent materials to keep your inventory visible. With a little planning and the right set of bins, that “black hole” under your sink can become the most organized spot in your home.
Picture Gallery


