
Industrial Design Bathrooms: Modern Chic Trends
When most people hear “industrial design,” they immediately picture cold warehouses, rusty pipes, and drafty windows. My goal as a designer is always to shift that perspective toward what industrial style actually offers: durability, honesty in materials, and a surprising amount of warmth.
I remember a project I worked on in a converted factory building downtown. The client was terrified that an industrial bathroom would feel like a public locker room. We managed to create a space that felt high-end and spa-like by balancing raw concrete with warm timber and brass, proving that “edgy” doesn’t have to mean uncomfortable.
If you are looking for visual inspiration, check out our full Picture Gallery at the end of the blog post.
1. The Foundation: Walls, Floors, and Raw Materials
The backbone of any industrial bathroom is the shell. In traditional design, we often try to hide the construction materials, but here, we celebrate them. However, in a bathroom specifically, porosity is your enemy.
Concrete and Microcement
Concrete is the quintessential industrial material. For bathroom floors or walls, I often recommend microcement rather than poured concrete slabs.
Microcement is thinner, lighter, and easier to waterproof. It gives you that seamless, grout-free look that makes small bathrooms feel larger.
Designer’s Note: Real concrete is porous and stains easily from oils and soaps. If you pour a real concrete floor, you must seal it with a high-grade penetrating sealer immediately. Re-seal it every 12 to 18 months.
Slip Resistance: Polished concrete is dangerous when wet. Always ask your contractor for a “honed” finish or add a non-slip additive to the final topcoat.
Exposed Brick
If you are lucky enough to have existing brick, keep it. It adds instant texture and history.
However, raw brick in a moist environment is a mold magnet. You must use a matte masonry sealer. This prevents moisture from seeping into the clay without making the wall look shiny or plastic.
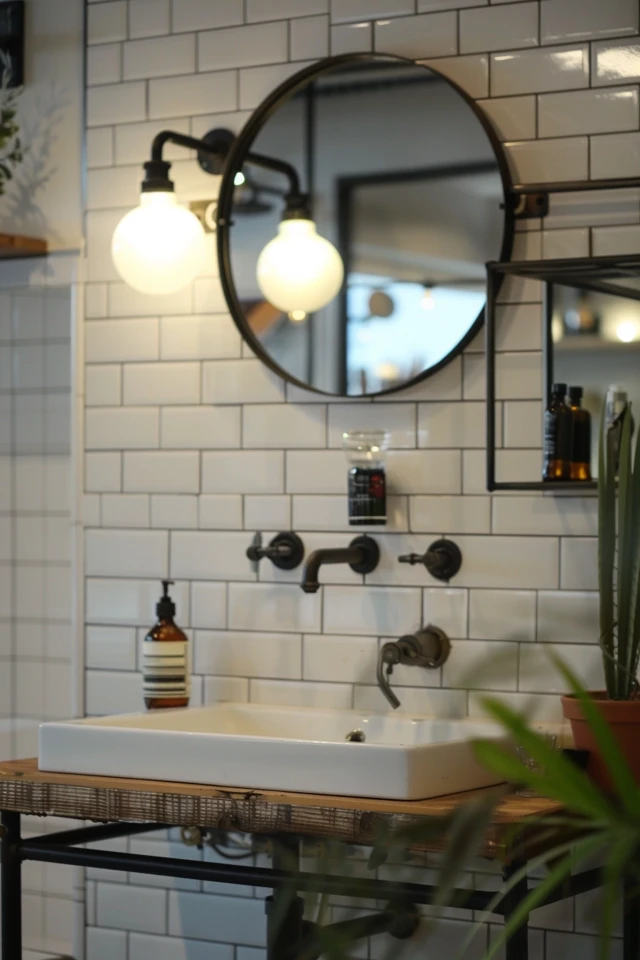
Subway Tile: The Classic Alternative
Not everyone has a loft with brick walls. The most authentic and budget-friendly alternative is standard white ceramic subway tile (3×6 inches).
To make it industrial, use a dark gray or charcoal grout. This highlights the grid pattern and is infinitely easier to keep clean than white grout.
2. The Hardware: Plumbing and Metals
In an industrial bathroom, the plumbing isn’t just functional; it is the decor. We want to see the “guts” of the room.
Exposed Plumbing
Exposing the P-trap (the U-shaped pipe under the sink) is a great move if you are using a wall-mounted or console sink.
However, you have to buy a decorative P-trap. Standard white PVC pipes look unfinished, not industrial. Look for plated brass or matte black kits specifically designed to be seen.
Mixing Metals
A common question I get is whether you can mix metal finishes. The answer is yes, but you need a hierarchy.
Dominant Metal (70%): Usually matte black (faucets, shower frame, door hardware).
Accent Metal (30%): Aged brass or brushed copper (light fixtures, mirror frame).
Common Mistakes + Fixes
The Mistake: Using shiny chrome everywhere. While chrome is durable, it often reads as “builder-grade” rather than industrial chic.
The Fix: Swap chrome for brushed nickel or oil-rubbed bronze. If you must use chrome, pair it with very rough textures like raw wood to dull the shine.
3. Lighting: Illuminating the Factory Vibe
Lighting in an industrial bathroom needs to be practical for grooming but ambient enough to relax. We often use fixtures that look like they were salvaged from a 1920s naval ship or a factory floor.
Sconce Placement and Height
The biggest error I see in DIY bathrooms is placing lighting above the mirror. This casts shadows under your eyes and nose.
For the best grooming light, place sconces on either side of the mirror. The center of the light bulb should be roughly 60 to 66 inches from the finished floor. This aligns with the average person’s eye level.
Bulb Selection
Industrial fixtures often expose the bulb. You might be tempted to use “Edison” style filament bulbs.
Be careful here. Vintage incandescent Edison bulbs put off a very yellow, dim light (around 2200K). This is terrible for applying makeup or shaving.
Look for LED Edison-style bulbs that are rated at 2700K (warm white) or 3000K (bright white) with a high lumen output (at least 800 lumens). You get the look without the gloom.
Grid Glass and Cages
Wire cages around bulbs are a staple of this style. They add great texture. Just ensure the cage doesn’t block too much light output.
Safety Ratings
Designer’s Note: Never buy a vintage light from a flea market and install it directly into a bathroom without rewiring. Bathrooms have strict electrical codes. Ensure your fixtures are “damp rated” for general areas and “wet rated” if they are inside the shower zone.
4. The Enclosure: Glass and Grids
The shower enclosure is usually the largest visual element in the room. In modern chic industrial design, the black grid shower screen (Crittall style) is king.
The Grid Glass Trend
These are framed glass panels with black aluminum or steel grids. They act as a piece of art and frame the shower area beautifully.
Maintenance Reality Check
I always warn my clients about the cleaning aspect. If the grid is raised on the inside of the shower, you will hate cleaning soap scum off of 12 individual window panes.
The Solution: Buy a screen where the black grid is printed within the glass or applied only to the outside. The inside surface should be one smooth sheet of glass for easy squeegeeing.
Open Wet Rooms
Industrial bathrooms often favor a “wet room” layout where there is no curb to step over into the shower. The floor tiles run seamlessly from the vanity to the drain.
This requires excellent drainage planning. You need a linear drain and a floor slope of at least 1/4 inch per foot toward the drain to prevent pooling water.
5. Warming It Up: Softening the Edges
This is where the “Chic” part of the title comes in. If you only use concrete, steel, and white tile, your bathroom will feel sterile. You must introduce organic elements to create balance.
Timber Elements
Wood is the perfect counterpoint to metal. I love using a reclaimed wood vanity or thick floating wood shelves above the toilet.
If you are using real wood, look for Teak or White Oak. These species handle humidity better than softwoods like Pine. Always ensure the wood is sealed with a marine-grade varnish or a high-quality polyurethane.
Textiles
Don’t underestimate the power of towels and rugs. In an industrial space, I avoid fluffy, high-pile rugs.
Instead, look for flat-weave Turkish towels or waffle-weave textures. For rugs, a faded vintage runner or a jute-blend mat adds necessary texture.
Greenery
Plants breathe life into industrial spaces. The stark contrast between a green leaf and a gray concrete wall is stunning.
Bathrooms often have low light and high humidity. My go-to plants for these conditions are:
Snake Plant (Sansevieria): Indestructible and vertical.
ZZ Plant: Thrives in low light.
Pothos: Great for trailing off a high shelf.
Final Checklist: What I’d Do in a Real Project
If I were designing your industrial bathroom today, here is the exact workflow I would follow to ensure success.
1. Function First
- Check the plumbing locations. Moving a toilet can cost \$2,000+. Can we keep the layout?
- Determine who uses the room. If it’s for kids, skip the open vanity; you need closed storage for bath toys.
2. Select the “Hero” Material
- Pick one dominant feature. Is it a brick wall? A concrete floor? A steel shower door?
- Don’t try to do all three. If you have a brick wall, keep the floor simple tile.
3. Choose the Vanity
- I would source a wood vanity to add warmth.
- Ensure the countertop is durable (Quartz that looks like concrete is better than real concrete for counters).
4. Lighting Plan
- Plan for layers. Recessed cans for general cleaning, sconces for grooming, and maybe a subtle LED strip under the vanity for a nightlight.
- Select matte black fixtures.
5. The “Touch” Test
- Before buying, touch the hardware. Industrial handles should feel heavy and substantial, not hollow.
- Knurled brass or textured black metal adds a tactile luxury.
FAQs
Is an industrial bathroom expensive to build?
It can be, but it doesn’t have to be. Leaving pipes exposed can actually save on drywall and carpentry labor. However, finishes like authentic steel shower doors are pricey. You can save money by using ceramic tile that looks like concrete or brick rather than the real thing.
How do I make a small bathroom look industrial without it feeling dark?
Light colors are key. Use white subway tiles floor-to-ceiling to bounce light. Use a glass shower partition instead of a curtain to open up the sightlines. Stick to lighter gray grout rather than black.
Can I use industrial design in a rental?
Absolutely. You can’t change the tiles, but you can swap the mirror for a black metal framed one. You can install open shelving brackets. You can also swap out the cabinet hardware for matte black pulls. Just keep the old parts to reinstall when you move out.
Is this trend going out of style?
“Hard” industrial (rusty gears and steampunk vibes) is out. However, “Soft” industrial (clean lines, black metal, wood, and concrete) is effectively a modern classic. It is functional and neutral, which gives it longevity.
Conclusion
Designing an industrial bathroom is about finding beauty in utility. It is about stripping back the layers of a room to reveal its honest structure, and then layering back just enough comfort to make it livable.
Don’t be afraid of dark colors or raw textures. When paired with the right lighting and a few organic touches, these spaces become incredibly grounding and serene. It is a style that handles the mess of everyday life beautifully—because it was built to work.
Picture Gallery


