
Title: Innovative Downspout Drainage Tips for Your Home
Introduction
As an interior designer, I often tell clients that the most expensive room in their house isn’t the kitchen or the primary suite; it’s the one they have to renovate twice because of water damage. There is nothing more heartbreaking than walking into a beautifully finished basement or a living room with new hardwood floors, only to find warping and mold caused by poor exterior drainage. If you are looking for visual inspiration, don’t miss the Picture Gallery at the end of the blog post.
We often ignore downspouts until a storm hits, viewing them as purely utilitarian eyesores attached to the side of our homes. However, proper water management is critical to protecting your interior finishes, foundation, and landscape investments.
In this guide, we are going to move beyond the ugly plastic splash block. I want to show you how to treat drainage as a design opportunity, blending functionality with curb appeal to keep your home dry and beautiful.
1. The Foundation of Flow: Assessing Grade and Distance
Before we buy materials or dig trenches, we have to look at the physics of your property. In design, we call this site analysis; for drainage, it is simply ensuring water moves away from the structure.
The golden rule of thumb for downspout extensions is the “10-foot rule.” You generally want to discharge water at least 6 to 10 feet away from your foundation to prevent hydrostatic pressure from building up against your basement walls.
Designer’s Note:
A common failure I see in renovations is beautiful landscaping that pitches toward the house. Always ensure your “positive grade” slopes away from the home, dropping at least one inch for every foot of distance within the first 6 feet.
Analyzing Your Discharge Zone
Start by walking your perimeter during a light rain to see where the water naturally pools.
- Check the soil type: Clay soil holds water and requires longer extensions, while sandy soil drains faster.
- Identify obstacles: Look for walkways, driveways, or patios that block the natural path of water.
- Measure the drop: Use a string level to ensure you have enough gravity to move the water where you want it.
If you are working with a small lot or tight property lines, you cannot simply dump water onto your neighbor’s yard. You will need vertical solutions or underground diversion, which we will cover next.
2. The Invisible Solution: Underground Piped Extensions
For a clean, modern aesthetic, burying your downspouts is the professional standard. This removes tripping hazards across the lawn and creates a seamless look that highlights your architecture rather than your plumbing.
I recommend using rigid PVC pipe (SDR 35 or Schedule 40) rather than the flexible black corrugated pipe often sold at big-box stores. Flexible pipe traps debris in its ridges, is difficult to clean, and is easily crushed by lawnmowers.
Step-by-Step Installation Basics
This is a labor-intensive project, but it solves drainage issues permanently if done right.
- Dig the trench: Excavate a trench that slopes away from the house at a 1% grade (about 1/8 inch drop per foot).
- Connect the adapter: Use a downspout adapter to transition from the rectangular metal gutter to the 4-inch round PVC pipe.
- Install a cleanout: Install a Y-fitting with a screw-cap access point near the house so you can snake the line if it ever clogs.
- Terminate with a pop-up: End the run with a pop-up emitter in the lawn, which sits flush with the grass when dry and rises to release water when it rains.
Common Mistakes + Fixes:
Mistake: Terminating the pipe into a dry well that is too small for the roof’s square footage.
Fix: Calculate the roof area feeding that specific downspout. If you have a 500-square-foot roof section, a simple 5-gallon bucket dry well won’t suffice; route the water to daylight (an open exit point) whenever possible.
3. The Aesthetic Solution: Dry Creek Beds
If you cannot bury pipes due to tree roots or rocky soil, turn the drainage path into a landscape feature. A dry creek bed is essentially a guided channel lined with stones that directs water while looking like a natural riverbed.
This is my favorite solution for homes with a rustic, cottage, or organic modern aesthetic. It adds texture and visual interest to the yard even when it is bone dry.
Designing the Creek Bed
Scale is everything here; if the rocks are too small, they will wash away in a heavy storm.
- Excavate a swale: Dig a shallow channel about 12 to 18 inches deep and 2 to 3 feet wide, creating a curved, organic path.
- Line with fabric: Use heavy-duty, non-woven landscape fabric to prevent weeds and keep the rocks from sinking into the mud.
- Layer the stone: Place large boulders (12+ inches) on the sides for structure, medium river rock (4-6 inches) in the center, and smaller gravel only in the deepest crevices.
What I’d do in a real project:
I would soften the hard edges of the stone by planting hardy perennials along the banks. Use moisture-loving plants like Hostas, Siberian Irises, or Ferns. This integrates the “drainage ditch” into the garden so it feels intentional, not remedial.
4. Vertical Interest: Rain Chains and Catch Basins
Rain chains are a beautiful alternative to traditional aluminum downspouts, originated from Japanese architecture (known as kusari-doi). They guide water down a series of links or cups, creating a soothing auditory experience during rainfall.
These are best used in specific locations, such as near a front porch or a visible garden corner, rather than for the primary drainage of a massive roof valley. They work best on overhangs that extend at least 2 feet from the wall to prevent splashing on the siding.
Anchoring the Chain
A rain chain must terminate into something to prevent erosion at the foundation.
- Decorative Pots: Use a large, frost-proof ceramic pot filled with river stones. Drill a hole in the bottom so water slowly seeps out away from the house.
- Copper Basins: A hammered copper bowl creates a stunning focal point and develops a lovely verdigris patina over time.
- Gravel Pits: Dig a small square pit (2×2 feet), line it with edging, and fill it with decorative slate chips or white marble stones.
Designer’s Note:
In colder climates with heavy ice and snow, rain chains can freeze into heavy icicles that may damage the gutter. If you live in a freeze zone, consider using detachable clips to swap the chain for a standard downspout during winter months.
5. The Eco-Conscious Solution: Rain Gardens
A rain garden is a depressed area in the landscape designed to collect rain water and allow it to soak into the ground within 24 to 48 hours. This filters runoff and prevents it from overloading municipal storm sewers.
From a design perspective, this creates a lush, wilder zone in your landscaping plan. It is perfect for low spots in the yard where water naturally wants to go anyway.
Building the Basin
The success of a rain garden depends on soil preparation.
- Location: Place the garden at least 10 feet from the foundation to ensure you aren’t inviting water back into the basement.
- Soil Amendment: You need high porosity. Mix your native soil with 30% sand and 20% organic compost to encourage rapid drainage.
- Plant Selection: Choose deep-rooted native plants that can tolerate “wet feet” during storms and drought conditions in between. Coneflowers, Black-eyed Susans, and Joe Pye Weed are excellent choices.
Rental & Budget Constraint Tip:
If you are renting or on a tight budget, you don’t need to excavate a massive garden. Use a “rain barrel” diverter on your downspout. You can buy aesthetically pleasing barrels that look like terracotta urns. They collect water you can use for your container plants, keeping it away from the foundation for free.
Final Checklist: What I’d Do in a Real Project
If I were managing your exterior renovation, this is the checklist I would run through before signing off on the drainage plan.
- Check the Gutters: Ensure gutters are sized correctly (5-inch is standard, but 6-inch is better for heavy flow) and are free of debris.
- Verify Slope: Confirm the ground slopes away from the foundation on all sides, not just where the downspouts are.
- Seal the Gap: Check where the driveway meets the foundation; fill any cracks with high-quality masonry sealant to stop water intrusion.
- Test the System: Run a garden hose into the gutter for 5 minutes. Watch where the water exits. If it pools within 4 feet of the house, extend it immediately.
- Material Match: Ensure the downspout color matches the siding or trim. If it’s ugly, paint it or replace it with copper or zinc for a premium finish.
FAQs
How far should a downspout extend from the house?
Ideally, water should be discharged at least 6 to 10 feet away from the foundation. If you have a crawl space or basement, the further the better. For slab foundations, 4 to 6 feet is often sufficient.
Can I paint my PVC drainage pipes?
Yes, but you should sand them lightly first to help the paint adhere. However, for underground systems, only the small pop-up emitter is visible, which usually comes in green or black to blend with the grass.
Are rain chains suitable for heavy storms?
Rain chains can handle moderate rainfall, but in a torrential downpour, some splashing is inevitable. I recommend using them on smaller roof sections or porticos, rather than the main corners of the house.
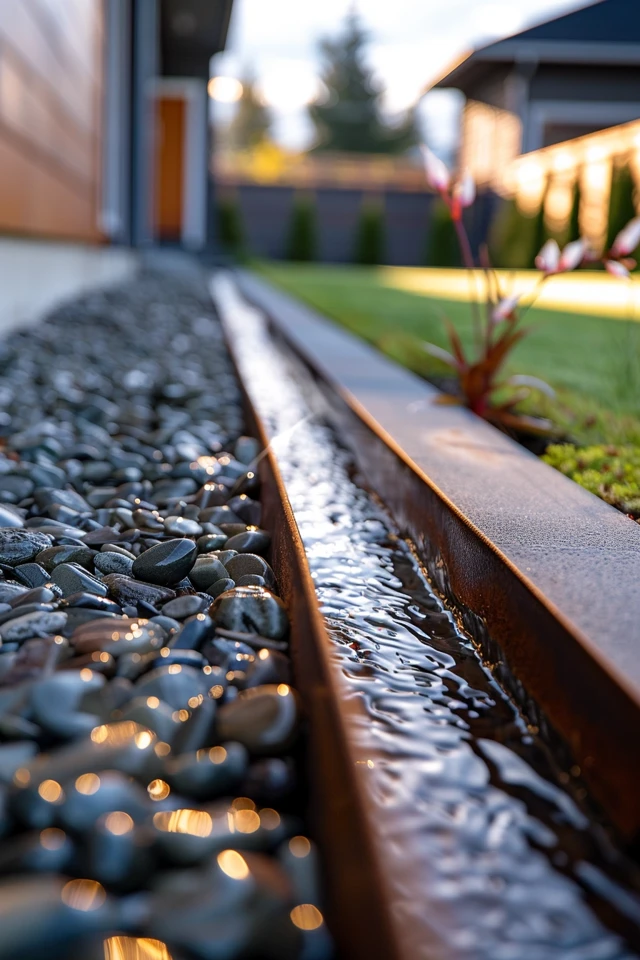
How do I hide a downspout extension on a driveway?
If a downspout dumps onto a driveway, install a channel drain (trench drain) across the concrete. This flush metal grate catches the water and pipes it away, preventing an icy patch in winter.
What is the best rock size for a dry creek bed?
Use a mix of sizes for a natural look. Start with 6 to 12-inch river stones for the borders and 2 to 4-inch stones for the bed. Avoid pea gravel, as it washes away too easily in heavy rain.
Conclusion
Managing downspout drainage is about more than just keeping your basement dry; it is about integrating the mechanics of your home into the beauty of your landscape. Whether you choose to hide the water with underground pipes or celebrate it with rain chains and creek beds, the goal is control.
By directing water with intention, you protect the interior design investments you have made inside the house. No rug, sofa, or hardwood floor looks good with water damage. Take the time to assess your grade, choose the right materials, and turn a potential hazard into a functional design feature.
Picture Gallery


