
Inspiring Built-In China Cabinet Ideas for Your Home
For a long time, the china cabinet felt like a relic of the past. Many of us grew up with heavy, dark oak hutches filled with porcelain figurines that no one was allowed to touch.
Today, however, the built-in china cabinet has made a massive comeback in interior design. We are seeing them used not just for fine china, but as sophisticated storage walls that anchor a dining room or kitchen. They offer the perfect blend of concealed storage for bulky items and display space for your favorite treasures.
If you are looking for visual inspiration, you can jump right to the Picture Gallery at the end of the blog post.
Designing for Architecture and Flow
The most successful built-ins look like they were part of the house’s original blueprint. When I design a cabinet for a client, I start by looking at the existing millwork in the home. You want your crown molding and baseboards to wrap seamlessly around the new unit.
If you have a modern home, a flat-panel or shaker-style door with clean lines works best. For traditional spaces, you might incorporate fluting details, decorative corbels, or an arched top.
The goal is integration, not isolation. If your home has high ceilings, take the cabinetry all the way to the top. Stopping a foot short often creates an awkward dust trap that visually lowers the ceiling height.
Designer’s Note: The “Built-In” Illusion
A common issue in DIY projects is placing a standard cabinet against a wall and calling it a built-in. To achieve a true high-end look, you must use filler strips. These scribed pieces of wood close the gaps between the cabinet box and your uneven drywall. Never skip the scribe; it is the difference between custom millwork and a big-box store purchase.
Critical Measurements and Zoning
Functionality hinges on the numbers. You cannot simply guess the depth of your shelves or the clearance for your doors.
Standard Depths
For the lower cabinets (the buffet portion), I recommend a depth of 18 to 24 inches. This is deep enough to store large serving platters, crockpots, or table linens.
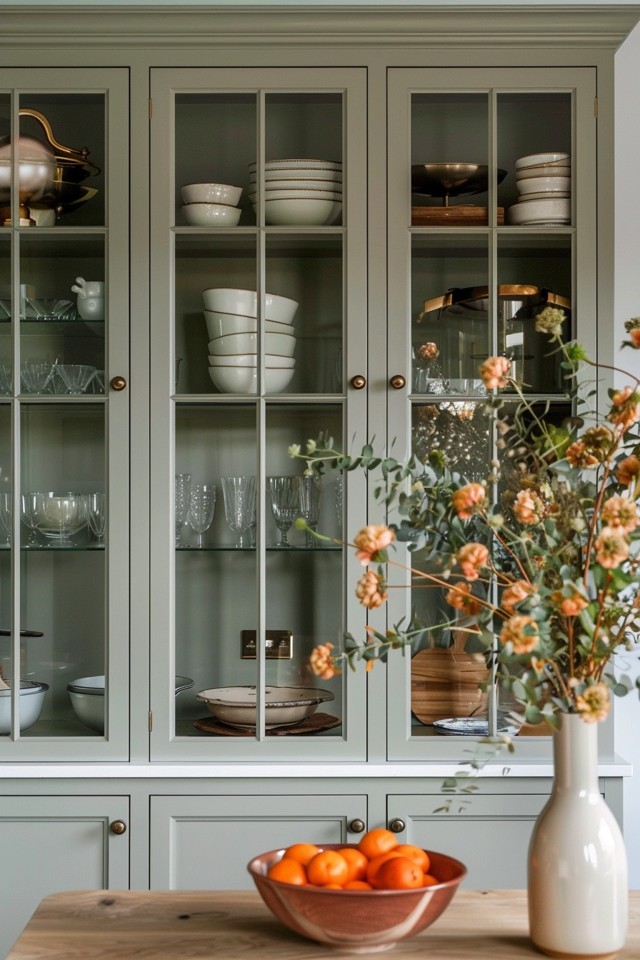
For the upper cabinets (the display portion), a depth of 12 to 14 inches is standard. Most dinner plates are 11 inches wide, so a 12-inch interior depth is the “Goldilocks” zone—deep enough for plates, but shallow enough that things don’t get lost.
The Countertop Ledge
If your design includes a lower buffet and an upper hutch, you need a “step back.” I usually leave a 6 to 10-inch exposed countertop surface between the upper and lower units. This serves as a landing zone when you are plating food or rearranging the display.
Clearance Rules
If your built-in is in the dining room, you must account for the dining table.
- Chair Clearance: You need at least 36 inches between the edge of the dining table and the front of the cabinet. This allows someone to pull a chair out and sit down.
- Walkway Clearance: If people need to walk behind seated guests to access the cabinet, aim for 44 to 48 inches of clearance.
- Door Swing: Ensure your cabinet doors don’t hit the back of a chair when opened. If space is tight, use sliding doors instead of swinging doors.
Material Selection and Finishes
The finish you choose dictates the mood of the entire room. While white is timeless, we are seeing a strong shift toward moody, saturated colors in dining spaces.
Paint vs. Stain
Stained wood (like white oak or walnut) adds warmth and texture. It is durable and forgiving of scuffs. Painted finishes offer more color flexibility. If you go with paint, use a lacquer or a high-quality enamel. Standard wall paint will peel and chip on shelving.
Mixing Materials
A great way to elevate a built-in is to contrast the interior back panel.
- Wallpaper: Adding a grasscloth or patterned wallpaper to the back of the open shelving adds incredible depth.
- Beadboard: This adds a cottage or farmhouse texture that feels cozy and historic.
- Mirror: Antique mirror applied to the back panel reflects light and makes a small dining room feel twice as big.
Common Mistakes + Fixes
Mistake: Using matte paint on horizontal shelves.
Fix: Items slide across shelves constantly. Always use a Satin or Semi-Gloss finish for the cabinetry. It hardens into a shell that resists scratches and is wipeable.
Lighting Your Display
Lighting is what takes a cabinet from “storage locker” to “showpiece.” Without proper illumination, your beautiful glassware will look dark and flat.
LED Strip Lighting
The most modern approach is to route a channel vertically inside the face frame of the cabinet. This casts an even glow across every shelf from front to back.
Puck Lights
These are installed at the top of the cabinet, shining down. They are classic but can create shadows on the lower shelves if your glass shelves aren’t perfectly clear.
Color Temperature Matters
Always match the Kelvin temperature of your cabinet lights to the rest of the room.
- 2700K: Warm, cozy, matches traditional incandescent bulbs.
- 3000K: Crisp, neutral white. Good for modern spaces.
- 4000K+: Too blue. Avoid this in residential dining rooms; it looks like a refrigerator.
Designer’s Note: Glass Shelving
If you want light to travel all the way from the top to the bottom, use glass shelves rather than wood. If you use wood shelves, you must install a separate light strip for every single shelf, which significantly increases electrical costs.
Glass and Hardware Details
The doors are the “face” of the cabinet. The type of glass you choose impacts both the style and how tidy you need to be.
Clear Glass
This is the most traditional choice. It requires you to keep the interior perfectly organized because everything is visible.
Reeded or Fluted Glass
This is a major trend right now. The texture obscures the contents slightly, creating a beautiful silhouette without showing every detail. It is perfect if your dishware stack isn’t perfectly neat.
Seeded Glass
This glass has small bubbles trapped inside. It looks fantastic in farmhouse or vintage-inspired homes.
Hardware Selection
Treat hardware like jewelry.
- Latches: Cremeone bolts or cupboard latches add a vintage, tactile feel.
- Knobs vs. Pulls: I prefer small knobs on upper glass doors and bin pulls on lower drawers.
- Finish Coordination: You don’t have to match your light fixture perfectly. Mixing unlacquered brass hardware with a black chandelier creates a layered, curated look.
Configuring Storage: Drawers vs. Doors
When designing the lower section of your built-in, think about what you actually own.
The Case for Drawers
I always try to include at least one bank of drawers in a china cabinet.
- Linens: Shallow top drawers are essential for napkins, placemats, and napkin rings.
- Silverware: If you have a “good” set of silverware, a velvet-lined drawer prevents tarnish and scratches.
- Heavy Items: Deep drawers are better for heavy stacks of plates than shelves. You can pull the drawer out to see everything, rather than crouching down and digging into a dark cabinet.
The Case for Doors
Cabinets with doors are necessary for very tall items. If you have tall vases, tiered serving stands, or a large soup tureen, you need adjustable shelving behind doors to accommodate that height.
What I’d Do in a Real Project: The Storage Audit
Before I draw a single line, I ask clients to count their inventory.
1. Measure your tallest vase.
2. Count your wine glasses.
3. Measure the width of your largest platter.
4. Design the shelf heights based on these real items, not arbitrary standards.
Styling the Built-In
Once the carpentry is done, the styling brings it to life. A common struggle is making the shelves look “full” without looking cluttered.
The Rule of Thirds
Visually divide your shelf into three sections. Balance heavy items (like a stack of books) on the left with a heavy item on the right, and leave some negative space or a lighter object in the center.
Varying Heights
Nothing is more boring than a row of objects that are all the same height.
- Lean Art: Lean a small framed print or painting against the back of the shelf to add height.
- Stack Books: Use coffee table books horizontally to create a riser for a smaller object, like a bowl or candle.
- Plants: A trailing pothos or a small fern adds organic softness to the hard lines of the cabinetry.
Grouping Collections
Group similar items together. A collection of white pitchers looks like an intentional design statement. Scattered individually, they just look like random dishes.
Final Checklist: Before You Build
Use this checklist to ensure you haven’t missed any critical details before construction begins.
- Outlet Access: Have you relocated electrical outlets to the back of the cabinet or the toe kick? Do not bury them behind the unit.
- Ventilation: If you are hiding a wine fridge or electronics inside, have you added ventilation grates to prevent overheating?
- Baseboard Match: Do you have enough matching baseboard material to wrap the bottom of the cabinet?
- Ceiling Slope: Have you checked if your ceiling is level? You may need a larger top molding to hide the variance.
- Door Swing: Have you physically taped out the door swing on the floor to ensure it doesn’t hit the table?
FAQs
How much does a custom built-in china cabinet cost?
Costs vary wildly by region and material. A simple DIY using IKEA bases with custom trim might cost $1,500–$2,500. A fully custom joinery project from a professional cabinet maker typically ranges from $5,000 to $15,000 depending on size, wood species, and electrical work.
Can I put a china cabinet in a small dining room?
Yes, but keep it shallow. A 12-inch deep unit from floor to ceiling provides massive storage without encroaching on the room. Painting it the same color as the walls also helps it recede visually, making the room feel larger.
Should the built-in match my kitchen cabinets?
It should coordinate, but it does not need to match. In fact, giving the dining room built-in its own color (like a deep navy or charcoal) separates the dining zone from the kitchen, making it feel more formal and distinct.
What is the best wood for painting built-ins?
Poplar and Maple are the industry standards for painted cabinetry. They have a tight grain that takes paint beautifully. Avoid Oak if you want a smooth finish, as the heavy grain texture will show through the paint.
Conclusion
A built-in china cabinet is an investment that pays off in both functionality and property value. It solves the perennial problem of where to put the “good stuff” while adding a layer of architectural character that makes a house feel like a home.
Whether you choose a sleek, modern look with reeded glass or a traditional design with beadboard and arches, the key is planning. Measure your space, audit your storage needs, and don’t be afraid to be bold with your finish choices.
Picture Gallery


