
Island Range Hood Ideas: Elevate Your Kitchen
Designing a kitchen island with a cooktop creates an immediate focal point in the room. It allows the cook to face guests or family members rather than staring at a tiled backsplash. However, this layout introduces a significant challenge: ventilation.
Without a wall to hide ductwork or anchor a heavy appliance, the range hood becomes a floating sculptural element. It can either define the aesthetic of the entire space or feel like a bulky obstruction blocking your view. Balancing the technical requirements of airflow with the desire for an open sightline is one of the hardest tasks in kitchen design.
In this guide, I will walk you through the structural rules, material options, and design strategies I use to make island hoods work. For a dose of visual inspiration, make sure to scroll all the way to the curated Picture Gallery at the end of this post.
1. Understanding Scale and Placement: The Technical Foundation
Before we look at finishes or shapes, we must address the physics of ventilation. Island cooking generates smoke, grease, and steam that is much harder to capture than wall-mounted cooking.
On a wall, the backsplash and cabinets help guide the smoke upward into the vent. On an island, cross-drafts from walking past or HVAC vents can blow the smoke sideways before it reaches the hood. This means the scale of your hood is not just an aesthetic choice; it is a functional necessity.
The Height Rule
The standard distance between the cooktop surface and the bottom of the hood is between 30 and 36 inches.
If you mount it lower than 30 inches, you risk head injuries and obstructed views. If you mount it higher than 36 inches, the smoke will dissipate before the fan can catch it.
The Width Rule
Designer’s Note: This is the most common mistake I see in DIY renovations. Do not buy a hood that is the exact same width as your cooktop.
For an island, the hood should extend 3 to 6 inches beyond the cooktop on both sides. If you have a 30-inch range, you need a 36-inch hood. If you have a 36-inch range, I strongly recommend a 42-inch hood. This extra width creates a larger “capture area” to account for the cross-drafts mentioned earlier.
CFM Requirements
Power is measured in Cubic Feet per Minute (CFM). For wall units, standard calculations often suffice. For islands, you need more power.
I generally recommend at least 600 CFM for an electric island cooktop and up to 900–1200 CFM for high-BTU gas ranges.
Common Mistakes + Fixes
Mistake: Ignoring ceiling height constraints.
Fix: If you have 10-foot or 12-foot ceilings, a standard chimney extension kit will not reach. You must order a custom chimney cover or build a soffit box to lower the connection point.
Mistake: Forgetting about “Make-Up Air.”
Fix: When you install a powerful hood (usually over 400 CFM), you suck air out of the house faster than it can enter. This can cause back-drafting of carbon monoxide from fireplaces or water heaters. You likely need a make-up air system (a motorized damper) to bring fresh air in automatically when the hood turns on.
2. Material Selection and Finishes
Once the math is done, the fun begins. The material you choose dictates whether the hood stands out as a statement piece or blends into the architecture.
Stainless Steel
This is the industry standard for a reason. It is durable, heat resistant, and matches most appliance packages.
However, a large stainless steel box hanging in the middle of a room can feel cold or industrial. To soften this, I often look for models with varying textures or mixed metal bands.
Clad and Custom Materials
If you want a warmer look, you can buy a “hood insert” (the machine part) and build a custom shell around it.
- Wood: A wood-wrapped hood brings warmth and connects the kitchen to the living area cabinetry. It works beautifully in farmhouse or transitional homes. Note that code requires a metal liner inside the wood shell to prevent fire hazards.
- Plaster or Drywall: This is a favorite trick for modern minimalist designs. We frame the hood and finish it with the same plaster or paint as the ceiling. It makes the mass of the hood disappear visually.
- Brass and Copper: These are for high-budget statement kitchens. A custom unlacquered brass hood is a piece of jewelry. Keep in mind that living finishes will change color and patina over time.
Glass
Curved glass hoods were very popular in the early 2000s. While they technically allow light through, I find they are incredibly difficult to keep clean. Grease and dust settle on the top of the glass, creating a visible grime layer that is hard to reach. I generally avoid these in modern projects unless the client is committed to weekly cleaning.
3. Design Styles and Shapes
The shape of the hood defines the era and style of the kitchen.
The Box or Rectangular Prism
This is the current darling of the design world. Sharp corners and vertical lines look substantial and architectural. This shape works well when clad in quartz, shiplap, or sleek metal.
The Cylinder
Tube-shaped hoods are excellent for smaller islands or contemporary spaces. They are slender and take up very little visual volume.
Because they are narrow, their capture area is small. These are best suited for induction cooktops where heavy grease and open flame are less of a concern.
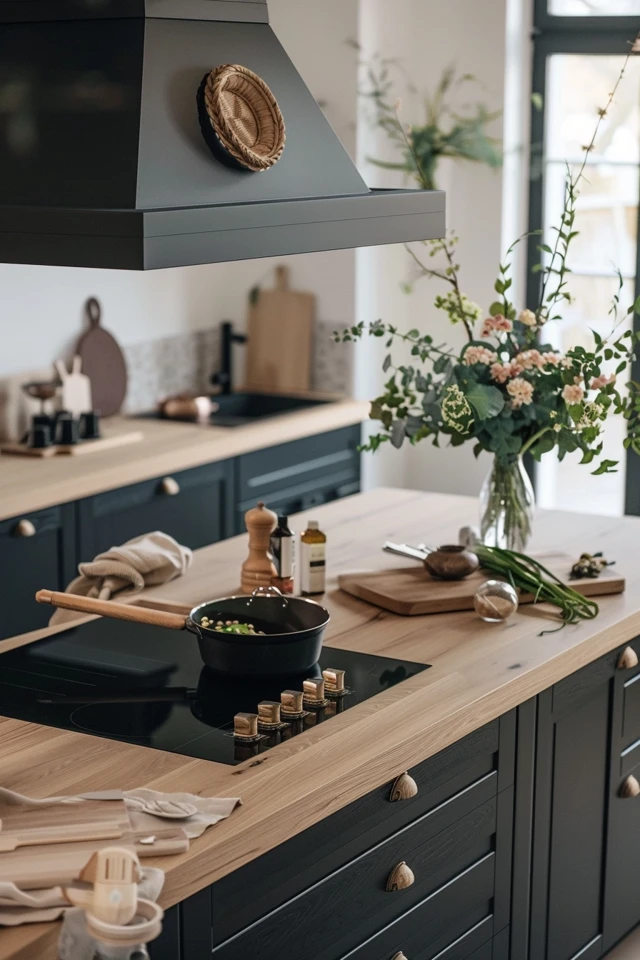
The Chimney Style
This is the classic pyramid shape. It feels lighter at the top and wider at the bottom. This is often the most budget-friendly option as many manufacturers mass-produce this shape in stainless steel.
Designer’s Note on Sightlines
Before finalizing a shape, stand in the living room or dining room. Imagine where the hood will hang.
Does it block the view of a beautiful window? Does it cut off eye contact with guests sitting at the island?
If the view is paramount, we need to look at the “invisible” options discussed in the next section.
4. The Invisible Options: Downdrafts and Flush Mounts
Sometimes the best island hood idea is one you cannot see at all. If you have an incredible view or a small open-concept apartment, a hanging obstruction might be a dealbreaker.
Flush Ceiling Mounts
These units recess completely into the ceiling, leaving the space above the island wide open. They look sleek and modern.
The Reality Check: Because they are 5 to 6 feet above the cooking surface, they need massive power to work. You will likely need a remote blower (motor mounted on the roof or exterior wall) to handle the suction without sounding like a jet engine. They also require significant space between ceiling joists, which can be a structural headache during renovations.
Downdraft Ventilation
These systems pull smoke downward, either through a slot at the back of the cooktop or a grid in the center (common in induction styles).
The Physics Problem: Hot air naturally rises. Downdrafts have to fight physics to pull that air down.
They are never as effective as overhead hoods. However, they are often “good enough” for people who do light cooking. If you sear steaks or use a wok every night, a downdraft will likely disappoint you.
Pop-Up Downdrafts
These are slightly better than flush surface downdrafts. The vent rises 8 to 14 inches out of the counter when in use. This gets the intake closer to the pot. When you are done, it retracts into the cabinet, restoring your view.
5. Lighting and Styling Integration
An island hood is also a major lighting fixture. It casts shadows on your workspace if not properly illuminated, but it can also provide ambient glow.
Task Lighting
Ensure the hood comes with high-quality LED lighting. I prefer a color temperature of 3000K. Anything cooler (4000K+) looks like a hospital operating room; anything warmer (2700K) makes the food look yellow.
Check that the lights are positioned at the front of the hood, not just the back. You need light centered over your pots.
Pot Rails and Shelf Styling
We often see photos of hoods with brass rails hanging ladles and copper pots. This looks charming in a photoshoot.
In reality, anything hanging directly in the airstream of a cooktop will get coated in a fine mist of oil. Unless you use those tools daily and wash them constantly, they will become sticky dust magnets.
If you love the look, install a rail on the side of a box-clad hood, or on a nearby wall, rather than directly over the burners.
What I’d Do in a Real Project: The Checklist
When I am designing a kitchen for a client, I run through this mental checklist before ordering anything.
- Joist Direction: Which way do the ceiling beams run? If they run perpendicular to where the duct needs to go, we have to drop the ceiling or build a soffit.
- Venting Route: What is the shortest path to the outside? Every turn or “elbow” in the ductwork reduces airflow efficiency.
- Blower Location: If the budget allows, I always move the fan motor to the exterior of the house (remote blower). This keeps the noise outside, making the kitchen much more peaceful.
- User Height: I measure the tallest person in the house. The hood needs to be high enough that they don’t stare directly into the metal edge while cooking.
Final Checklist: Designing Your Hood
Use this summary to guide your purchase or design meeting.
- Measure the Range: Ensure the hood is 6 inches wider than the cooktop.
- Check the BTUs: Match the CFM power to your stove’s output (divide gas BTUs by 100).
- Verify Ceiling Height: Confirm the chimney stack is long enough or if you need a custom extension.
- Plan the Route: Determine exactly how the duct pipe gets from the ceiling to the outdoors.
- Select the Finish: Choose a material that complements your cabinet hardware or wall color.
- Plan for Make-Up Air: If over 400 CFM, budget for the air intake system.
FAQs
Q: Can I use a recirculating (ductless) hood over an island?
A: You can, but it should be a last resort. Recirculating hoods filter the air through charcoal and blow it back into the room. They remove odors and some grease, but they do not remove heat or humidity. On an island, where smoke is already hard to catch, ductless models are often ineffective. Always vent to the outside if structurally possible.
Q: How loud should an island hood be?
A: Noise is measured in “sones.” A quiet refrigerator is about 1 sone. A normal conversation is 4 sones. Look for a hood that is rated at 1 to 2 sones on its lower settings. Remember, if the hood is too loud, you simply won’t turn it on, which defeats the purpose.
Q: How do I clean the filters?
A: Most modern hoods use baffle filters (stainless steel slats) rather than mesh. Baffle filters are vastly superior because they are dishwasher safe and don’t clog as easily. I recommend running them through the dishwasher once a month to keep airflow optimal.
Q: What is the best height for a tall family?
A: If the primary cook is 6’2″ or taller, mounting the hood at 30 inches will be annoying. You can raise it to 34 or 36 inches. However, if you go higher than 36 inches, you must increase the CFM power and the width of the hood to compensate for the smoke spreading out.
Conclusion
Choosing the right island range hood is a balancing act between heavy-duty engineering and delicate interior design. It requires you to think about airflow paths and joist structures just as much as metal finishes and silhouettes.
Don’t let the technical constraints scare you. A well-chosen hood anchors the kitchen. It provides a professional feel and defines the cooking zone in an open floor plan. Whether you choose a seamless plaster finish that melts into the ceiling or a bold brass statement piece, the right hood elevates the kitchen from a simple cooking room to a designed living space.
Take your time with the measurements, invest in the right power, and ensure the venting path is clear. Your lungs (and your upholstery) will thank you.
Picture Gallery


