
Landscaping Along a Fence Ideas: Enhance Your Yard
Fences are often viewed strictly as functional boundaries, outlining the perimeter of our property to keep pets in and prying eyes out. However, as a designer, I see the fence line as one of the most underutilized “walls” of your outdoor room. Treating this vertical space with the same care as your interior walls can completely transform the depth and perceived size of your yard. For more visual inspiration, be sure to check out the comprehensive Picture Gallery at the end of this blog post.
I once worked with a client who referred to her backyard as “the box” because the six-foot white vinyl fencing felt suffocating and sterile. By introducing layered plantings, varying heights, and warm lighting along the perimeter, we turned that box into a lush sanctuary that felt infinite. The fence didn’t disappear, but it became a beautiful backdrop rather than a barrier.
Whether you are dealing with a standard wood privacy fence, chain link, or masonry, the landscaping along the edge sets the tone for the entire garden. This guide will walk you through professional strategies to soften hard lines, add privacy, and increase your home’s value.
1. The Art of Layering: Creating Depth and Interest
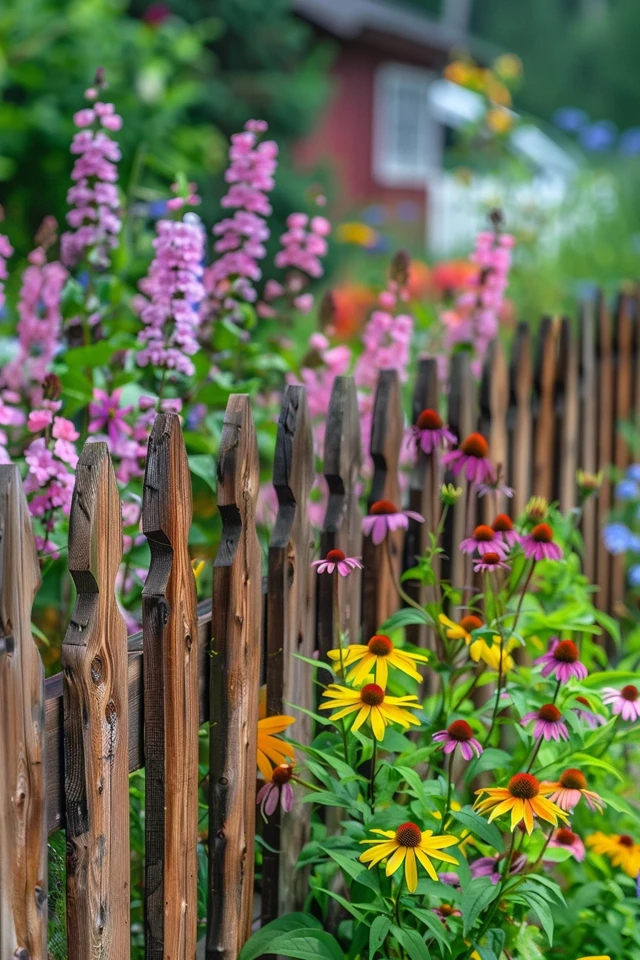
The most common mistake homeowners make is planting a “soldier row.” This is when identical plants are lined up in a straight line right up against the fence. While this is tidy, it lacks the depth that makes a garden feel luxurious.
To achieve a professional look, you must embrace layering. This involves creating tiers of plant material that step down from the fence toward the lawn. This technique tricks the eye into seeing more space than actually exists.
The Three-Tier Rule
I generally design fence borders using a three-tier system. This works whether your bed is three feet deep or ten feet deep.
- The Back Layer (Tall): This serves as your secondary screen. Use taller shrubs, ornamental grasses, or columnar trees. They should reach about two-thirds of the fence height or taller.
- The Middle Layer (Structure): This provides color and texture. Use flowering shrubs or rounded evergreens that grow to about 3–4 feet high.
- The Front Layer (Ground Cover): This bridges the gap to the grass or patio. Use low-growing perennials, annuals, or creeping ground covers that spill over the edging.
Designer’s Note: The “Airflow” Rule
Never plant directly against a wood fence. I always leave a maintenance gap of at least 12 to 18 inches between the fence and the back of the mature plant size.
If plants touch the wood, they trap moisture. This accelerates rot, causes paint to peel, and creates a haven for pests. That small gap allows for airflow and gives you room to squeeze in for fence repairs or staining without crushing your landscape.
Spacing and Grouping
Avoid planting one of everything. In design, we rely on the “Rule of Odds.” Group your plants in clusters of three, five, or seven.
Repeating these groupings along the fence line creates rhythm. For example, a cluster of three hydrangeas, followed by a vertical ornamental grass, then another cluster of three hydrangeas. This repetition is pleasing to the eye and makes the design feel intentional.
2. Hardscaping and Vertical Solutions for Small Yards
If you have a small yard or a narrow side return, you might not have the floor space for deep garden beds. In these scenarios, we have to look up. Vertical gardening utilizes the fence structure itself (if sturdy enough) or independent structures to draw the eye upward.
Trellises and Vines
Climbing vines are the best way to soften a fence without sacrificing lawn space. However, not all vines are created equal. Some attach themselves destructively, while others need help.
Common Mistakes + Fixes:
- Mistake: Letting Ivy or climbing hydrangea attach directly to a wood fence. Their aerial roots can pry boards apart and trap moisture.
- Fix: Install a wire trellis system or a freestanding metal trellis about 6 inches in front of the fence. Train vines like Clematis, Star Jasmine, or Annual Sweet Peas onto the trellis, keeping the fence clear.
Espalier Trees
If you want fruit trees but lack space, espalier is your answer. This is the ancient practice of training a tree to grow flat against a wall or fence.
Apple and pear trees work beautifully for this. You can maintain them in a footprint that is only 12–18 inches deep. It creates a stunning, architectural look that feels very high-end and custom.
Integrating Seating
Sometimes the best way to landscape a fence is to build functional furniture into it. A floating bench attached to a sturdy retaining wall or fence posts can save space.
Pro Measurements:
- Seat Height: Aim for 18 inches off the ground.
- Seat Depth: You need at least 18–20 inches for comfort.
- Back Angle: If building a backrest, angle it slightly (about 10–15 degrees) for comfort; 90-degree backs are terrible for lounging.
The “Renter Friendly” Container Border
If you rent or can’t dig into the soil due to roots or utility lines, use large containers. Place rectangular planter boxes along the fence line.
Choose pots that are at least 24 inches tall to give the plants height. Alternating tall, tapered pots with lower, trough-style planters creates a dynamic skyline against a boring fence.
3. Lighting: Setting the Mood and Defining Boundaries
Lighting is often an afterthought, but it is actually the most cost-effective way to make your landscaping look expensive. At night, a dark fence line makes a yard feel small and ominous. Lighting pushes the visual boundary back to the perimeter, expanding the space.
Uplighting vs. Grazing
There are two main techniques I use for fence lines, and the choice depends on your texture.
Uplighting: This is best for highlighting trees or tall shrubs planted along the fence. Place the fixture at the base of the plant and aim it upward. This creates dramatic shadows on the fence behind the plant.
Grazing: This is used when the fence itself has a beautiful texture, like stone or horizontal slats. You place the light fixture right next to the fence (within 6 inches) and aim the beam straight up. The light grazes the surface, exaggerating the texture.
Kelvin Temperature Matters
Nothing ruins a landscape faster than “hospital white” light. When buying outdoor LEDs, check the Kelvin (K) rating.
I strictly use 2700K to 3000K. This is a warm white that mimics incandescent bulbs. Anything over 4000K looks blue and cold, which is uninviting for a residential garden.
Spacing Your Lights
You do not need to light every single fence post or every single plant. That creates a “runway effect” that looks cheap.
Instead, highlight focal points. Illuminate the large tree in the corner, a specific trellis, and perhaps the gate. Darkness is just as important as light in creating ambiance.
4. Solving Problems: Privacy, Noise, and Ugly Fences
Sometimes landscaping isn’t just about aesthetics; it is about solving a functional problem. Whether you have noisy neighbors, a chain-link eyesore, or a lack of privacy, your planting choices can help.
The “Green Wall” for Privacy
If you need privacy fast, “Green Giant” Arborvitae is the industry standard. They grow 3–5 feet per year.
Designer’s Note on Spacing:
Homeowners often plant Arborvitae too close together in a panic for privacy. If you plant them touching, they will compete for resources and the inner branches will die and turn brown.
Space Green Giants 5 to 6 feet apart (center to center). They will touch within a few years, forming a dense hedge that remains healthy. Be sure to account for their mature width; don’t plant them 2 feet from the fence, or you will lose your yard.
Camouflaging Chain Link
Chain link is durable but unattractive. The best way to hide it is to paint it black. It sounds counterintuitive, but black paint helps the metal mesh disappear from the eye, allowing the green plants in front of it to pop.
Once painted, use a fast-growing vine like Virginia Creeper or Boston Ivy (check invasiveness in your region). These can cover a chain-link fence in two growing seasons.
Sound Dampening
Plants are not as effective at blocking sound as a solid wall, but they help psychologically. “Out of sight, out of mind” applies here.
To mitigate noise, you need mass. A wide, dense planting of broadleaf evergreens (like Hollies or Laurels) mixed with the white noise of a water feature is your best bet. A fountain placed near your seating area will mask the distant traffic noise better than a hedge will block it.
Bamboo: The Nuclear Option
Bamboo is beautiful and provides instant screening, but it is dangerous if you choose the wrong kind. Never plant “Running” Bamboo without a professional containment barrier. It will destroy your yard and your neighbor’s yard.
Instead, choose “Clumping” Bamboo (Fargesia varieties). It behaves like a polite shrub and expands slowly from the center. It creates a modern, Zen aesthetic perfect for contemporary homes.
5. Materials and Maintenance: The “Set It and Forget It” Approach
A beautiful border garden is useless if it becomes a weeding nightmare. Proper preparation of the bed line is crucial for long-term success.
Define the Edge
A crisp edge between the lawn and the garden bed is the hallmark of a professional job. I recommend using steel edging, brick, or a “natural spade edge” (a trench cut into the soil).
Avoid plastic edging that sticks up above the ground. It inevitably cracks, looks wavy, and gets chewed up by lawnmowers. Steel edging disappears into the landscape and holds a perfect curve.
Mulch vs. River Rock
Mulch:
- Pros: Retains moisture, breaks down to improve soil, keeps roots cool.
- Cons: Needs replenishing every year or two.
- Verdict: Best for plants that love rich soil, like Hydrangeas and Ferns.
River Rock:
- Pros: Permanent, looks modern, great for drainage.
- Cons: Absorbs heat (can cook plant roots), hard to clean leaves out of.
- Verdict: Best for succulents, ornamental grasses, and drought-tolerant landscapes (xeriscaping).
Drip Irrigation
Watering a fence line by hand is tedious. Before you plant, run a simple drip irrigation line along the bed. It connects to your hose spigot.
Drip lines deliver water directly to the roots, preventing fungal diseases on the leaves and saving water. It is an inexpensive upgrade that saves hours of labor.
Final Checklist: What I’d Do in a Real Project
If I were consulting on your yard today, here is the exact mental checklist I would run through before buying a single plant.
- Check Sun Exposure: Stand at the fence at 10 AM, 12 PM, and 4 PM. Is it full sun (6+ hours), partial shade, or deep shade? This dictates every plant choice.
- Measure the Bed Depth: I would mark out a bed that is at least 3 to 4 feet deep. Anything narrower looks stingy and limits plant growth.
- Soil Test: I would dig a small hole and fill it with water to see how fast it drains. If it sits for hours, we need to amend the soil with compost or choose wet-tolerant plants.
- Select the Palette: I would pick 3 to 5 plant varieties maximum. Restraint is elegant.
- Plan the Focal Point: I would decide where the eye should go first—perhaps a Japanese Maple in the corner or a water feature halfway down.
- Utility Check: I would call 811 to ensure I am not digging into gas or power lines near the property boundary.
FAQs
How far should I plant trees from a fence?
For small ornamental trees, allow at least 3 to 4 feet from the trunk to the fence. For large shade trees, you need 10 to 15 feet. Always research the mature canopy width and halve it to find your minimum spacing.
What can I plant along a fence in total shade?
Shade is actually a great opportunity for texture. Hostas, Ferns, Astilbe, and Hydrangeas thrive in shade. For evergreen structure, look at Yews or Boxwoods (check shade tolerance for specific varieties).
How do I stop grass from growing into my fence line?
You must install a physical barrier. Steel edging is best. Alternatively, you can dig a “V-trench” about 4 inches deep along the bed edge. Mulch the bed heavily to suppress weeds.
Can I landscape a neighbor’s fence?
Technically, no. You cannot attach anything to a fence you do not own without permission. However, you can plant a freestanding garden in front of it on your side. Just be sure to leave that maintenance gap so the neighbor can maintain their property.
Conclusion
Landscaping along your fence is about more than just hiding a boundary; it is about creating a cohesive frame for your outdoor life. By layering plants, respecting spacing rules, and adding thoughtful lighting, you can turn a flat yard into a multi-dimensional retreat.
Remember that gardens are patient. It is better to start with smaller plants and proper soil preparation than to rush with overgrown trees in a bad layout. Take your time, plan your layers, and enjoy the process of watching your perimeter come to life.
Picture Gallery


