
Landscaping Ideas Under Oak Trees: Tips & Inspo
There is nothing quite as majestic as a mature oak tree anchoring a property. They provide a sense of history, massive amounts of shade, and a beautiful architectural ceiling for your outdoor space. However, if you have ever tried to plant a lush garden beneath one, you know the struggle is incredibly real.
Oaks are notoriously competitive. Their canopy creates dense, dry shade, and their aggressive root systems drink up almost all available water, leaving very little for other plants. For plenty of visual inspiration on how to tackle these challenges, check out the Picture Gallery at the end of the blog post.
In my design practice, I treat the area under an oak not as a problem to be solved, but as a unique room with specific rules. You cannot force a sun-loving, water-hogging English garden under an oak, but you can create a serene, textured sanctuary. Here is how to navigate the roots, the shade, and the soil to create a landscape that thrives.
The Golden Rules of the Root Zone
Before we buy a single fern or bag of mulch, we have to talk about tree health. The most common mistake homeowners make is suffocating the tree in an attempt to beautify it. An oak tree absorbs oxygen through its roots, specifically the feeder roots that sit in the top 12 to 18 inches of soil.
If you pile soil on top of these roots to create a raised bed, you will slowly kill the tree. It might take five years or ten, but the decline is irreversible. The rule of thumb I use is simple: never change the grade (soil level) within the drip line of the tree.
You also need to identify the “root flare.” This is the base of the tree where the trunk widens and enters the ground. This area must always remain exposed to the air. If your existing landscaping covers this flare, your first task is to gently excavate it until the flare is visible.
Designer’s Note: The “Small Pot” Strategy
When planting under an established oak, never buy large, mature plants. I know it is tempting to buy the 5-gallon hostas for instant gratification, but digging a hole that big will damage major tree roots. Instead, I always source plants in “plugs,” 4-inch pots, or 1-gallon containers at the absolute largest. These smaller root balls can be tucked into the pockets between tree roots without requiring you to chop through them.
Hardscaping Solutions: Floating Above the Roots
Sometimes the best solution for the area directly under a massive oak isn’t plants at all—it is a living space. However, pouring a concrete slab over the root zone is a recipe for disaster. It blocks water and oxygen, and the tree roots will eventually crack the concrete.
I prefer “permeable” hardscaping options. This allows water to pass through to the roots and lets the soil breathe. Dry-laid flagstone or pavers set into a bed of sand and gravel are excellent choices. They shift slightly with root growth rather than cracking.
For a more rustic or cottage look, pea gravel is my go-to material. It provides a satisfying crunch underfoot, drains instantly, and creates a clean, negative space that highlights the tree’s trunk. When using gravel, install a steel edger to keep the stones contained, but ensure the edging doesn’t slice into major roots.
Common Mistakes + Fixes
- Mistake: Building a raised wooden deck directly on the ground around the tree.
- Fix: Use a pier-and-beam construction method. This elevates the deck a few inches to a few feet off the ground. It requires far fewer dig points (just for the footings) and allows air to circulate over the root zone.
- Mistake: Installing solid plastic sheeting under gravel to stop weeds.
- Fix: Use heavy-duty, non-woven landscape fabric. It suppresses weeds but allows water and air to permeate freely.
The Plant Palette: Texture Over Blooms
Designing under an oak requires a shift in mindset. You likely won’t get riots of colorful blooms because there isn’t enough sun. Instead, I focus on texture, leaf variegation, and varying shades of green. We want plants that tolerate “dry shade,” which is a difficult condition where there is no light and very little moisture.
The Ground Layer
For ground cover, you want plants that creep and spread to suppress weeds.
- Liriope (Monkey Grass): Incredibly tough. I use the ‘Spicata’ variety for filling large areas.
- Mondo Grass: Great for a modern look. Dwarf Mondo Grass creates a lush, lawn-like carpet that never needs mowing.
- Ajuga (Bugleweed): diverse foliage colors ranging from chocolate to dark green, with sweet blue flower spikes.
The Architectural Layer
These plants add height and structure.
- Cast Iron Plant (Aspidistra): The name says it all. It is nearly indestructible and adds a tropical, upright look.
- Autumn Ferns: These add a beautiful coppery color in the spring and stay green through mild winters.
- Hellebores (Lenten Rose): These are my secret weapon. They are evergreen, deer-resistant, and bloom in late winter when everything else is dead.
The Shrub Layer
Use these sparingly toward the edge of the canopy where the roots are less dense.
- Oakleaf Hydrangea: Since they are native to woodland settings, they handle the oak environment better than other hydrangeas.
- Mahonia: Adds architectural structure and bright yellow winter flowers.
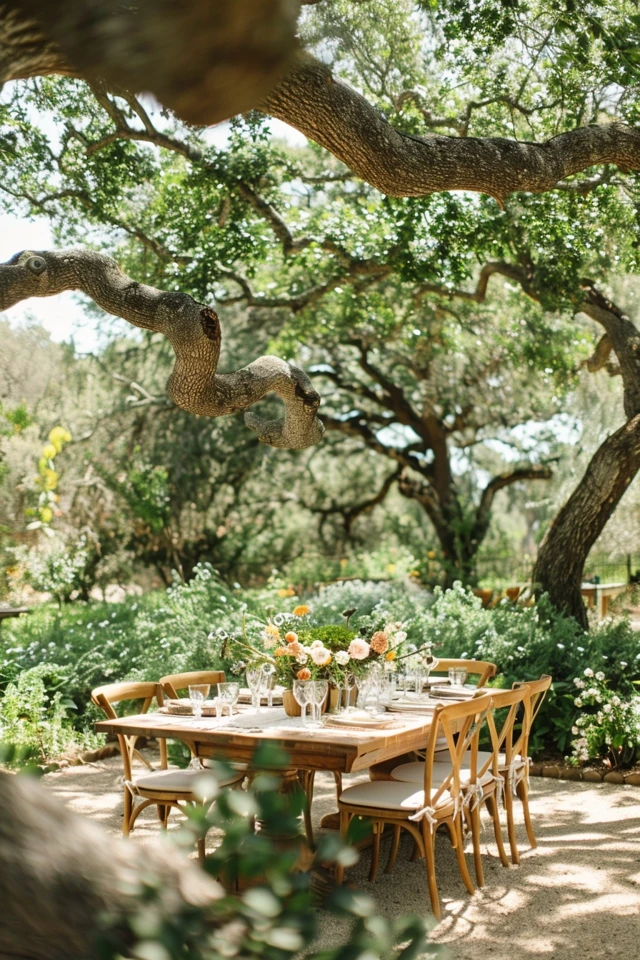
Design Layouts: Creating an Outdoor Room
When I layout a space under an oak, I treat the tree trunk as a sculptural column in the room. The canopy acts as the ceiling. The goal is to maximize usable space without cluttering the base of the tree.
The Seating Circle
A circular layout works naturally with the shape of the canopy. I often place a circular bench around the trunk, but I leave a gap of at least 6 to 12 inches between the wood of the bench and the bark of the tree. This prevents moisture buildup that can rot the trunk and allows the tree to grow in girth.
Alternatively, create a gravel patio about 10 feet out from the trunk. Place Adirondack chairs facing inward. This encourages conversation while letting everyone admire the tree. In terms of spacing, allow 30 to 36 inches of clearance for walkways around your furniture groups so the space flows comfortably.
Lighting the Canopy
Lighting is crucial for enjoying these spaces at night. I never nail fixtures into the tree. Instead, use strap-mounted downlights positioned high in the branches to create a “moonlighting” effect. This casts dappled shadows through the leaves onto the patio below.
For uplighting, place fixtures about 3 to 5 feet away from the trunk, aimed upward at the branch structure. This highlights the architectural drama of the oak. Avoid placing lights directly against the trunk, as this creates a “hot spot” that looks unnatural.
Maintenance and Long-Term Care
Once you have installed your garden, maintenance is about balance. Oaks drop leaves, acorns, and occasionally branches. If you have a gravel patio, a leaf blower is your best friend. However, in the planting beds, you don’t need to be fastidious.
Oak leaves are acidic and break down into wonderful compost. I generally leave a thin layer of leaves in the planting beds to decompose naturally. If the leaf litter gets too thick (over 3 inches), it can mat down and suffocate small plants, so rake the excess gently in the fall.
The Mulch Rule
Mulch helps retain moisture, which your new plants desperately need in the shadow of a thirsty oak. Use natural shredded hardwood or pine straw. Apply a 2 to 3-inch layer.
Crucial Warning: Do not create a “mulch volcano.” Keep mulch pulled back at least 6 inches from the trunk of the tree. The root flare should always be visible. Mulch touching the bark invites pests and rot.
Watering Protocols
Even drought-tolerant plants need help getting established under an oak. I recommend installing a drip irrigation system rather than using overhead sprinklers. Drip lines deliver water directly to the soil, minimizing evaporation. For the first year, you will likely need to water your new plants two to three times a week, as the tree will outcompete them for every drop.
What I’d Do in a Real Project: The Mini Checklist
If I were consulting on your property today, this is the exact workflow I would follow to ensure success.
1. Site Analysis & Pruning
I would call a certified arborist first. Before planting, we need to raise the canopy (prune lower branches) to let more ambient light reach the ground. This increases air circulation and plant survival rates.
2. The Soil Test
I would test the soil pH. Oaks generally prefer acidic soil, and the leaves reinforce that. If we need to amend the soil for specific plants, we do it gently by top-dressing with compost, never by tilling.
3. Hardscape Installation
I would lay out the pathways using permeable materials like decomposed granite or stepping stones. I’d ensure the path is at least 36 inches wide for comfortable walking.
4. Plant Sourcing
I would head to the nursery and buy “flats” of ground cover and 1-gallon perennials. I would verify every plant is labeled for “dry shade.”
5. The “Swiss Cheese” Planting Method
I would place plants in the natural pockets between roots. If I hit a root while digging, I move the plant, not the root. I would water everything deeply immediately after planting.
FAQs
Can I plant grass under my oak tree?
Honestly? Probably not. Most turf grasses need 4 to 6 hours of direct sun. Even “shade-tolerant” varieties like St. Augustine or Fescue struggle under the dense canopy of a mature oak and compete with the tree for water. You will fight a losing battle. It is better to switch to shade-loving ground covers or mulch.
How do I deal with all the acorns?
Acorns are a reality of oak life. In heavy mast years, they can be slippery on hardscaping. For patios, use a stiff push broom or a shop vac. In planting beds, leave them; they will eventually decompose, though you may have to pull up the occasional seedling.
Is it okay to cut small tree roots when planting?
You can cut very small fibrous roots (less than the width of a pencil) if absolutely necessary, but you should avoid it if possible. Never cut a root that is 2 inches in diameter or larger. That is a structural highway for the tree’s nutrition.
My soil is very hard; can I till it?
No. Tilling under an oak tree shreds the feeder roots. Instead, add a 1-inch layer of organic compost over the area once a year. The earthworms will do the tilling for you, slowly pulling that organic matter down into the soil.
Conclusion
Landscaping under an oak tree is an exercise in respect. You are respecting the age and scale of the tree by not damaging its roots, and you are respecting the natural conditions by choosing plants that actually want to live there. It is not about forcing a look; it is about curating a space.
When you stop fighting the shade and start embracing the moody, textured atmosphere an oak provides, you end up with a garden that feels established, cool, and timeless. Focus on foliage, keep your hardscaping permeable, and remember that under an oak, less is often more.
Picture Gallery


