
Mexican Tile Backsplash – Ideas for Vibrant Kitchens
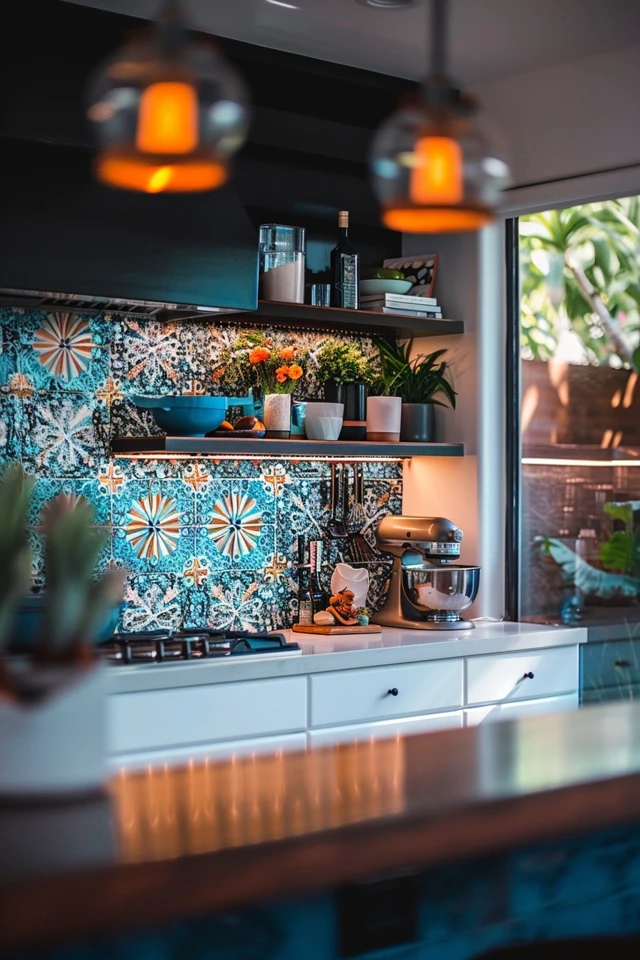
There is a distinct energy that shifts when you walk into a kitchen featuring authentic Mexican tile. While the minimalist, all-white kitchen has dominated Pinterest boards for years, I have noticed a strong return to personality, warmth, and artisanal imperfections. A Mexican tile backsplash offers an immediate cure for the sterile “laboratory look” that many homeowners are trying to escape.
These tiles, often hand-painted and glazed, bring a human element into the heart of the home. They tell a story through their slightly irregular shapes, vibrant pigments, and historical motifs. Whether you are aiming for a full Spanish Revival renovation or simply want to inject some bohemian flair into a modern space, this material allows for incredible creativity.
However, working with handmade materials requires a different mindset than installing standard machine-cut subway tiles. If you are looking for visual inspiration, you can find our curated Picture Gallery at the end of this blog post. Before you get there, let’s dive into the practical design rules, installation quirks, and maintenance realities you need to know to get this look right.
Understanding the Materials: Talavera vs. Cement
Before you start pinning patterns, you must understand what you are actually buying. “Mexican tile” is a broad umbrella term that usually refers to two very different materials. Knowing the difference will save you from costly maintenance headaches down the road.
Talavera Tile (The Classic Choice)
Talavera is the ceramic tile most people imagine when they think of Mexican design. It typically features a red clay body coated in a glossy, tin-based glaze. These tiles are fired in a kiln, making them heat resistant and relatively easy to wipe down.
Because they are handmade, no two Talavera tiles are perfectly identical in size or thickness. They often have a slight “pillowing” or curvature on the surface. This is not a defect; it is the character that catches the light and adds depth to your backsplash.
Cement or Encaustic Tile
Cement tiles are cured at room temperature rather than fired in a kiln. They have a matte, chalky finish and the pattern is inlaid into the body of the tile, not just painted on top. While beautiful, cement tiles are extremely porous.
If you choose cement tiles for a backsplash behind a stove, you must be vigilant about sealing. Without a high-quality penetrating sealer, a splatter of tomato sauce or hot grease can stain the tile permanently. For most residential kitchens, I generally recommend glazed Talavera for the backsplash because it is much lower maintenance.
Mastering Scale and Layout
The biggest mistake DIYers make with Mexican tile is overwhelming the room. These patterns are dense and energetic. If you cover every square inch of your kitchen walls with a busy 4×4 pattern, it can feel claustrophobic.
The 60/40 Rule
In my design projects, I often use a 60/40 balance to keep the eyes from getting tired. This means 60% of the surface area should be “quiet” (solid colors or simple borders), and 40% can be “loud” (the patterned decorative tiles).
You can achieve this by using solid-colored tiles for the main field of the backsplash and saving the intricate patterns for a focal point. A common application is creating a “rug” pattern behind the range or a single horizontal row of decorative tile acting as a border.
Designer’s Note: The “Picture Frame” Technique
One of my favorite ways to elevate a kitchen is to create a mural or focal point behind the cooktop.
- Measure your clearance: Standard clearance between the cooktop and the range hood is usually 30 to 36 inches.
- Select a centerpiece: Choose a group of 9, 12, or 16 patterned tiles to create a square or rectangle.
- Frame it: Use solid-colored pencil liners (narrow trim tiles) or bullnose tiles to frame this section.
- Fill the rest: Use a solid color tile (like a Mexican white or cobalt blue) for the rest of the backsplash under the cabinets.
This technique provides the visual punch of the pattern without making the entire kitchen feel chaotic.
Coordinating Colors and Countertops
When you choose a vibrant backsplash, the rest of the kitchen needs to play a supporting role. Authentic Mexican tiles often feature cobalt blue, terra cotta orange, canary yellow, and emerald green. These are strong personalities.
The Countertop Rule
If you are using a patterned Mexican tile, your countertops should be solid or have very minimal movement.
- Avoid: Heavy-veined marble or granite with lots of speckling. Placed next to a geometric tile, this creates visual vibration that looks messy.
- Choose: Solid quartz, soapstone, concrete, or wood butcher block.
A solid white or cream quartz countertop is often the safest bet. It provides a clean, bright ledge that allows the colorful backsplash to be the star of the show.
Cabinetry Pairings
You don’t have to stick to rustic wood cabinets to make this look work. In fact, painted cabinetry can look stunning with Talavera.
- Pick a color from the tile: If your tile has a deep navy blue in the pattern, paint your lower cabinets that exact shade. It anchors the room.
- Keep uppers neutral: To keep the room feeling airy, consider keeping upper cabinets white or cream, or opting for open shelving to show off the tile work.
Installation Realities: What Your Contractor Needs to Know
Installing handmade Mexican tile is not the same as installing laser-cut porcelain from a big-box store. If you hire a general tiler, make sure they have experience with irregular materials.
Grout Joint Width
You cannot use a tight 1/16-inch grout line with authentic Talavera. The size variation between tiles can be up to 1/8 of an inch.
- Recommended spacing: Plan for a grout line between 1/4 inch and 3/8 inch.
- The logic: The wider grout line absorbs the irregularities of the tile sizes, keeping the overall rows straight and level.
If you try to jam these tiles too close together, your horizontal lines will start to wave and slope, making the installation look amateur.
The Importance of “Dry Laying”
Before a single drop of mortar hits the wall, you or your installer must do a dry lay. Open every box of tile you ordered. Shuffle them to mix up slight color variations.
- Check for “duds”: In every box of handmade tile, you will likely find one or two that are significantly warped or chipped. Use these for cuts at the end of the row, or discard them.
- Pattern orientation: Some Mexican patterns are directional. Ensure you know which way is “up” before installation begins.
Sealing Crackle Glaze
Many Talavera tiles have a “crazed” finish—tiny hairline cracks in the glaze. This is a desirable aesthetic, but it can absorb grout pigment.
Pro Tip: Apply a penetrating sealer to the face of the tiles before grouting. This acts as a grout release, ensuring that the dark gray grout doesn’t get stuck in the tiny crackle texture of the white parts of your tile.
Common Mistakes + Fixes
I have seen many well-intentioned projects go sideways because of small oversights. Here are a few corrections for common issues.
Mistake 1: Ignoring the Edges
Handmade tiles rarely come with matching manufactured metal trim pieces, and plastic edging looks cheap against artisanal clay.
The Fix: Always order the matching “bullnose” or “surface cap” tiles when you buy your field tile. These have one rounded, glazed edge. Use them wherever the tile ends on an open wall or around a window. If your supplier doesn’t have them, you will have to paint the exposed clay edge of the tile, which rarely looks professional.
Mistake 2: Using Bright White Grout
Bright white grout is a magnet for tomato sauce and grease. Furthermore, the contrast between stark white grout and the creamy, off-white background of most Mexican tiles can look jarring.
The Fix: Use a “Natural Gray,” “Driftwood,” or a warm “Antique White” grout. These tones blend better with the clay body and hide stains much more effectively.
Mistake 3: Under-ordering
Because handmade tiles are fragile, they break easily during cutting.
The Fix: While the industry standard for overage is 10%, I recommend ordering 15% to 20% overage for authentic Mexican tile. This accounts for breakage during shipping, breakage during cutting, and the inevitable few tiles that are too warped to use.
Styles Beyond the Hacienda
While the rustic “Hacienda” look is timeless, Mexican tile is surprisingly versatile. You can adapt it to fit different architectural styles by changing how you use it.
The Modern Minimalist
To achieve a modern look, stick to a duo-tone palette. A backsplash of solid black and white geometric Mexican tiles looks incredibly sharp. Pair it with matte black fixtures and flat-panel cabinetry. The handmade texture warms up the modern lines without adding color clutter.
The Coastal vibe
If you are near the water, lean into the “Talavera Poblana” palette, which is strictly blue and white. This mimics the look of Delftware or Portuguese Azulejos. It pairs beautifully with light oak floors and white linen window treatments.
The Eclectic Bohemian
For a fun, relaxed vibe, mix and match different patterns in the same color family (known as a “patchwork” layout). This works best in smaller areas, like a wet bar or a breakfast nook, rather than a massive kitchen wall.
Final Checklist: What I’d Do in a Real Project
If I were managing your kitchen renovation today, here is the exact checklist I would follow to ensure success:
- Verify Inventory: I would buy all tiles from the same “lot” or firing batch to minimize color variation.
- Mock-up the Layout: I would tape the outline of the backsplash on the wall and use blue tape to mark where the pattern repeats will fall. This ensures we don’t end up with half a flower pattern cut off at the countertop.
- Check Surface Flatness: I would ensure the drywall or backer board is perfectly flat. You cannot install tile over bumpy walls, or the tiles will “lip” (stick out) and create shadows.
- Pre-Seal: I would seal the tiles once before installation if they are cement, or before grouting if they are heavily crackled ceramic.
- Grout Selection: I would choose a sanded grout for joints larger than 1/8 inch. Unsanded grout will crack in wide joints.
- Caulk the Bottom: I would never grout the seam between the countertop and the backsplash. That seam needs color-matched silicone caulk to allow for movement. Grout there will crack within months.
FAQs
Can I use Mexican tile behind a high-heat professional range?
Yes, authentic ceramic Talavera is fired at high temperatures and is non-combustible. It handles the heat from the back of a range perfectly well. However, be careful with the sealer you use on the grout; ensure it is heat-resistant.
Is Mexican tile difficult to clean?
Glazed Talavera is very easy to clean—just like a dinner plate. You can use mild soap and water. Avoid abrasive scouring pads, as they can scratch the hand-painted glaze over time. If you use Cement tile, it is harder to clean and requires immediate wiping of spills to prevent staining.
Does this style lower resale value?
It depends on the execution. A tasteful, well-coordinated Mexican tile backsplash is a classic design element that fits many home styles (Spanish, Mediterranean, Ranch, Boho). However, an overly chaotic or poorly installed job can be a turn-off. Sticking to classic color combinations (Blue/White or Terracotta/White) is generally safer for resale than wild multi-color mixes.
Can I install this over my existing tile?
Generally, no. Because Mexican tile is often thicker and more irregular than standard tile, layering it over existing tile will cause issues with outlet extenders and window moldings. It is always best to demo the old splash down to the studs and install fresh cement board or drywall.
Conclusion
Choosing a Mexican tile backsplash is a commitment to color and character. It signals that you value craftsmanship and warmth over perfection and symmetry. By respecting the material’s unique properties—its size variations, its need for spacing, and its bold patterns—you can create a kitchen that feels curated and welcoming.
Don’t be afraid of the imperfections; they are the soul of the design. Whether you go with a simple blue and white border or a full ceiling-height mural, the key is balancing the tile’s energy with the rest of the room’s elements.
Picture Gallery


