
Mid Century Bathroom Decor: Retro Chic Design Ideas
There is a distinct nostalgia that comes with walking into a home built between 1945 and 1970, especially when you step into the bathroom. The clean lines, the bold geometric tiles, and the warmth of walnut wood create an atmosphere that feels both sophisticated and playful. For visual inspiration on how these elements come together, be sure to check out the curated Picture Gallery at the end of this blog post.
I remember working on a renovation for a client who purchased a distinct Eichler home in California. She wanted to gut the bathroom entirely because the plumbing was failing, but she was terrified of losing that authentic “Mad Men” soul. We managed to salvage the original sputnik light fixture and matched the new cabinetry to the deep, amber tones of the original hallway paneling.
That project taught me that Mid-Century Modern (MCM) design isn’t about creating a museum exhibit; it is about functional beauty. In this guide, I will walk you through how to blend retro chic aesthetics with modern functionality, ensuring your bathroom stands the test of time.
1. The Foundation: Tile, Flooring, and Wall Coverings
The envelope of the room sets the stage for the entire design. In mid-century bathrooms, the tile work is often the star of the show. You generally have two routes to take: the preserved vintage look or the modernized organic look.
For a playful, authentic vibe, consider Kit-Kat tiles (finger tiles) or square tiles stacked vertically. The “stack bond” pattern—where tiles are aligned in straight columns rather than staggered like bricks—is a hallmark of modern design. It elongates the walls, making low ceilings feel higher, which is common in older ranch-style homes.
If you prefer something more organic and earthy, Terrazzo is your best friend. Terrazzo flooring, with its flecks of marble, quartz, and glass, hides dust and hair incredibly well. It provides a texture that feels historically accurate but offers the durability of modern composite materials.
Designer’s Note: The Scale of the Tile
A common mistake I see in DIY renovations is choosing the wrong scale of tile for the floor. If you are using a geometric hexagon tile, keep the size under 2 inches for a true retro feel. Large-format 12-inch hexagons tend to look too contemporary and lose that vintage charm. Additionally, smaller tiles mean more grout lines, which equals better slip resistance for wet feet.
What I’d do in a real project:
- Floor: Matte porcelain terrazzo with a warm beige base and multi-colored aggregate.
- Shower Walls: 2×8 inch matte teal or mustard tiles installed in a vertical stack bond.
- Grout: I always specify a high-performance epoxy grout in a light grey. Never use bright white grout on floors; it will yellow over time.
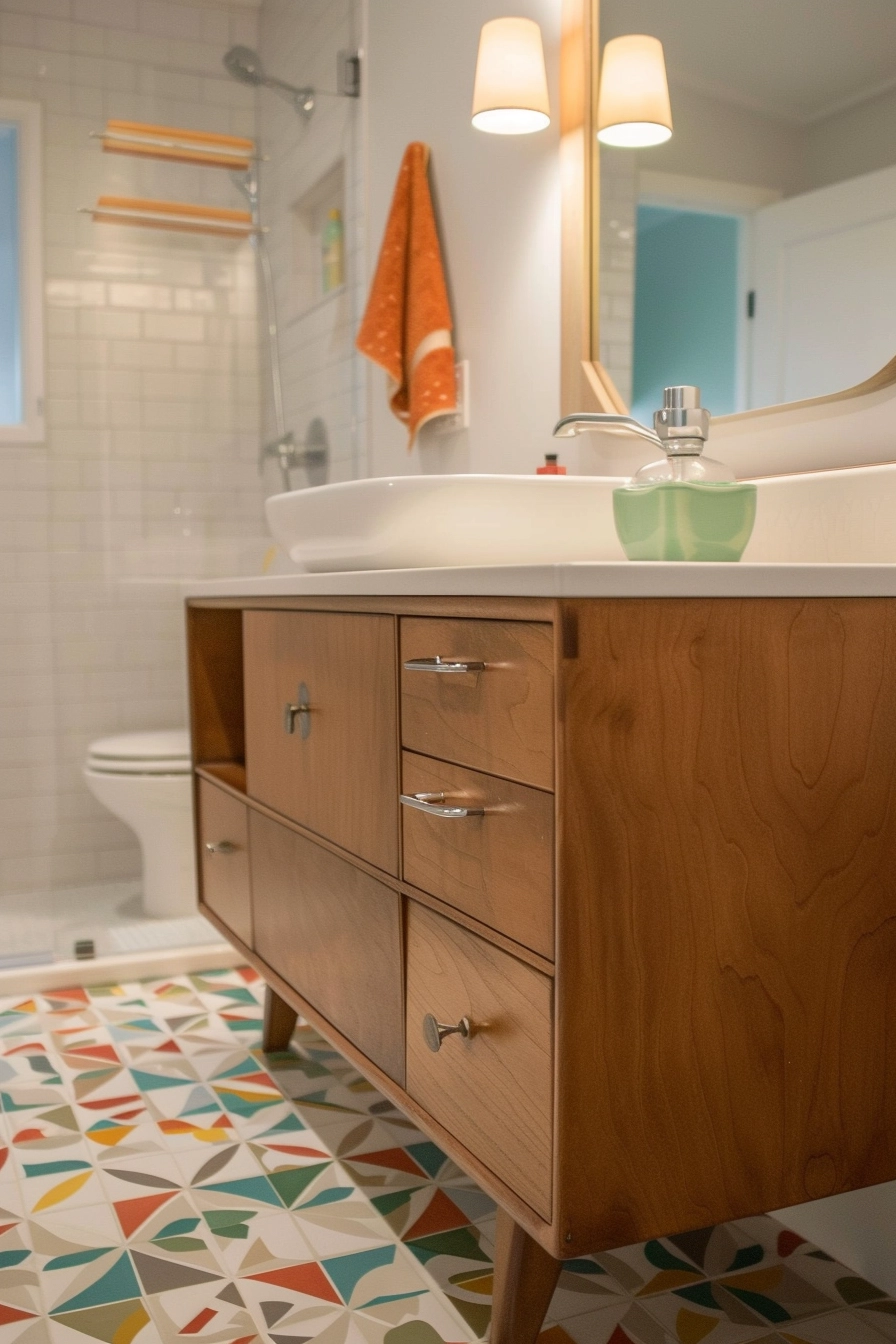
2. The Vanity: Furniture-Style Cabinetry
In modern bathrooms, vanities often look like built-in boxes. In the mid-century aesthetic, the vanity should look like a piece of furniture. This usually means lifting the cabinet off the floor on tapered legs or using a floating vanity to create a sense of airiness.
Walnut and Teak are the gold standards for wood tones in this style. The grain should be visible and celebrated. If you are working with a small footprint, a floating vanity is a practical magic trick. By seeing the floor extend underneath the cabinet, the room psychologically feels 20% larger.
For hardware, skip the ornate curves. You want sleek, minimal pulls or simple round knobs. Matte black offers a nice industrial contrast, but brushed brass or champagne bronze warms up the cool tones of tile and porcelain.
Common Mistakes + Fixes
Mistake: Buying a “vintage” dresser to use as a vanity without waterproofing.
Fix: If you repurpose vintage furniture, you must seal the top with a marine-grade varnish or add a quartz countertop. Real wood veneers from the 60s cannot handle standing water and toothpaste spills.
Measurements to keep in mind:
- Standard Height: Aim for a vanity height of 34 to 36 inches. Vintage dressers are often only 30 to 32 inches, which can feel back-breakingly low for modern adults.
- Leg Clearance: If choosing a leggy vanity, ensure there are at least 6 to 8 inches of clearance underneath for easy cleaning.
- Counter Depth: Standard depth is 21 inches. If you have a tight space, you can find narrow 18-inch depth vanities, but you will need a specific narrow sink to match.
3. Lighting: Globes, Sputniks, and Layering
Lighting is where you can have the most fun with this aesthetic. The mid-century era was obsessed with the “Space Age,” resulting in fixtures that resemble stars, atoms, and planets.
The most iconic look is the opal glass globe. Whether it is a single pendant or a vanity light with three globe bulbs, the white glass diffuses light beautifully. This eliminates harsh shadows on your face, which is crucial for applying makeup or shaving.
Don’t rely on a single overhead light. You need to layer your lighting. I typically place sconces at eye level on either side of the mirror. This cross-illumination is far more flattering than a light shining down from the ceiling, which creates dark circles under the eyes.
Lighting Specifications Checklist:
- Kelvin Rating: Always buy bulbs in the 2700K to 3000K range. This is a warm white light. Anything over 3500K will look blue and clinical, killing the cozy retro vibe.
- Sconce Height: Mount side sconces so the center of the bulb is roughly 60 to 66 inches off the floor, depending on your height.
- Dimmers: Install a dimmer switch. Mid-century bathrooms are often designed as relaxing sanctuaries, and being able to lower the lights for a bath is essential.
4. Color Theory: Earth Tones vs. Pastels
When people think of the 1950s and 60s, they often think of aggressive pinks and mint greens. While those are accurate, high-end mid-century design often leaned heavily into earth tones.
You have two distinct palettes to choose from. The first is “Palm Springs Pop,” which utilizes bright turquoise, flamingo pink, and lemon yellow against stark white backgrounds. This is great for kids’ bathrooms or powder rooms where you want high energy.
The second palette is “Organic Modern,” which relies on olive greens, burnt orange, mustard yellow, and slate greys. This palette pairs exceptionally well with walnut wood and brass fixtures. It feels more grounded and sophisticated.
Renter-Friendly Solution:
If you are renting and stuck with boring white walls, use peel-and-stick wallpaper. Look for patterns with abstract geometric shapes or botanical prints (like the classic Monstera leaf). Apply it to just one focal wall—usually behind the vanity—to anchor the space without overwhelming it.
Designer’s Rule of Thumb: 60-30-10
- 60% Main Color: Neutral tile or white walls.
- 30% Secondary Color: Walnut wood vanity and door trim.
- 10% Accent Color: A bold teal or orange in the rug, towels, or art.
5. Mirrors and Fixtures: The Finishing Touches
The mirror is not just a reflective surface; it is a sculptural element. Mid-century design broke away from the standard rectangle. Look for pill-shaped mirrors (rectangles with rounded corners), perfect circles, or asymmetric “amoeba” shapes.
Frameless mirrors can work if they have interesting bevels, but a thin metal frame in brass or black usually ties the room together better. The frame helps define the mirror against the wall tile.
For faucets and showerheads, simple is better. A single-handle faucet keeps the counter clean. Wall-mounted faucets are very period-appropriate and save counter space, but they require more complex plumbing work behind the wall.
Common Mistakes + Fixes
Mistake: Ignoring the metal finish consistency.
Fix: While mixing metals is trendy, it is hard to pull off in a small bathroom. Try to match your faucet, shower trim, and cabinet hardware. If you must mix, keep the black metals on the architectural elements (mirror frame, light fixture) and the warm metals (brass/gold) on the touch points (faucets, handles).
Real World Constraint: The Bathtub
In a dream renovation, we would all install a freestanding soaking tub. However, most of us have a standard 60-inch alcove tub. You can still make this look mid-century. Swap the shower curtain rod for a curved or ceiling-mounted track. Use a simple, textured shower curtain in a linen weave rather than cheap plastic. If budget allows, install a glass panel instead of a curtain; it showcases the tile work and opens up the visual space.
Final Checklist: bringing It All Together
Before you buy a single tile or towel, run through this checklist to ensure your design is cohesive and practical.
- Layout Check: Does the vanity door or drawer hit the toilet or entry door when opened? Measure twice.
- Storage Plan: Mid-century vanities often have less storage than modern ones. Do you have a plan for where the toilet paper and towels go? Consider adding a floating shelf above the toilet.
- Lighting Safety: Is your lighting damp-rated? If a fixture is within a certain distance of the shower, it must be rated for moisture.
- Slip Resistance: Did you choose a matte finish for the floor tiles? Glossy tiles are a safety hazard in wet areas.
- Ventilation: Beautiful wood vanities will warp in high humidity. Ensure your exhaust fan is powerful enough for the square footage of the room.
FAQs
Can I do Mid-Century style in a tiny bathroom?
Absolutely. In fact, this style thrives in small spaces because it focuses on clean lines and minimalism. Use a floating vanity to expose more floor, use a large mirror to bounce light, and stick to a light color palette for the walls while using bold colors for the floor.
Is brass hardware durable?
Yes, but you need to know what you are buying. “Living brass” is unlacquered and will develop a patina (turn brownish/greenish) over time. This is desirable for some but looks “dirty” to others. If you want it to stay shiny, ensure you buy “Brushed Gold” or “Lacquered Brass” finishes (PVD finishes are the most durable against scratching and tarnishing).
How do I mix modern technology with retro design?
Hide the tech. You can install heated floors under your terrazzo tile—you won’t see it, but you’ll feel it. You can also install smart anti-fog mirrors that look like simple vintage circles but have heating elements behind the glass.
What if I can’t afford a full renovation?
Start with the “jewelry.” Swapping out a faucet, cabinet hardware, and the light fixture can completely change the look of a bathroom for under $500. Add a vintage rug (washable wool or synthetic blend) and some plants, and you are halfway there.
Conclusion
Designing a mid-century modern bathroom is about balancing the optimism of the past with the comfort of the present. It is a style that invites you to be bold with pattern and texture while maintaining a sense of order and calm.
Remember that you don’t need to replicate a 1950s catalog page perfectly. The best designs feel collected and curated. Trust your eye, measure your spaces accurately, and don’t be afraid to let natural materials like wood and stone take center stage. Whether you are doing a full gut renovation or a weekend refresh, these retro chic elements will add undeniable character to your home.
Picture Gallery


