
Mid Century Kitchen Backsplash Ideas & Tips
Mid-century modern design has a way of feeling both nostalgic and fiercely contemporary at the same time. I remember walking into a client’s renovation project in a classic 1960s ranch home; the original cabinets were intact, but the backsplash was a victim of a bad 90s remodel. We stripped it back, and the moment we applied a vertical stack of matte teal tiles, the entire kitchen breathed a sigh of relief.
The backsplash is often the place where people feel safe taking a risk, but in a mid-century kitchen, restraint is just as powerful as bold color. Whether you are aiming for the organic warmth of a Frank Lloyd Wright inspired space or the playful energy of a Palm Springs aesthetic, the tile choice ties the cabinetry and countertops together. It is the bridge between the utility of cooking and the architecture of the room.
In this guide, I will walk you through the shapes, colors, and installation methods that define this era, while keeping modern functionality in mind. If you are looking for visual inspiration, you can scroll down to the Picture Gallery at the end of this blog post.
1. Defining the Palette: Earth Tones vs. Pop Colors
When we talk about Mid-Century Modern (MCM) colors, we are usually talking about two distinct directions. Understanding which “camp” your kitchen falls into is the first step in selecting a backsplash.
The first direction is the “Organic Modern” palette. This is heavily influenced by nature and Scandinavian design. Think moss greens, mustard yellows, warm terracottas, and deep slate grays. If your cabinetry is natural walnut or warm teak, these earth tones create a seamless, cozy environment. In my own projects, I find that matte finishes work best with these colors because they absorb light and feel softer.
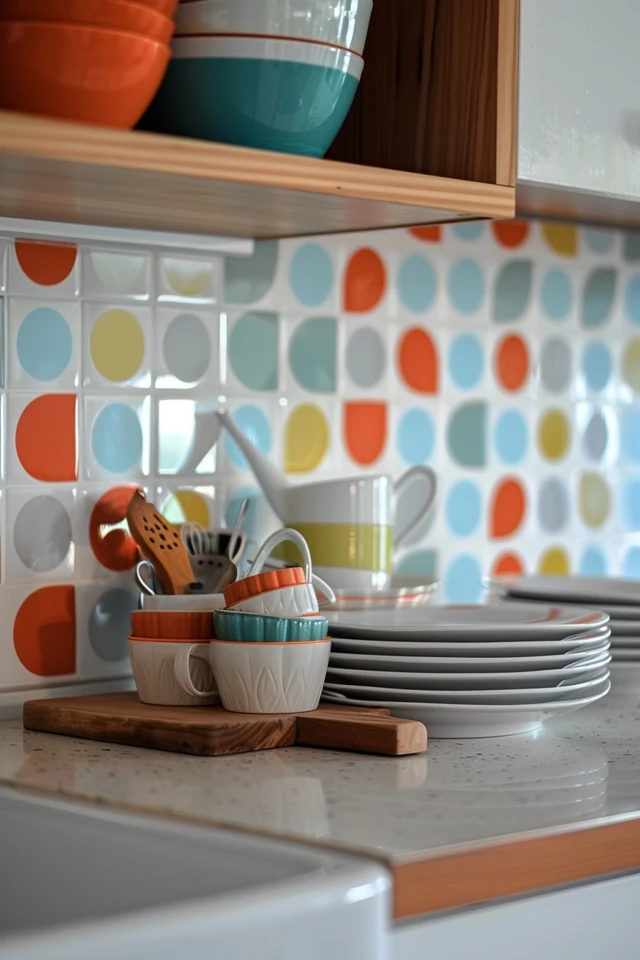
The second direction is the “Atomic Age” palette. This is where you see bright turquoise, atomic orange, and cherry red. This look is much harder to pull off without looking like a 1950s diner replica. If you choose a bright pop color, I recommend keeping the tile shape simple and the rest of the kitchen neutral. A bright orange backsplash looks incredible against flat-panel white cabinets, but it can look chaotic next to wood grain.
Designer’s Note: The 60/30/10 Rule
I often see homeowners fall in love with a bold tile and then struggle to style the rest of the room. I use the 60/30/10 rule to prevent this:
- 60% Main Color: Usually walls and cabinetry (neutral).
- 30% Secondary Color: Flooring or countertops.
- 10% Accent Color: This is your backsplash.
If your backsplash is the 10%, you can afford to be bold. If you want the backsplash to blend in (making it part of the 60%), stick to neutrals like white or cream but use an interesting texture or shape to keep it mid-century.
2. Geometry is King: Shapes and Layouts
The shape of the tile and how you lay it out is actually more important than the color in an MCM kitchen. You can take a standard, inexpensive white subway tile and make it look high-end mid-century just by changing the layout.
The Stacked Bond
This is the hallmark of modern design. Instead of the traditional brick pattern (running bond), you stack the rectangular tiles directly on top of one another.
- Vertical Stack: This draws the eye up, making low mid-century ceilings feel higher. It feels very contemporary and clean.
- Horizontal Stack: This emphasizes the width of the room. It creates distinct linear lines that mimic the horizon line often emphasized in MCM architecture.
Geometrics
Hexagons and penny rounds are period-appropriate, especially for the atomic aesthetic. Small hexagons (1 to 2 inches) create a lot of grout lines, which adds texture. Larger hexagons (4 to 6 inches) feel more modern and are easier to clean.
Common Mistakes + Fixes
Mistake: Using a beveled subway tile in a brick pattern.
Why it fails: Beveled subway tiles in a brick layout read “farmhouse” or “traditional Victorian,” not mid-century.
The Fix: Use a flat (rectified) tile. Mid-century design celebrates flat planes and clean lines. Avoid the bevel.
3. Balancing Materials: Wood, Stone, and Clay
Mid-century design is all about “truth to materials.” This means plastic should look like plastic, wood like wood, and clay like clay. For backsplashes, ceramic and glass are the top contenders, but how they interact with your countertops matters immensely.
If you have chosen a terrazzo countertop or a quartz with a lot of movement, your backsplash needs to be quiet. A handmade ceramic tile with slight variation in the glaze (called variegation) adds depth without adding visual clutter. The slight imperfections in handmade tile contrast beautifully with the machine-made precision of sleek slab cabinets.
Glass tile was also very popular in the mid-20th century, specifically in 1×1 or 1×2 mosaics. However, modern glass tile often looks cheap or “early 2000s.” To get the vintage glass look right, opt for a matte glass or a recycled glass tile that has a bit of cloudiness to it, rather than a high-gloss, transparent finish.
Real World Constraints: The “Busy” Factor
I recently worked with a client who had beautiful, heavy-grain walnut cabinets. They wanted a geometric patterned cement tile for the backsplash. We laid the samples out, and it was headache-inducing. The wood grain is a pattern itself.
My rule of thumb:
- Heavy Wood Grain Cabinets: Solid color tile, simple geometry (stacked rectangles).
- Painted/Solid Cabinets: Safe to use patterned tiles, mosaics, or high-variation glazes.
4. Technical Details: Height, Grout, and Trim
The difference between a DIY look and a pro look often comes down to the math and the finishing details. In a mid-century kitchen, crisp lines are non-negotiable.
Backsplash Height
Standard backsplash height is typically 18 inches from the countertop to the bottom of the upper cabinets. However, mid-century homes often have open shelving or lack upper cabinets entirely on some walls.
If you have open shelving, I strongly suggest tiling all the way to the ceiling. Stopping the tile halfway up the wall cuts the room in half visually. Taking a simple tile to the ceiling costs less than you think (since the material is often affordable) and makes the kitchen look custom and expansive.
Grout Selection
In MCM design, grout is a design element, not just a necessity.
- Contrasting Grout: White tile with dark gray grout emphasizes the geometric grid. This is perfect for the “stacked bond” look.
- Matching Grout: If you are using a bold color like teal or mustard, match the grout to the tile. This creates a “color block” effect that is very true to the era.
The Edge Problem
How do you end the tile run? Traditional rounded bullnose tiles can look dated. For a sharp, modern mid-century look, I use metal Schluter strips (an L-shaped metal profile) in anodized aluminum or brass. This creates a razor-sharp edge that looks intentional and architectural.
5. Functionality and Maintenance in a Working Kitchen
We cannot talk about design without talking about grease and tomato sauce. Mid-century kitchens are often working kitchens, not just showrooms. The material you choose must hold up to heat and scrubbing.
Matte vs. Gloss
I love matte tiles for the aesthetic, but they can be harder to clean. Grease tends to cling to the surface texture of matte ceramics. If you are a heavy cook, install a glossy tile behind the range and perhaps switch to matte elsewhere, or ensure your matte tile is high-quality and sealed properly. However, keeping the finish consistent is usually the safest bet for visual flow.
The Mosaic Trap
Penny rounds and small mosaics look amazing, but they result in a high ratio of grout to tile. Grout is porous and absorbs stains. If you choose a mosaic for the area behind the stove, you must use a high-performance epoxy grout or a high-quality sealer. I usually advise clients to use larger format tiles (like 3×12) behind heavy cooking zones to minimize scrub lines.
Designer’s Note: Outlets and Switches
Nothing ruins a clean geometric grid like a stark white outlet cover floating in the middle of a dark green backsplash.
- The Splurge: flush-mount outlets that sit inside the tile surface.
- The Hack: paint the outlet cover to match the tile or buy colored Lutron plates that blend in.
- The Pro Move: Install plug mold strips underneath the upper cabinets so the backsplash remains completely uninterrupted. This is my preferred method for maintaining that clean MCM horizontality.
What I’d Do: A Real Project Checklist
If I were designing your kitchen today, this is the exact order of operations I would follow to ensure the backsplash lands perfectly.
Phase 1: The Hard Finishes
- Confirm the countertop material first. It is the horizontal plane that the vertical backsplash rests on.
- Confirm the cabinet finish. Bring a sample door to the tile showroom.
Phase 2: The Tile Selection
- Select a shape. (My go-to is a 2×8 or 3×12 rectangle).
- Select a layout. (Vertical stack for low ceilings, horizontal stack for narrow rooms).
- Select a color. (Hold the sample vertically, not flat on a table, to see how light hits it).
Phase 3: The Verification
- Buy 5 to 10 loose tiles. Do not rely on one sample piece.
- Tape them to the wall in your kitchen. Look at them in the morning, noon, and night. Artificial light changes glaze colors dramatically.
- Check the dye lot. Ensure the boxes you order all come from the same batch number.
Phase 4: The Installation Prep
- Measure the distance between the counter and the cabinet. If it is 18 inches, and your tile is 3 inches high, you have a perfect fit. If it is 19 inches, you will have a sliver cut.
- Adjust the starting point of the tile so the “sliver” cut is hidden up under the cabinets, not resting on the countertop.
- Select the grout color. Make a mock-up board with leftover tile and wet grout before applying it to the wall. Grout dries lighter than it looks when wet.
Frequently Asked Questions
Can I use marble in a mid-century kitchen?
Yes, but proceed with caution. Marble was used in mid-century luxury homes, but it wasn’t the standard. If you use marble, choose a slab or large format tile rather than a small subway tile. The goal is to let the stone’s vein be the art. Avoid beveled marble, which leans too traditional.
Is a backsplash necessary behind the stove if I have a guard?
Yes. Even with a stainless steel guard, moisture and grease travel. A tiled backsplash seals the drywall and prevents mold growth and staining. From a design perspective, tiling the full wall behind a range hood creates a stunning focal point.
How do I handle corners if my walls aren’t square?
This is common in older homes (original mid-century homes are notorious for this). Do not wrap the tile around the corner if the walls are crooked. End the tile at the corner using a metal trim piece. This visually corrects the line and prevents weird, wedge-shaped tile cuts.
Is peel-and-stick tile tacky?
Not anymore, but you get what you pay for. For renters, I recommend high-quality vinyl “tiles” that have actual texture and thickness. The flat stickers look fake because they don’t catch the light. Look for brands that offer “gel” or “composite” peel-and-stick options. Install them with the same care you would use for real tile—measure twice, cut once.
Conclusion
Creating a mid-century modern kitchen is about balancing nostalgia with modern needs. The backsplash is your opportunity to inject personality into the space, whether through a moody olive green matte finish or a crisp, architectural white stack.
Remember that the most successful designs are the ones that respect the architecture of the home. Don’t force a trend that doesn’t fit the bones of your space. Keep your lines straight, your materials honest, and your functionality at the forefront. When you get the geometry and the color balance right, the result is a kitchen that feels timeless rather than just “retro.”
Picture Gallery


