
Mid Century Modern Fence Ideas for Stylish Homes
Designing a fence for a Mid Century Modern home is about more than just marking a property line. It is an opportunity to extend the architectural integrity of your home into the landscape, creating a seamless transition between indoor and outdoor living.
Whether you are looking for total privacy or a decorative accent to boost your curb appeal, the right design can transform your yard. Before we dive into the technical details and design rules, please note that we have curated an extensive visual inspiration gallery at the very end of this post to help you visualize these concepts.
At-a-Glance: Key Takeaways
- Horizontal Emphasis: Most MCM fences use horizontal slats to elongate the property and mimic the low-slung lines of the home.
- Natural Materials: Clear-grade cedar, redwood, and ipe are the gold standards for achieving the authentic warm-toned look.
- Geometric Play: Mixing materials like wood with decorative breeze blocks or metal mesh adds architectural interest.
- Negative Space: Controlled gaps between boards allow for airflow and light, preventing the fence from feeling like a heavy wall.
- Integration: A successful fence design incorporates existing landscaping and reflects the home’s window patterns or siding.
What This Style Means (and Who It Is For)
Mid Century Modern design, which flourished from the mid-1940s through the 1960s, is defined by its focus on functionalism, minimalism, and a deep connection to nature. In the context of fencing, this means moving away from the ornate Victorian pickets or the rustic split-rail styles of the past.
This style is for the homeowner who values clean lines and geometric order. It is for those who want their outdoor space to feel like a private sanctuary rather than a fortification. If your home features large windows, flat or shed roofs, and an open-concept layout, an MCM fence is the natural extension of that aesthetic.
From a practical standpoint, this style is incredibly versatile. It works just as well for a 1950s ranch in the suburbs as it does for a contemporary new build looking for a touch of organic warmth. It is also an excellent choice for homeowners with smaller lots, as the horizontal orientation of the boards can make a narrow yard feel much wider.
The Signature Look: Ingredients That Make It Work
To achieve a true MCM look, you need to focus on specific material choices and structural details. It is not just about putting boards sideways; it is about the “rhythm” of the design.
1. High-Quality Timber
The wood species you choose dictates the longevity and the color palette of your project. Western Red Cedar is the most popular choice because of its natural resistance to rot and its beautiful reddish-brown hue. For a more luxury “splurge” look, Ipe or Cumaru offer a dense, tropical feel that looks stunning when oiled.
2. Metal Framing
Many modern interpretations of this style use black powder-coated steel or aluminum posts. This creates a sharp, industrial contrast against the organic wood grain. It also provides a much thinner profile than traditional 4×4 pressure-treated wood posts, making the entire structure look lighter and more “floating.”
3. Breeze Blocks (Screen Blocks)
Nothing says Mid Century Modern quite like the geometric patterns of concrete breeze blocks. These are often used as “windows” within a wooden fence or as standalone accent walls. They provide privacy while allowing breezes to pass through, which is essential for patios and pool areas.
4. The Finish
MCM design favors natural wood tones over painted surfaces. Instead of opaque paint, look for semi-transparent stains in walnut, teak, or honey tones. If you do use paint, stick to a “Palm Springs” palette: charcoal gray, muted teal, or a crisp architectural white.
Layout and Proportions (Designer Rules of Thumb)
In my years as a designer, I have found that the difference between a fence that looks “DIY” and one that looks professional comes down to measurements. Proportions are everything in a minimalist design because there is nowhere for mistakes to hide.
The Slat Ratio
For a standard 6-foot privacy fence, I recommend using 1×4 or 1×6 boards. However, for a high-end custom look, I often suggest alternating 1×2 and 1×4 boards. This creates a sophisticated “barcode” rhythm that adds texture without being overwhelming.
Gap Sizing
The “reveal” or gap between your horizontal boards is critical.
- Total Privacy: Use a 1/8-inch gap. This accounts for the natural expansion and contraction of the wood while preventing neighbors from seeing through.
- Semi-Privacy: A 1/2-inch to 3/4-inch gap is the sweet spot. It creates a beautiful play of light and shadow throughout the day.
- Decorative: Gaps of 1 inch or more are great for front yards where you want to define the boundary without blocking the view of the house.
Post Spacing
While standard fencing uses 8-foot spacing, horizontal fences put more stress on the posts due to the weight of the boards. I strongly recommend spacing your posts at 6-foot intervals. This prevents the horizontal slats from sagging over time, which is the most common failure in this style.
Height Considerations
In the front yard, keep fences low—usually 36 to 42 inches. This maintains the “open” feel of the neighborhood. In the backyard, a standard 72-inch (6-foot) fence is typical, but you can add a 12-inch lattice or “slat top” section to bring the total height to 7 feet if your local code allows it.
Step-by-Step: How to Recreate This Look
If you are planning to tackle this as a project, or if you are hiring a contractor and want to ensure they do it correctly, follow these steps.
Step 1: Site Preparation and Legalities
Before you dig, call your local utility company to mark underground lines. Check your local building codes and HOA guidelines. Many HOAs have specific rules about horizontal fencing or the “good side” of the fence. In an MCM design, both sides should ideally look “good.”
Step 2: Setting the Foundation
Dig post holes at least 24 to 36 inches deep, depending on your frost line. Use a gravel base at the bottom of the hole for drainage before pouring concrete. This prevents the bottom of the post from sitting in water and rotting.
Step 3: Post Installation
If using wood posts, ensure they are perfectly plumb. If using steel posts, ensure they are aligned in a perfectly straight line. Even a 1/2-inch deviation will be highly visible once the horizontal boards are attached.
Step 4: Installing a Support Cleat
Instead of nailing the boards directly to the face of the post, I prefer to install a vertical 2×2 “cleat” on the inside of the posts. You then screw the horizontal slats into this cleat. This creates a recessed, framed look that is much more architecturally interesting than a flat surface.
Step 5: Board Placement
Start from the top and work your way down. Use a level on every single board. To keep gaps consistent, use “spacers”—small pieces of wood or plastic of the desired thickness—that you can rest the next board on while you screw it in.
Step 6: Fastening
Always use stainless steel screws. Standard galvanized nails will eventually “bleed” black streaks down your beautiful cedar boards due to the tannins in the wood. Pre-drilling your holes is essential to prevent the ends of the boards from splitting.
Budget Breakdown: Low / Mid / Splurge
Low Budget: Pressure-Treated Pine and Stain
You can achieve the MCM look on a budget by using standard pressure-treated pine 1×6 boards. The key is to let them dry out for a few months and then apply a high-quality oil-based stain in a walnut or teak tone. This mimics the look of expensive hardwoods at a fraction of the cost.
Estimated Cost: $25–$40 per linear foot.
Mid-Range: Western Red Cedar
Cedar is the industry standard for a reason. It is beautiful, smells great, and lasts 15–20 years with proper maintenance. Use black metal posts for a modern “mixed material” look.
Estimated Cost: $50–$80 per linear foot.
Splurge: Ipe or Composite with Custom Steel
If you want a fence that will last 40+ years and looks like a piece of fine furniture, go with Ipe or a high-end capped composite like Trex. Combine this with custom-welded steel frames.
Estimated Cost: $120–$200+ per linear foot.
Common Mistakes (and How to Fix Them)
Mistake: Forgetting about wood movement.
Wood expands when it gets wet. If you butt the horizontal boards tightly against the posts without a small gap, they will buckle and warp when it rains.
The Fix: Leave a 1/16-inch gap at the ends of each board where they meet the post or frame to allow for expansion.
Mistake: Using thin “fence pickets.”
Standard dog-ear pickets are usually only 1/2-inch to 5/8-inch thick. When placed horizontally over a 6-foot span, they will eventually bow and look wavy.
The Fix: Use 1-inch (actual thickness 3/4-inch) dimensional lumber. It is much more rigid and holds its shape over time.
Mistake: Neglecting the “Top Cap.”
Many people leave the end grain of their posts exposed to the sky. This is where water enters the wood and causes rot from the inside out.
The Fix: Install a horizontal “cap rail” across the top of the fence. Not only does this protect the posts, but it also gives the fence a finished, polished look.
Designer’s Note:
In a recent project, a client wanted a horizontal cedar fence but was worried about it looking like a “giant wooden crate.” We solved this by breaking the fence into sections. Every 12 feet, we swapped the wood slats for a 2-foot section of black powder-coated laser-cut metal panels in a geometric pattern. It broke up the visual weight and allowed the garden lighting to cast amazing shadows at night. Always look for ways to break up long, monotonous stretches of wood.
Room-by-Room Variations
When we think of fences, we usually think of the perimeter, but in MCM design, “fencing” is often used to define specific outdoor “rooms.”
The Front Entry Court
Many Mid Century homes use a small courtyard near the front door. Use a low, 4-foot horizontal slat fence to create a “transition zone” between the street and your front door. This is a great place to incorporate a custom gate with a large, round MCM-style handle.
The Pool Surround
Safety is the priority here, but style shouldn’t suffer. Use a combination of glass panels and horizontal wood slats. This allows you to keep an eye on the pool area while maintaining a private, resort-like feel.
The Trash and Utility Hideaway
Don’t let your AC unit or trash cans ruin your curb appeal. A small, 3-sided MCM screen is a weekend project that makes a massive difference. Use the same slat spacing and stain as your main fence to keep the look cohesive.
The Garden “Art” Wall
Sometimes a fence isn’t for privacy; it is for backdrop. A short section of breeze blocks in a backyard can act as a gallery wall for hanging outdoor art or as a trellis for climbing vines like jasmine or bougainvillea.
Finish and Styling Checklist
To get that “magazine-ready” finish, you need to go beyond just the construction. Here is my personal checklist for every project:
- Lighting: Install low-voltage LED “wash” lights at the base of the fence. This highlights the horizontal texture of the wood at night.
- Hardware: Avoid standard “farmhouse” gate latches. Look for sleek, modern thumb-latches in matte black or brushed brass.
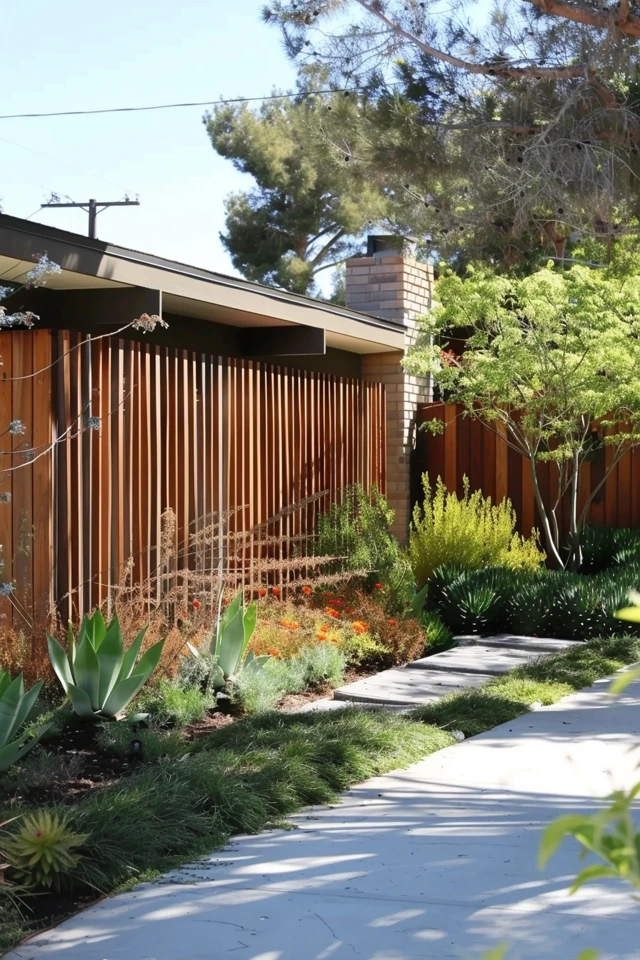
- Landscaping: Plant architectural greens like horsetail reed, agave, or ornamental grasses in front of the fence. The structured plants contrast beautifully with the linear wood.
- Maintenance: Plan to re-oil or re-stain your fence every 2–3 years to prevent it from turning gray (unless you prefer the weathered “driftwood” look).
- Fasteners: Ensure all screws are driven to the same depth. Inconsistent screw heads can ruin the clean lines of a modern fence.
What I’d Do in a Real Project: Mini Checklist
If I were managing your fence installation tomorrow, this is exactly what I would verify:
- Check that the “bottom gap” is at least 2 inches off the soil to prevent moisture wicking.
- Ensure the installer is using a string line to keep the top of the fence perfectly level, even if the ground slopes.
- Verify that the wood is “Clear” or “Select” grade (fewer knots mean a cleaner MCM look).
- Confirm that the stain is applied to all six sides of the board (including the ends) before they are installed.
FAQs
How do I handle a sloped yard with a horizontal fence?
This is the most common challenge. You have two choices: “stepping” or “following the grade.” For MCM homes, I almost always recommend stepping. This keeps the lines of the boards perfectly level, which is essential for the style. You will have small triangular gaps at the bottom, which can be filled with landscaping or a gravel berm.
Will a horizontal fence make my small yard look smaller?
Actually, the opposite is true. Much like horizontal stripes on clothing, horizontal boards lead the eye around the perimeter of the space, creating the illusion of more width.
Can I use vinyl for an MCM fence?
While there are horizontal vinyl options, they often lack the “soul” of an MCM design. Vinyl can look a bit “plastic-y” and doesn’t have the natural variation in grain that makes this style work. If you want low maintenance, look into high-quality composite or aluminum instead.
Is horizontal fencing more expensive than vertical?
Generally, yes. It requires more labor to ensure everything is level, and it often requires more expensive, higher-grade wood to prevent warping over long horizontal spans. Expect to pay 20% to 30% more than a standard vertical privacy fence.
Conclusion
A Mid Century Modern fence is an investment in your home’s architectural identity. By focusing on clean lines, high-quality natural materials, and the correct proportions, you can create a boundary that feels like an intentional design choice rather than a functional necessity.
Remember that the best designs are those that consider the “whole picture”—how the fence looks from the street, how it feels from your patio, and how the light hits it at sunset. Whether you choose the warmth of cedar or the iconic pattern of breeze blocks, your fence is the frame for your outdoor life.
Picture Gallery


