
Title: Minimalist Window Treatments: Elegant Solutions
Introduction
There is a common misconception that minimalism means bare windows. I have walked into countless client homes where they have left their windows completely uncovered in the name of “clean lines,” only to suffer through blinding afternoon glare and a total lack of privacy at night. True minimalist design isn’t about removing everything; it is about finding the perfect balance where function meets a quiet, unobtrusive aesthetic.
When we approach window treatments with a minimalist mindset, we are looking for architectural integration. We want the treatments to feel like part of the building’s bones rather than a decoration slapped on top. This requires precise measurements, specific fabric choices, and hardware that knows how to disappear. For visual inspiration on how these elements come together, be sure to check out the Picture Gallery at the end of the blog post.
In this guide, I will walk you through exactly how I select and install treatments that look effortless but perform heavy lifting. We will cover the specific styles that work, the measurements you cannot get wrong, and the materials that elevate a room without screaming for attention.
The Philosophy of “Less But Better” in Window Design
Minimalism in window treatments is defined by the absence of visual clutter. We avoid swags, ornate valances, heavy tassels, and bold, contrasting patterns. Instead, we focus on the quality of the material and the precision of the hang.
The goal is usually one of two things: to frame the view or to diffuse the light. If you have a spectacular view, the treatment needs to vanish completely when open. If your view is a brick wall or a neighbor’s window, the treatment needs to filter light beautifully while obscuring the outside world.
Designer’s Note: The “White Box” Trap
In my early years, I thought minimalism meant white roller shades on white walls. I learned the hard way that this can make a home feel like a sterile dentist’s office.
The Fix: Use texture instead of color contrast. A white linen shade with a visible weave adds warmth and depth that a flat vinyl shade lacks, even if the color code is identical. Texture is the minimalist’s secret weapon.
Top 3 Minimalist Treatment Styles
Not all window coverings work for this aesthetic. Through trial and error on dozens of projects, I have narrowed down the list to three key players that consistently deliver that sleek, modern look.
1. Solar and Roller Shades
This is the workhorse of modern design. A roller shade is essentially a flat piece of fabric that rolls up onto a tube. When raised, it almost disappears.
However, the “cheap” look of roller shades usually comes from the hardware. To keep it elegant, you must specify a “reverse roll.” This means the fabric rolls off the front of the tube, hiding the roll itself. Alternatively, use a sleek metal fascia (a cover for the roller) that matches your window trim exactly.
Understanding Opacity:
- 1% to 3% Opacity: You can barely see out, and people cannot see in during the day. This cuts the most glare.
- 5% Opacity: A nice balance. You can see the view, but UV rays are cut down.
- 10% Opacity: Very sheer. Primarily for reducing heat, not for privacy.
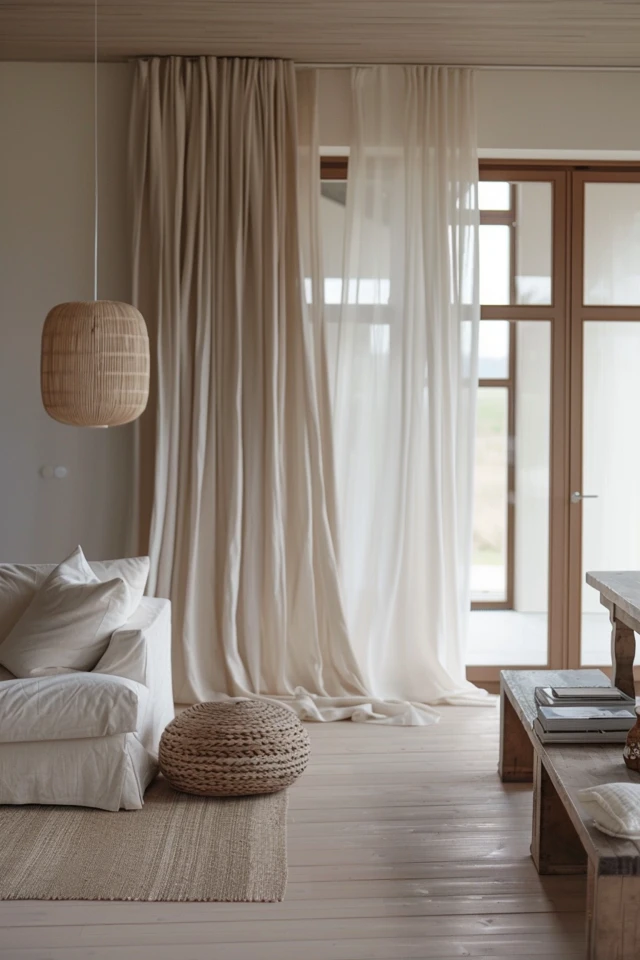
2. Ripple Fold Drapery
If you prefer curtains, “Ripple Fold” is the only style I recommend for a truly minimalist home. Unlike pinch-pleats or grommets, ripple fold drapery hangs on a specialized track that creates consistent, smooth “S” curves in the fabric.
The beauty of this style is its uniformity. When open, the stack (the bunched fabric) is very tight and tidy. When closed, it looks like a structured architectural column of fabric.
Pro Rule of Thumb:
For a full, luxurious look that isn’t messy, aim for 1.8x to 2x fullness. Anything less looks like a flat sheet; anything more looks too traditional and heavy.
3. Flat Roman Shades
Roman shades are fabric panels that stack up in folds. For minimalism, you want a “Flat Fold” Roman shade.
Avoid “hobbled” or “waterfall” styles, which have loops of fabric cascading down the front. A flat fold creates a seamless panel of fabric when lowered. It looks like a piece of art or a wall panel rather than a fluffy curtain.
Selecting the Right Materials and Tones
The fabric you choose dictates the mood of the room. In minimalist design, we usually stick to natural fibers or high-quality synthetics that mimic them.
Linen and Linen Blends
Linen is my top choice for living spaces. It has a natural “slub” or irregularity in the weave that catches the light beautifully. However, 100% linen grows and shrinks with humidity.
If you live in a humid climate, I recommend a linen/polyester blend. You get the look of linen with the stability of a synthetic. This ensures your drapes won’t be dragging on the floor in the summer and hovering two inches above it in the winter.
Sheers vs. Semi-Opaque
- Sheers: Great for daytime privacy and softening light. They do not provide night privacy.
- Semi-Opaque: These filter light but block the view. You will see shadows at night, but no details.
- Blackout: Essential for bedrooms. In a minimalist room, blackout fabrics can look heavy or rubbery. I always recommend lining a nice textured fabric with blackout liner rather than buying a “blackout fabric.”
The Tone-on-Tone Technique
To make a room feel larger and taller, match your window treatment color to your wall color. If you have “Chantilly Lace” white walls, get white drapes.
This reduces visual breaks in the room. When the eye scans the space, it doesn’t stop at the window; it flows right across, making the envelope of the room feel continuous and expansive.
Installation Rules for a Clean Look
You can buy the most expensive fabric in the world, but if you hang it incorrectly, it will look cheap. Installation is where the design actually happens.
The “High and Wide” Rule
Never mount your drapery rod or shade directly on the window frame (architrave). It crowds the glass and makes the window look small.
My Installation Standards:
- Height: Mount the rod or shades as close to the ceiling line or crown molding as possible. This draws the eye up and emphasizes verticality.
- Width: Extend your rod 10 to 12 inches past the window frame on each side. This allows the drapes to “stack” against the wall, leaving the glass completely uncovered when open.
Ceiling Mounted Tracks
For the ultimate minimalist look, mount a drapery track directly to the ceiling. This eliminates the need for a rod and brackets entirely. The fabric simply flows from the ceiling like a waterfall.
If you are renovating, ask your contractor to recess the track into the drywall. This is a high-end detail where the curtain appears to drop out of a thin slit in the ceiling. It is stunning and incredibly clean.
Inside vs. Outside Mount for Shades
- Inside Mount: The shade sits inside the window frame. This is the cleanest look and highlights beautiful molding. However, you will have a “light gap” of about 1/8 inch on the sides.
- Outside Mount: The shade mounts on the wall above the frame. This is better for blackout needs as it covers the light gaps, but it hides the window trim.
Room-by-Room Strategies
Different rooms have different functional requirements. Here is how I adapt the minimalist approach across a home.
The Living Room
Here, we want light control and UV protection for furniture. I often layer treatments here, even in minimalist homes.
What I’d do in a real project:
I would install a solar roller shade (3% opacity) inside the window frame for daytime glare control. Then, I would add floor-to-ceiling ripple fold drapes on a sleek track for softness and acoustic dampening at night.
The Bedroom
Sleep hygiene is the priority. Light leaks are the enemy.
If using roller shades, install “side channels.” These are U-shaped aluminum tracks that run down the sides of the window frame. The shade fabric rides inside the tracks, blocking 100% of the light gaps. It looks very technical and sleek, almost like a hotel setup.
If using drapes, ensure you have a “return.” This means the last hook of the drapery wraps around to the wall, sealing the side so light doesn’t creep in at the edges.
The Kitchen and Bathroom
Moisture and grease are factors here. Avoid raw linen or silk.
Faux-wood blinds or composite shutters are excellent here. They can be wiped down and are impervious to humidity. For a softer look, use a Roman shade made of an outdoor performance fabric. These fabrics resist mildew and staining but still look like high-end textiles.
Common Mistakes and Fixes
I see these errors frequently in DIY projects. Correcting them makes a massive difference in the final polish of the room.
Mistake 1: The “Puddle”
The Issue: Letting curtains pool on the floor. While this works for romantic, traditional styles, it looks messy in a minimalist room. It also collects dust and pet hair.
The Fix: The “Kiss.” The hem of the drape should just barely touch the floor—literally “kissing” it. Or, hover exactly 1/4 inch off the floor for a perfectly tailored trouser break.
Mistake 2: Visible Hardware
The Issue: Chunky finials (the decorative ends of curtain rods) or massive brackets.
The Fix: Use “end caps” instead of finials. They are flat metal discs that finish the rod without adding length or ornamentation. Choose a rod finish that matches your window frames (e.g., matte black on matte black) to make it disappear.
Mistake 3: Cutting Costs on Lining
The Issue: Unlined drapes look flimsy and show the window frame silhouette through the fabric when back-lit.
The Fix: Always use a liner. A simple privacy liner gives the drapes body and weight, helping them hang straighter and look more substantial.
Final Checklist: The Designer’s Protocol
Before you order anything, run through this checklist to ensure you haven’t missed a critical detail.
- Measure three times: Measure the top, middle, and bottom of the window. Use the narrowest measurement for inside mounts and the widest for outside mounts.
- Check for obstructions: Look for window cranks, handles, or alarm sensors that might get in the way of a shade lowering.
- Determine stack back: If you want the window 100% clear when drapes are open, calculate where the fabric will bunch and extend your rod accordingly.
- Verify floor level: Floors are rarely perfectly level. If your drapes hang 1/4 inch off the floor on the left, they might drag on the right. Adjustable hem hooks can help fix this later.
- Sample the fabric: Tape a swatch of the fabric to the window and look at it at three times of day: morning, noon, and night. Artificial light changes fabric colors drastically.
FAQs
Can I mix different window treatments in the same open-plan space?
Yes, but keep the color consistent. You might use ripple fold drapes on the large sliding doors and matching roman shades on the smaller kitchen windows. As long as the fabric is the same (or extremely similar tones), it will feel cohesive.
How do I handle privacy without losing light?
“Top-Down/Bottom-Up” cellular shades are a solution, but they can look a bit busy. A better minimalist solution is a “café curtain” rod placed halfway up the window, or using a frosted film on the lower pane of glass combined with a standard shade.
Are motorized shades worth the cost?
For minimalism, absolutely. Motorization eliminates pull chains and cords, which are visual clutter. It is also safer for homes with children and pets. New battery motors are rechargeable and don’t require hardwiring, making them easy to retrofit.
What if I am a renter?
For renters, tension rods have come a long way. Look for “industrial” style tension rods that wrap into the window jamb. Alternatively, simple roller shades can often be installed with just two small screw holes that are easy to patch when you move out.
Conclusion
Minimalist window treatments are about restraint and precision. By choosing the right mechanism, investing in quality textures over patterns, and adhering to strict installation heights, you can transform a room.
The goal is to control the light and privacy of your home without the window treatments becoming the protagonist of the story. They should be the supporting characters that make the architecture and the furnishings shine. Remember, in design, what you take away is just as important as what you add.
Picture Gallery


