
Modern Pool Waterline Tile Ideas for a Chic Look
Designing a pool is much like designing a living room, except your primary element is water and your lighting is the sun. The waterline tile is arguably the most critical aesthetic decision you will make for your swimming pool. It acts as the frame for the water, bridging the gap between the liquid surface and the solid coping or deck.
When done correctly, this six-inch band of material defines the style of the entire outdoor space. It can turn a simple backyard hole-in-the-ground into a glistening, architectural feature. If you are looking for visual inspiration, you can scroll down to the Picture Gallery at the end of this post.
However, selecting the right tile requires balancing durability with high design. In my years of designing outdoor living spaces, I have seen beautiful tiles fail because they weren’t rated for submersion or freeze-thaw cycles. This guide will walk you through the modern options that look incredible and actually last.
Understanding the Function of Waterline Tile
Before we dive into aesthetics, we need to address why this tile exists. It is not just decorative. The waterline is where your pool water meets the air, creating a prime environment for pollen, sunscreen oils, and calcium scale to accumulate.
If you had plain plaster right up to the top, that “bathrub ring” or scum line would stain the porous surface permanently. Tile provides a sealed, non-porous band that is easy to scrub and chemically treat without damaging the finish.
From a design perspective, this band also handles the transition between the pool interior and the coping. It serves as a visual anchor. Without it, the pool edge can look unfinished or washed out.
Designer’s Note: The Scale Rule
The standard height for a waterline tile band is 6 inches. This is not arbitrary. It allows for the water level to fluctuate by a few inches (due to evaporation or splashing) while still keeping the plaster submerged and the tile visible.
If you are renovating, stick to the 6-inch rule unless you are doing a complete remodel of the beam. Visually, a 6-inch band provides enough weight to be seen from the patio but isn’t so thick that it dominates the pool interior.
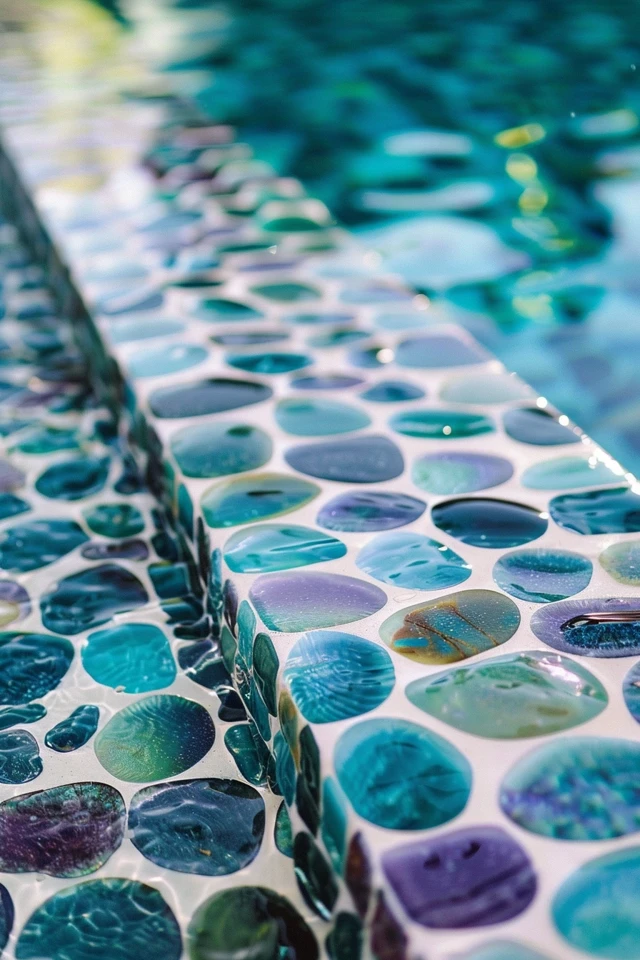
Material 1: The Rise of Glass Mosaic
Glass tile has become the gold standard for modern luxury pools. Unlike ceramic or stone, glass has a translucency that interacts with the water and sunlight in a mesmerizing way. It adds depth and dimension that opaque materials simply cannot match.
For a modern chic look, I almost always steer clients toward glass mosaics. They come in sheets, usually 12×12 inches, comprised of smaller chips ranging from 1×1 inch to 1×4 inches.
Why choose glass?
- Luminosity: Glass reflects light, making the pool water appear brighter and more sparkling.
- Non-porous: It is the most water-resistant material available, making it impervious to staining and chemical damage.
- Illusion of space: Because it reflects the surroundings, it can make a smaller pool feel larger.
The downside
Installation is unforgiving. Glass is transparent or semi-transparent, meaning you can see the adhesive behind it. Your installer must smooth out the thin-set perfectly, or you will see trowel marks through the tile. It is also more expensive to cut than porcelain, requiring a specific glass blade to avoid chipping.
Material 2: Large Format Porcelain
If glass feels too “glitzy” for your taste, large format porcelain is the sophisticated, understated alternative. This is a massive trend in contemporary landscape design right now. We are moving away from small, busy patterns toward sleek, monolithic looks.
I love using 6×6 inch or even 6×24 inch porcelain tiles. This reduces the number of grout lines significantly. Fewer grout lines mean a cleaner visual look and less maintenance down the road.
The Stone Look without the Sorrow
Modern porcelain technology is incredible. You can find porcelain that mimics travertine, slate, or bluestone with hyper-realistic texture. This allows you to get the organic, earthy vibe of natural stone without the maintenance headaches of sealing porous rock every season.
Specific recommendation: Look for a matte finish or a “flamed” texture. High-gloss porcelain can sometimes look plastic-y when applied in large formats. A matte finish looks more like natural architectural stone and pairs beautifully with concrete decking.
Material 3: The Dark Lagoon Aesthetic
One of the chicest moves you can make is abandoning the traditional “pool blue” tile. For a truly modern, high-end resort feel, consider black, charcoal, or deep navy waterline tiles.
When you use dark tile, it creates a mirror effect on the water’s surface. Instead of seeing the bottom of the pool, the water reflects the sky and the surrounding trees. It creates a deep, lagoon-like appearance that is incredibly relaxing.
Color Theory in Pools
- Black/Charcoal Tile: Creates a deep, mysterious blue water color. It acts as a mirror for the landscape. Ideal for modern, geometric pools.
- White/Light Grey Tile: Creates a “glacial blue” water color. The water looks incredibly clear and crisp, like Caribbean shallows.
- Teal/Green Tile: Creates a vintage or Balinese resort look. The water will take on an aquamarine tint.
Common Mistake: The Heat Factor
Clients often worry that dark tiles will make the water too hot. While dark surfaces absorb heat, the waterline tile represents a very small surface area compared to the volume of water. It will not significantly change your pool temperature. However, the tile itself can get hot to the touch if exposed to direct sun, so keep that in mind if you like to hang onto the edge.
Material 4: Natural Stone and Maintenance
For a rustic modern or organic modern aesthetic, natural stone is unbeatable. Travertine and limestone are the classics. They provide a soft, tactile experience and blend seamlessly if you are using the same stone for your pool deck.
However, as a designer, I must warn you about the “salt issue.” If you have a salt-water pool (which uses a salt chlorine generator), you must be extremely careful with natural stone. Salt water can erode soft stones like travertine over time, causing them to pit and crumble.
If you insist on natural stone for a salt pool, you have two options:
- Seal religiously: You must use a high-quality consolidating sealer every 1-2 years.
- Choose harder stone: Granite or dense bluestone holds up much better than soft limestone.
Grout: The Forgotten Detail
You can pick the most expensive tile in the world, but if you choose the wrong grout, the project will look cheap. Grout color can either highlight the pattern or make it disappear.
For a modern look, I usually recommend a grout color that matches the tile as closely as possible. This creates a seamless “wall of color.” Contrasting grout (like white grout on blue tile) creates a grid pattern that can look busy and dated.
The Case for Epoxy Grout
In pool applications, I almost exclusively specify epoxy grout. Traditional cement-based grout is porous. It absorbs water, stains easily, and can crack over time.
Epoxy grout is essentially liquid plastic. Once it cures, it is completely waterproof, stain-proof, and chemical-resistant. It costs more upfront—both for the material and the labor, as it is difficult to work with—but it will save you years of scrubbing algae out of your grout lines.
Coordinating with Coping
Your waterline tile does not exist in a vacuum. It lives right next to your coping (the stone or concrete edge of the pool). These two materials must talk to each other.
There are two main strategies for this coordination:
1. The Blend
You choose a waterline tile that is a similar tone to your coping. For example, if you have ivory travertine coping, you might choose a beige or taupe porcelain waterline tile. This makes the pool edge look thick and substantial, blurring the line between the deck and the water. This is excellent for small spaces as it reduces visual clutter.
2. The Contrast
You treat the waterline tile as a ribbon of color that pops against the coping. For example, cool grey concrete coping paired with a vibrant iridescent blue glass tile. This frames the water sharply and draws the eye directly to the pool.
Common Mistakes + Fixes
Mistake: Using bathroom tile in a pool.
Fix: Just because a tile is ceramic doesn’t mean it is pool-rated. Pool tiles must be frost-proof (absorbing less than 0.5% water). If you use standard bathroom tile, it will absorb water, freeze in the winter, and pop off the wall. Always verify the spec sheet says “Frost Proof” or “Vitreous.”
Mistake: Ignoring the “dry” look.
Fix: Glass tile looks different when dry versus wet. Some iridescent finishes look amazing underwater but look like oil slicks when dry. Always take your sample tile, dip it in water, and then look at it in direct sunlight.
Mistake: Small mosaics in a leafy yard.
Fix: If your pool is surrounded by trees, you will have a scum line of pollen and debris. Tiny mosaic tiles have a lot of grout lines. Grout lines grab dirt. If you have a messy yard, opt for a larger format tile (6×6 or 6×12) to minimize scrubbing.
What I’d Do in a Real Project: A Mini Checklist
If I were designing your pool today, here is the decision tree I would use to ensure we get the perfect look:
- Assess the Architecture: Is the home Mid-Century Modern? Go with a vertical stack 1×4 glass tile. Is it a Farmhouse? Go with a slate-look porcelain. The pool must match the house.
- Check the Budget: Glass is approx. $25-$50/sq ft. Porcelain is $5-$15/sq ft. Know your limit before falling in love with a sample.
- Sunlight Analysis: Does the pool get full sun? Iridescent glass will look spectacular. Is it in the shade? Go with a lighter color tile to brighten the water.
- Sample on Site: I never approve a tile without taping a sheet of it to the existing pool wall (or a mock-up board) and looking at it from the kitchen window. Distance changes perception.
- Select the Grout: Epoxy only. Color matched to the tile.
FAQs
Can I tile the entire inside of my pool?
Yes, and it is the ultimate luxury finish. It is incredibly smooth on the feet and looks stunning. However, it is also the most expensive finish possible, often costing 10x more than standard plaster. It also requires a highly skilled installer, as the waterproofing must be perfect.
How long should waterline tile last?
If installed correctly with proper waterproofing and expansion joints, your tile should last 15 to 20 years. The most common failure is not the tile itself, but the grout or the thin-set behind it giving way due to water chemistry imbalances.
Is glass tile harder to clean?
Actually, the glass itself is easier to clean than stone or ceramic because it is so smooth. Calcium deposits usually wipe right off. The difficulty comes from the grout lines. If you use small glass mosaics, you have more grout to clean.
Conclusion
Renovating your waterline tile is one of the highest-impact changes you can make to your outdoor space. It is a relatively small surface area that commands a huge amount of visual attention.
Whether you choose the shimmering luxury of glass mosaic or the grounded elegance of matte porcelain, the key is to prioritize material quality. A pool is a harsh environment—between the chemicals, the UV rays, and the water pressure, your materials need to be tough.
Take your time selecting your samples. Look at them wet, look at them dry, and look at them from inside your house. When you find the one that makes the water look inviting and complements your home’s architecture, you will know you’ve found the right match.
Picture Gallery


