
Title: Pumpkin Trellis Ideas for Your Fall Garden
Introduction
There is something undeniably architectural about a well-planned vegetable garden. While many homeowners focus on the ground-level layout of raised beds and pathways, neglecting vertical space is a missed opportunity for both aesthetics and yield. In my years of designing exterior spaces, I have found that introducing vertical elements like trellises transforms a flat, utilitarian patch into a dynamic “garden room” that feels like an extension of the home’s interior.
When a client recently asked for a pumpkin patch in a relatively small urban backyard, the only viable solution was to grow upward. We utilized cattle panel arches to create a tunnel of greenery, turning a simple agricultural necessity into a stunning focal point. If you are looking for visual inspiration regarding these structures, you can jump right to the Picture Gallery at the end of this post.
In this guide, I will walk you through the structural and stylistic considerations of pumpkin trellising. We will move beyond basic gardening tips and look at this through a design lens, focusing on scale, material durability, and visual integration with your home’s exterior. Whether you are working with a sprawling estate or a compact patio, vertical gardening is the key to a lush, organized autumn harvest.
1. The Structural “Bones”: Choosing the Right Trellis Style
In interior design, we often talk about the “bones” of a room—the flooring, walls, and fixed elements that dictate the flow. In a garden, your trellis system serves the same function. It defines the space, directs traffic, and provides the framework for your living walls.
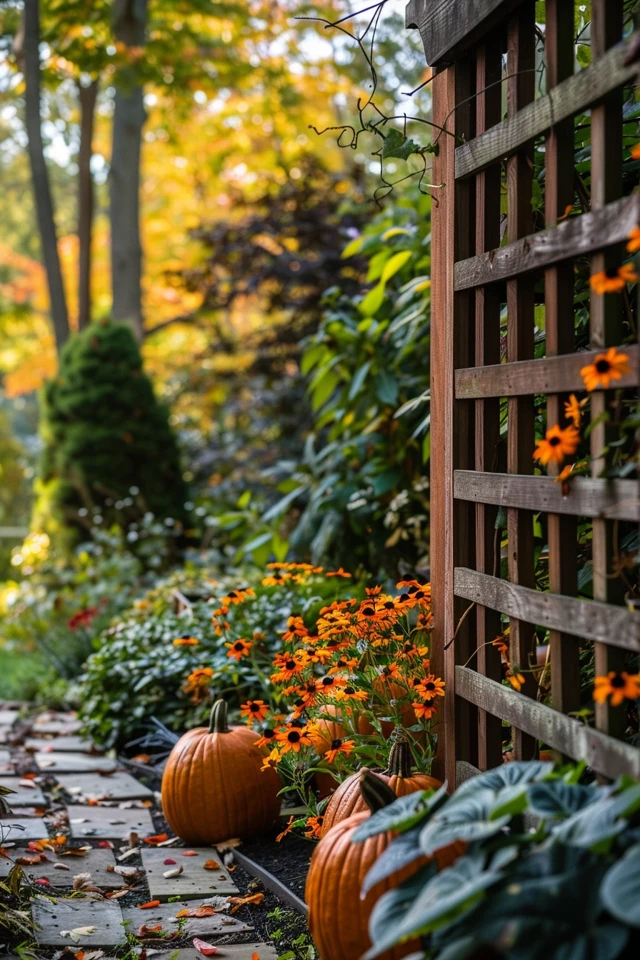
The most common mistake I see DIYers make is choosing a trellis based on how it looks in the store, rather than how it functions under load. Pumpkin vines are heavy, thick, and aggressive. A delicate wooden lattice meant for clematis will snap under the weight of a mature pumpkin vine in a severe summer storm.
The Cattle Panel Arch
For durability and architectural impact, the cattle panel arch is my top recommendation. These are heavy-duty, galvanized steel wire panels, typically sold in 16-foot lengths. By bending them into an arch shape, you create a walkthrough tunnel that maximizes planting area without sacrificing foot traffic space.
Designer’s Note: Scale and Clearance
When installing an arch, you must consider the clearance height. A 16-foot panel bent into an arch usually creates a peak height of about 6.5 to 7 feet, depending on how wide you set the base. If you have family members taller than 6 feet, or if you plan to hang lights, you need to lift the trellis. I often mount the panels on top of 2-foot tall raised wooden beds to gain extra vertical clearance.
The A-Frame Trellis
If you are renting or need a movable solution, the A-frame is incredibly efficient. It consists of two flat panels leaning against each other, hinged or tied at the top. This structure is self-supporting and creates a shaded sanctuary underneath for cool-weather crops like lettuce or spinach.
Common Mistakes + Fixes
- Mistake: Using chicken wire or flimsy plastic netting.
- Fix: Use rigid welded wire fencing with openings of at least 4×4 inches. This allows you to reach your hand through the mesh to prune leaves or support fruit.
- Mistake: Placing the trellis in a wind tunnel.
- Fix: Anchor your trellis deeply. For cattle panels, use T-posts driven at least 12 inches into the ground.
2. Material Selection: Coordinating with Your Home’s Exterior
As a designer, I always strive for cohesion between the interior and exterior of a home. Your garden structures should not look like an afterthought; they should echo the architectural style of your main residence. The material you choose for your pumpkin trellis sets the tone for the entire garden.
Wood (Cedar and Redwood)
If your home has a Craftsman, Farmhouse, or Traditional aesthetic, wood is the natural choice. Cedar and redwood are rot-resistant and age beautifully to a silvery-gray. When building wooden frames for trellising, use 4×4 posts for vertical support to ensure they don’t bow over time.
Pro Tip: If you use pressure-treated lumber for longevity, line the inside of the posts with plastic or stain them with a non-toxic sealant if they will be in direct contact with the soil where food is growing.
Metal and Iron
For Modern, Industrial, or French Country homes, metal offers cleaner lines. Black powder-coated steel or raw galvanized steel looks sharp and intentional. Metal trellises virtually disappear once the vines cover them, making the pumpkins appear as if they are floating.
Vinyl and PVC
I generally advise against PVC for heavy crops like pumpkins. While it is inexpensive and easy to work with, it lacks the rigidity required for heavy fruit. Over a hot summer, PVC can warp and bend under the weight of a vigorous vine, ruining the clean lines of your garden design.
3. Selecting the Right Pumpkin Varieties for Vertical Growth
Not every pumpkin is a candidate for vertical gardening. Attempting to trellis an Atlantic Giant (which can weigh hundreds of pounds) is a recipe for disaster. Success in vertical gardening relies heavily on selecting varieties that produce fruit under 10 pounds.
Small-Fruiting Varieties
These are the safest bets and require minimal intervention. They look charming hanging through the trellis mesh and add pops of orange, white, or striped green against the foliage.
- Jack-Be-Little: Miniature, classic orange pumpkins that fit in the palm of your hand.
- Baby Boo: Similar to Jack-Be-Little but with a ghostly white skin.
- Sugar Pie: The standard for baking. They usually grow to about 6-8 inches in diameter.
Medium Varieties (Requires Support)
You can grow mid-sized pumpkins vertically, but you have to act as the engineer. Varieties like the “Cinderella” or “Jarrahdale” can be trellised, but they require a hammock support system (discussed in the next section).
Designer’s Note: Visual Rhythm
When planting, I like to mix varieties for visual interest. I might plant a striped gourd variety on one side of an arch and a classic orange pumpkin on the other. As they meet at the top, the contrasting textures create a beautiful, lush canopy.
4. Engineering Support: The Hammock Method
Gravity is the enemy of a trellised pumpkin. As the fruit grows, its weight pulls on the stem. If the weight exceeds the stem’s tensile strength, the fruit will drop before it is ripe. To prevent this, professional gardeners and designers use the “sling” or “hammock” method.
This is a critical maintenance step that you cannot skip if you are growing anything larger than a grapefruit. It involves creating a cradle for the fruit that ties directly to the trellis, taking the weight off the vine entirely.
Materials for Slings
You don’t need expensive equipment for this. In fact, recycled materials often work best because they are stretchy and breathable.
- Pantyhose: The classic gardener’s choice. They expand as the pumpkin grows and dry out quickly after rain.
- Old T-shirts: Cut into strips or slings. They are soft and won’t damage the pumpkin skin.
- Onion Bags: The mesh netting from grocery store onions is strong and allows for excellent airflow.
How to Install a Pumpkin Sling
1. Wait until the pumpkin is about the size of a tennis ball.
2. Gently cradle the pumpkin in the fabric material.
3. Tie the ends of the fabric securely to the metal or wood grid of the trellis, not the vine itself.
4. Ensure there is slight slack so the pumpkin can expand, but tight enough that the stem has wiggle room.
5. Layout and Spacing: The “Garden Room” Concept
When I plan a room layout, I look at traffic flow and negative space. The same rules apply to a pumpkin trellis. A common error is placing the trellis in a way that blocks access to other parts of the garden or makes maintenance difficult.
Spacing Rules of Thumb
Pumpkins are heavy feeders and have extensive root systems. Crowding them results in poor airflow, which leads to powdery mildew—a fungal disease that turns your beautiful green wall into a dusty, dying eyesore.
- Plant Spacing: Plant seeds or transplants at the base of the trellis, spaced 24 to 36 inches apart.
- Path Width: If you are creating an archway, the path beneath it should be at least 36 inches wide. This allows you to walk through with a wheelbarrow or a harvest basket without brushing against thorny vines.
- Sun Orientation: Orient your trellis so that the broad side faces the sun (typically running East-West if possible) to maximize photosynthesis.
Companion Planting for Aesthetics
To make the trellis look like a finished design element, don’t leave the “feet” of the plants bare. I like to underplant the base of the pumpkins with marigolds or nasturtiums.
Nasturtiums are particularly effective; they are trailing plants that spill over the edges of raised beds, softening the hard lines of the trellis structure. Marigolds add a pop of color and help deter certain pests. This layering of plants creates the lush, “cottage garden” feel that is so popular in current landscape design.
Final Checklist: What I’d Do in a Real Project
If I were hired to install a pumpkin trellis in your garden tomorrow, this is the exact checklist I would follow to ensure the project is successful, safe, and beautiful.
1. Site Analysis
- Verify the location gets 6 to 8 hours of direct sunlight.
- Check that the ground is level. If not, I would level it or use raised beds to create a flat foundation.
- Ensure a water source is nearby. Dragging a hose 100 feet daily is a chore you will quickly resent.
2. Soil Preparation
- Pumpkins are hungry. I would amend the soil with at least 4 inches of organic compost and a slow-release balanced fertilizer.
- If planting in pots, use a pot that is at least 15-20 gallons per plant. Small pots dry out too fast for pumpkins.
3. Structural Anchoring
- For an arch: Drive four T-posts (two on each side) into the ground.
- Secure the cattle panel to the T-posts using heavy-duty zip ties or wire.
- Test the stability by shaking it vigorously. It should not wobble.
4. Irrigation Setup
- Install drip irrigation at the base of the plants. Overhead watering promotes disease on the leaves.
- Set a timer. Consistency is key to preventing blossom end rot.
5. The “Wait and Watch” Phase
- As vines grow, gently weave them through the trellis grid. They have tendrils, but they need initial guidance.
- Prune the vines once they reach the top of the arch to encourage energy to go into fruit production rather than more leaves.
FAQs
Can I grow pumpkins in a small container garden?
Yes, but you must choose bush varieties or miniature varieties like Jack-Be-Little. You will need a large container (20+ gallons) and a sturdy trellis staked directly into the pot. You must be diligent about watering, as containers dry out much faster than ground soil.
What happens if the pumpkin gets too heavy for the trellis?
If you have chosen a sturdy material like a cattle panel, the metal won’t break. However, the vine stem might snap. This is why the hammock/sling method is non-negotiable for medium-sized pumpkins. If a pumpkin looks like it is straining the vine, support it immediately.
How do I prevent powdery mildew on my vertical garden?
Vertical gardening actually helps prevent this because airflow is better than on the ground. However, you should still water only at the base of the plant (drip irrigation is best) and prune away some of the lower leaves to increase air circulation near the soil.
Can I leave the trellis up all year?
Absolutely. In the winter, a bare metal arch can look sculptural, especially if wrapped in weather-proof string lights. In the spring, you can use it for peas or pole beans before the pumpkin season starts. This makes it a multi-seasonal investment.
Conclusion
Integrating a pumpkin trellis into your fall garden is more than just an agricultural experiment; it is a design decision that adds height, drama, and utility to your outdoor space. By respecting the laws of scale, choosing durable materials, and employing proper support techniques, you can create a feature that is as beautiful as it is productive.
Remember that gardening, like interior design, is an iterative process. You might find that one variety works better for your specific microclimate, or that you prefer the look of wood over metal. Lean into the experimentation. The result—walking through a tunnel of hanging pumpkins on a crisp autumn evening—is a unique luxury that makes all the planning worthwhile.
Picture Gallery


