
Refreshing Pondless Waterfall Ideas for Your Garden
There is something inherently soothing about the sound of moving water. It changes the atmosphere of a garden instantly, masking street noise and creating a focal point that draws the eye.
However, many homeowners hesitate to install water features because they fear the maintenance of a full pond. They worry about green water, mosquito breeding grounds, or safety concerns regarding small children and pets.
This is where the pondless waterfall shines as a design solution. It offers all the sensory benefits of a cascading stream without the standing body of water at the bottom. For a dose of visual inspiration before we dive into the technical details, be sure to check out our curated Picture Gallery at the end of this blog post.
Understanding the Mechanics and Benefits
Before you break ground, it is vital to understand what makes a waterfall “pondless.” Instead of a visible pool, the water disappears into a bed of gravel.
Beneath that gravel lies a hidden reservoir, usually constructed from a heavy-duty matrix of milk-crate-like boxes called “aqua blocks” or a slotted pump vault. The pump sits deep in this protected excavation, recirculating the water back to the top of the falls.
This design drastically reduces maintenance. Because the water is not exposed to sunlight in a standing pool, algae growth is minimal. You spend your time enjoying the view, not skimming leaves or balancing pH levels.
Designer’s Note: The Safety Factor
In my years designing family-centric landscapes, the pondless waterfall is my number one recommendation for households with toddlers or curious dogs. Because the water level is hidden below gravel, there is zero risk of drowning. It allows you to introduce the element of water without the stress of constant supervision.
Calculating Scale and Placement
The most common failure in DIY water feature design is poor scale. A tiny trickle of water looks lost against a large retaining wall, while a massive “volcano” style eruption looks unnatural in a flat backyard.
You must design the feature to look like it has always been there. If your yard is flat, you need to build up a berm (a mounded hill of soil) to create the elevation for the falls. The ratio of the berm’s width to its height is crucial; I recommend a 3:1 ratio. For every foot of height, the berm should slope back three feet to look natural.
Placement is equally critical for enjoyment. I always tell clients to prioritize the view from inside the home. Most of us spend more time looking out our kitchen or living room windows than we do sitting on the patio.
What I’d do in a real project:
- Locate the primary view: Stand in the living room and mark the sightline with a flag in the yard.
- Check the distance: Place the waterfall 10 to 15 feet away from the main seating area. Closer can be too loud for conversation; further away diminishes the visual impact.
- Verify power access: Ensure you are within range of a GFI outlet to avoid expensive electrical trenching later.
Selecting the Right Stone and Hardscape
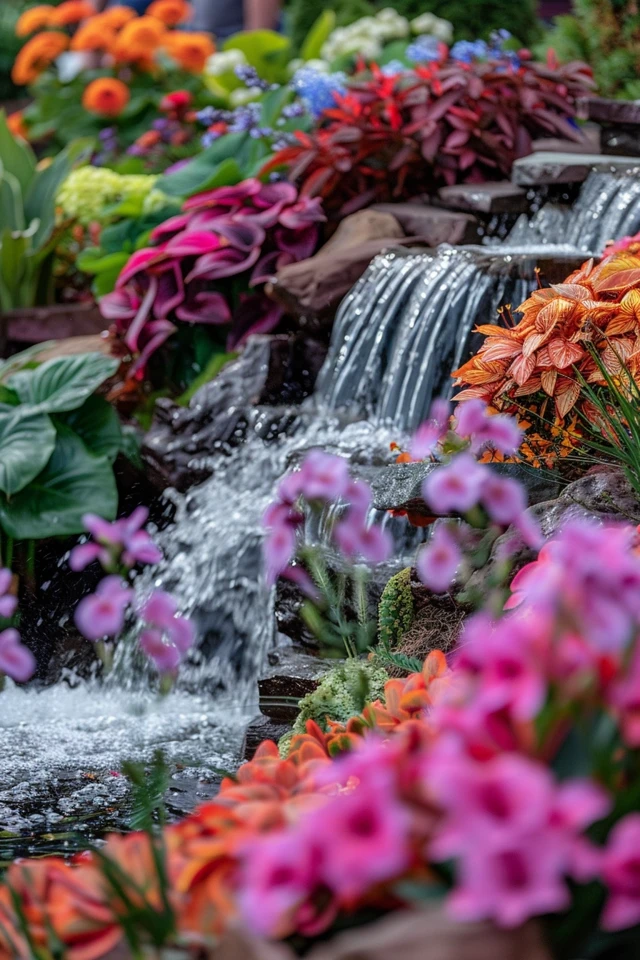
The difference between a professional-looking waterfall and a pile of rocks lies in the stone selection. You generally need three types of stone: boulders (for framing), flat rocks (for spillways), and gravel (for the basin and filler).
Avoid using stones that are all the same size. Uniformity is the enemy of naturalism. In nature, water exposes rocks of varying sizes, so you want a mix of large “character” boulders and smaller cobbles.
When choosing your “spillway” rocks—the flat stones the water runs over—texture matters. A smooth piece of slate will create a glass-like sheet of water. A rough, jagged piece of limestone will create white water and more noise.
Common Mistakes + Fixes
The Mistake: The “Pearl Necklace” effect. This happens when homeowners place rocks in a perfect single-file line around the edge of the stream or basin.
The Fix: Use the “inandout” method. Push some large boulders into the water flow and pull others back into the planting bed. This softens the edge and blurs the line between the water feature and the surrounding garden.
Engineering the Flow: Pump Sizing and Sound
The volume of water moving over your rocks determines both the look and the sound of the feature. In the industry, we calculate this based on the width of your spillway.
A general rule of thumb is to aim for 150 gallons per hour (GPH) for every inch of spillway width for a standard flow. If you have a 20-inch wide waterfall rock and want a robust flow, you need a pump capable of delivering at least 3,000 GPH at that specific head height.
“Head height” refers to the vertical distance the pump has to push the water. If your waterfall is 4 feet high, you need to check the pump’s flow chart to see what it delivers at 4 feet, not just its max rating.
Sound Tuning Guide:
- For white noise (masking traffic): Create a longer vertical drop (12 inches or more) into a shallow pool of water before it hits the gravel.
- For gentle trickling: Create multiple short drops (3 to 4 inches) where water slides over rocks rather than free-falling.
- For distinct splashing: Place a “splash rock” at the bottom of the falls for the water to hit directly.
Softening with Vegetation
Hardscape provides the structure, but plants provide the soul. A waterfall without plants looks like a construction site. The goal is to make the water feature look like it carved its way through the landscape over centuries.
You want to use plants to hide the “hand of man.” This means concealing the edges of the liner, the back of the berm, and the source of the waterfall (the bio-falls or spillway box).
I prefer to use cascading plants near the water’s edge. Varieties like creeping jenny, creeping phlox, or sedum work beautifully to drape over the rocks, softening the hard edges of the stone.
Planting Zones for Waterfalls:
- The Splash Zone: These plants will get misted constantly. Ferns, astilbe, and iris love this environment.
- The Berm (Background): This area is usually drier and provides the backdrop. Use evergreen shrubs like juniper or mugo pine to ensure the waterfall looks good in winter.
- The Edge: Use ornamental grasses like Japanese Forest Grass to create movement that mimics the flowing water.
Lighting for Nighttime Ambiance
A pondless waterfall should not disappear when the sun goes down. In fact, lighting water creates a magical, dancing effect that you cannot achieve during the day.
The mistake many make is shining a bright floodlight directly at the waterfall. This flattens the feature and looks harsh. Instead, you want to use submersible lights placed right where the water hits the gravel or tucked behind the falls shining up through the water curtain.
We always use warm white LEDs, typically in the 2700K to 3000K range. Cool white or blue-tinted lights can make the garden look artificial and uninviting.
Designer’s Note on Wiring:
Plan your lighting wire runs before you place your heavy boulders. It is incredibly difficult to fish a wire under a 500-pound rock after it has been set. Leave plenty of extra wire length (slack) coiled at the light fixture so you can pull it out of the water for servicing without disconnecting the system.
Final Checklist: The Build Process
If you are planning to oversee this project or tackle it yourself, following a strict order of operations prevents costly backtracking. Here is the checklist I use for project management.
1. Mark Out and Excavate
Use spray paint to outline the basin and the stream. Dig the basin deep enough to hold the matrix blocks plus a layer of gravel on top.
2. Install Underlayment and Liner
Never skip the underlayment fabric; it protects the rubber liner from sharp roots and rocks. Use a 45-mil EPDM fish-safe liner. It is heavy, but it lasts for decades.
3. Place Plumbing and Vault
Set the pump vault and run the flex-pipe up to the top of the waterfall. Connect it to the spillway box.
4. Rock Work (Bottom to Top)
Start placing boulders in the basin and work your way up. Frame the stream. Use expanding waterfall foam sealant between rocks to force water over them rather than under them.
5. Wash and Fill
Rinse the gravel dust off the rocks before turning the pump on. Pump that dirty water out, then fill the reservoir with clean water.
6. Tune the Falls
Turn the pump on. Move small rocks around on the spillways to tweak the water flow until the sound and visual are perfect.
7. Trim and Hide Liner
Only cut the excess liner once you are 100% sure the water is staying in the system. Hide the edges with soil and mulch.
FAQs
How much does a pondless waterfall cost to run?
Modern high-efficiency pumps are very affordable to operate. A typical pump for a residential backyard waterfall might cost between $15 and $30 per month in electricity, depending on local rates and if you run it 24/7.
Do I need to bring the pump inside for winter?
In most climates, you can leave the pump in the vault if it is deep enough not to freeze solid. However, if you live in an area with deep freezes (Zone 5 or lower), it is often safer to pull the pump and store it in a bucket of water in the garage to keep the seals moist.
How often do I need to refill the reservoir?
Evaporation happens, especially on hot, windy days. You may need to add water once a week. I highly recommend installing an automatic fill valve (connected to your irrigation line or spigot) to keep the water level topped off automatically.
Can I add fish later?
No. A pondless waterfall has no standing water for fish to swim in. The water exists only in the gravel basin and the active stream. If you want fish, you need a traditional pond.
Conclusion
Installing a pondless waterfall is one of the most rewarding upgrades you can make to your landscape. It engages the senses in a way that static planting beds simply cannot.
By removing the maintenance headaches of a traditional pond, you are left with the best parts of water gardening: the shimmer of light, the soothing acoustics, and the natural beauty of stone and moss.
Whether you choose a dramatic, high-flow cascade or a gentle, murmuring brook, the key is to respect the scale of your yard and blend the edges with thoughtful planting. Take your time with the rock placement, and you will build a feature that looks like it has been part of your garden for centuries.
Picture Gallery


