
Refreshing Tropical Outdoor Shower Ideas
There is something undeniably luxurious about rinsing off under the open sky while surrounded by lush greenery. It transforms a mundane daily task into a private, spa-like escape right in your own backyard. If you are looking for visual inspiration, we have curated a stunning picture gallery at the end of this blog post.
Creating a tropical outdoor shower is about more than just plumbing; it is about crafting an experience that engages all the senses. You want the sound of water hitting stone, the scent of jasmine or eucalyptus, and the feeling of warm wood under your feet.
However, executing this design requires careful planning regarding drainage, material durability, and privacy. I have designed dozens of these spaces, and the success of the project always lies in the balance between aesthetics and utility. Let’s dive into how to bring this vacation vibe home.
1. Strategic Placement and Layout for Privacy
The first step in designing your outdoor shower is determining the optimal location. This decision dictates your plumbing costs, your level of privacy, and how often you will actually use the feature.
Ideally, you want the shower located near existing plumbing lines to keep installation costs down. Placing it on an exterior wall of a bathroom or laundry room usually makes tapping into hot and cold water lines significantly easier.
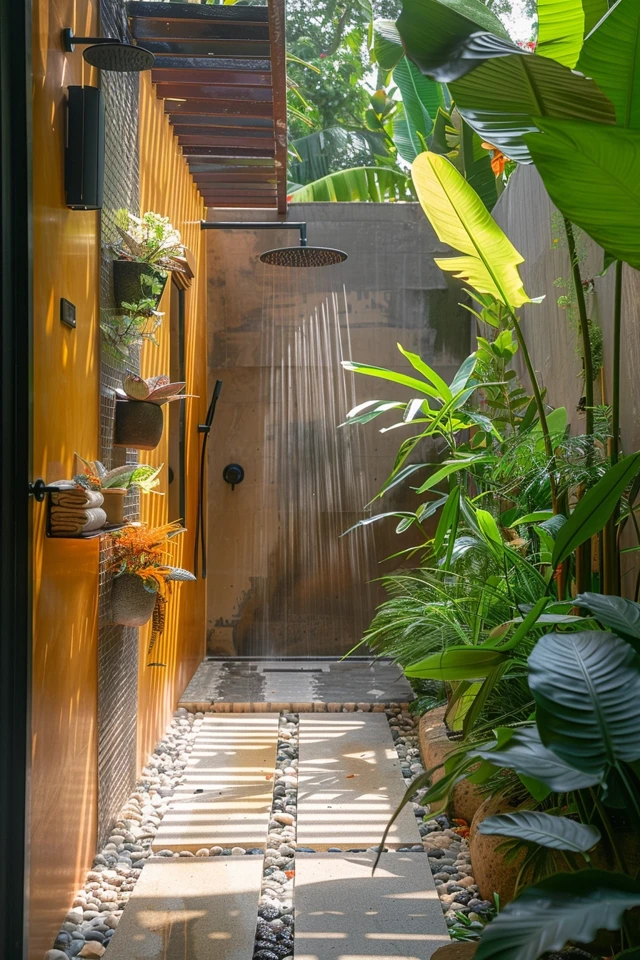
Privacy is obviously paramount, but you do not want to create a dark, damp box. I recommend using slatted timber screens or high-density landscaping rather than solid walls. This allows for airflow, which is critical for drying out the space and preventing mold growth.
Designer’s Note: The Sun Factor
In my experience, the biggest mistake homeowners make is placing the shower in a deep shade corner. While it might feel secluded, a shower that never sees the sun will struggle to dry out.
Aim for a spot that gets morning or midday sun. This solar exposure acts as a natural sanitizer and keeps the wood decking and stone surfaces from becoming slippery with algae.
Common Mistakes + Fixes
Mistake: Ignoring the “path of travel.”
Fix: Ensure there is a paved or stepping-stone path from the shower to the house. If you walk through grass or dirt immediately after rinsing, you defeat the purpose of the shower.
Mistake: Making the enclosure too small.
Fix: Treat outdoor dimensions differently than indoor ones. An outdoor shower feels best when it is at least 4 feet by 4 feet. If you have the space, 5 feet by 5 feet allows for a bench and better movement.
2. Selecting Durable Materials for a Tropical Aesthetic
To achieve that authentic tropical look, you need materials that weather gracefully. The tropical aesthetic relies heavily on natural textures like hardwoods, stone, and living finishes on metals.
For the flooring, I almost always recommend a slatted wood deck over a concrete or gravel drainage pit. This feels soft underfoot and stays cooler than stone in direct sunlight.
Top Wood Choices
- Ipe: This is the gold standard for outdoor decking. It is incredibly dense, resistant to rot, and ages to a beautiful silver-gray if left untreated.
- Teak: Teak is classic for a reason. It is naturally oily, which repels water. However, it requires regular oiling if you want to maintain that rich, golden-brown hue.
- Cedar: A more budget-friendly option that is naturally resistant to insects. It is softer than Ipe, so it may show wear faster in high-traffic areas.
Wall Materials
For the walls, consider stacking natural stone or using bamboo fencing for an instant island vibe. If you use stone, choose a rough-hewn finish rather than polished. Polished stone looks too formal and can become a slip hazard when wet.
Fixture Finishes
For the plumbing fixtures, avoid standard chrome, which can look too “indoor” and cold. Instead, opt for:
- Unlacquered Brass: This will patina over time, turning a lovely verdigris color that blends with the garden.
- Marine-Grade Stainless Steel (316): If you live near the ocean, this is non-negotiable to prevent rust.
- Copper: Exposed copper piping creates an industrial-tropical look that is very trendy and functional.
3. Landscaping: Creating the “Jungle” Effect
The plants you choose are the most important decorative element in a tropical outdoor shower. You want to create a sense of enclosure without overcrowding the user.
When selecting plants, you must consider the microclimate you are creating. These plants will be subjected to higher humidity and likely some soap runoff.
Planting for Layers
I like to design with three distinct layers of planting:
1. The Canopy: Tall palms or bamboo to provide overhead privacy from neighbors.
2. The Mid-Layer: Broad-leafed plants like Bird of Paradise, Philodendrons, or Ferns to create density at eye level.
3. The Ground Cover: River rocks or low-lying mosses around the perimeter of the drainage area.
Practical Landscaping Tips
If you live in a climate with cold winters, utilize large pots for your tropical plants. This allows you to move delicate species like Hibiscus or certain palms indoors when the frost hits.
Ensure that no plants are physically touching the shower hardware or the wood enclosure walls. Plants hold moisture against surfaces, which accelerates rot. Keep a buffer zone of at least 12 to 18 inches between the foliage and the structure.
Soap Sensitivity
Be mindful of where your soapy water drains. Many tropical plants are sensitive to the pH changes caused by shampoos and body washes.
I recommend using biodegradable, plant-safe soaps exclusively in outdoor showers. If you are plumbing the drain directly into the ground (a “French drain” or dry well), this is essential for the health of your garden.
4. Managing Drainage and Plumbing Logistics
This is the less glamorous side of design, but it is the part that determines if your shower is legal and functional. You essentially have two options: a simple cold-water rinse station or a fully plumbed hot/cold shower.
The Simple Rinse Station
This usually involves connecting a hose to an outdoor spigot. It is great for rinsing off pool chlorine or beach sand.
Drainage: Usually relies on gravity and permeable soil. A pit filled with crushed gravel is often sufficient.
The Fully Plumbed Shower
This requires running insulated pipes from inside the house. You will need a mixing valve to control temperature, just like an indoor shower.
Drainage: This is where local codes get tricky. Some municipalities allow “gray water” to drain into a dry well in your yard. Others require outdoor showers to connect to the main sewer line.
Designer’s Rule of Thumb: The Slope
Regardless of the drainage method, the floor must slope correctly. If you are pouring a concrete pad, aim for a slope of 1/4 inch per foot toward the drain.
If you are using a wood deck over gravel, the ground underneath should still be graded away from your home’s foundation. You do not want that water seeping back into your basement or crawlspace.
Winterization
If you live in a zone with freezing temperatures, you must install shut-off valves inside the house. The outdoor pipes need to be designed so they can be completely drained or blown out with compressed air at the end of the season.
5. Lighting and Accessories for Evening Ambiance
A tropical outdoor shower shouldn’t just be for daytime use. Showering under the stars is a magical experience, but it requires thoughtful lighting for safety and ambiance.
Avoid harsh floodlights. You want a soft glow that mimics moonlight.
Lighting Strategies
- Path Lighting: Low-voltage lights along the walkway leading to the shower prevent tripping.
- Up-lighting: Place small spotlights at the base of your large palms or bamboo. This casts dramatic shadows and creates a ceiling of light.
- Fixture Lighting: Consider a small, downward-facing fixture rated for wet locations (IP65 rating or higher) mounted on the post near the controls.
Essential Accessories
Functionality is key to enjoyment. In my projects, I always include:
Hooks: You need at least two substantial hooks for towels and robes.
Height Rule: Install hooks at 60 to 65 inches high. This keeps towels off the ground but within reach. Install them on the “dry side” of the shower or under a small overhang if possible.
The Bench: A teak bench or a large, flat boulder provides a place to sit or rest a leg while washing feet. It is also a convenient spot to place shampoo bottles if you don’t have a shelf.
Soap Storage: Do not rely on the floor. Install a rust-proof wire basket or build a niche into the stone wall. If using a wood wall, a simple floating teak shelf works wonders.
Final Checklist: What I’d Do in a Real Project
If I were managing your outdoor shower build today, this is the exact workflow I would follow to ensure nothing falls through the cracks.
- Check Local Codes: Before buying a single pipe, I would call the town building department to ask about gray water drainage regulations.
- Select the Spot: I would mark out a 5×5 foot square on the ground with spray paint to visualize the scale. I would check sightlines from neighbors’ windows.
- Rough-in Plumbing: I would hire a licensed plumber to run PEX lines and install freeze-proof shut-off valves inside the home.
- Establish Drainage: I would dig a dry well at least 3 feet deep and fill it with washed gravel, ensuring the soil perks (drains) effectively.
- Hardscaping: I would install the vertical posts and the flooring. I would prioritize Ipe wood for the decking due to its longevity.
- Fixture Installation: I would install a rain-head shower fixture. I would also add a handheld sprayer—this is invaluable for washing dogs or rinsing down the shower walls.
- Landscaping: I would plant the largest trees first, then fill in with ferns and ground cover.
- Styling: Finally, I would add a teak stool, a high-quality outdoor rug for the changing area, and sturdy brass hooks.
FAQs
How much does a tropical outdoor shower cost?
Costs vary wildly based on plumbing complexity. A simple hose-fed DIY setup can cost under $500. A fully plumbed, hot-water shower with stone walls, drainage, and professional installation typically ranges from $3,000 to $8,000.
Can I use an outdoor shower in the winter?
Generally, no, unless you live in a frost-free climate. In most of the US, you must shut off the water and drain the lines before the first freeze to prevent burst pipes.
What creates the most “tropical” smell?
Planting jasmine, gardenias, or tuberoses nearby adds an incredible fragrance. You can also use eucalyptus hanging from the showerhead, which releases oils when the steam hits it.
Is a door necessary?
Not always. A curved entrance wall (like a snail shell shape) can provide visual privacy without the need for a door. This improves airflow and reduces the number of moving parts that can break.
Conclusion
Building a tropical outdoor shower is one of the most rewarding home improvement projects you can undertake. It adds a layer of resort-style living to your daily routine and encourages you to spend more time outside.
By prioritizing privacy, selecting materials that can withstand the elements, and integrating lush landscaping, you can create a sanctuary that feels miles away from the real world. Remember to plan for drainage and maintenance upfront so your oasis remains stress-free for years to come.
Picture Gallery


