
Title: Revamp Your Space: Ideas for Painting Closet Doors
Introduction
Closet doors are often the forgotten giants of a room. We spend hours selecting the perfect shade of “greige” for the walls and agonizing over curtain lengths, yet we leave the closet doors in their standard builder-grade white or dated wood veneer. These doors take up a massive amount of visual real estate in a bedroom or hallway, often creating a design void that disrupts the flow of the space.
I had a client recently who felt her primary bedroom lacked character, despite buying expensive furniture. The culprit turned out to be three massive, sliding mirrored doors framed in cheap gold aluminum from the 1990s. By addressing the doors rather than buying more decor, we completely transformed the architectural feel of the room. It is one of the highest-return DIY projects you can tackle in a weekend.
Whether you are dealing with bifold doors, sliders, or standard hinged slabs, paint is your most powerful tool for reinvention. For a dose of inspiration before you start, make sure to check out the Picture Gallery at the end of this blog post. Let’s dive into the practical methods, color theories, and pro-tips needed to turn those doors into a design feature.
Step 1: Assessing Surface and Prep Work
The difference between a professional-looking finish and a DIY disaster always happens before the paint can is even opened. Closet doors endure a lot of handling, usually with unwashed hands, meaning they are covered in invisible oils. If you skip the prep, your paint will eventually peel around the handles.
First, determine the material of your door. Solid wood is forgiving, but many modern closet doors are hollow-core laminates or thermofoil. If your door has a slick, plastic-like feel, you cannot simply slap latex paint on it. You must use a bonding primer designed for difficult surfaces to ensure adhesion.
For wood or previously painted doors, scuff sanding is mandatory. You do not need to strip the paint entirely, but you must remove the sheen. I recommend using 120-grit sandpaper to knock down rough spots, followed by 220-grit to smooth the surface. This creates “teeth” for the new paint to grab onto.
Designer’s Note: The “Blocking” Nightmare
A common issue I see in client DIYs is “blocking.” This happens when you paint a door, let it dry to the touch, and then shut it. The paint on the door bonds to the paint on the frame, sealing it shut or peeling the paint off when you force it open. To prevent this, wait at least 48 hours before closing the door tight, or apply a thin layer of clear wax or furniture polish to the edges once the paint is cured.
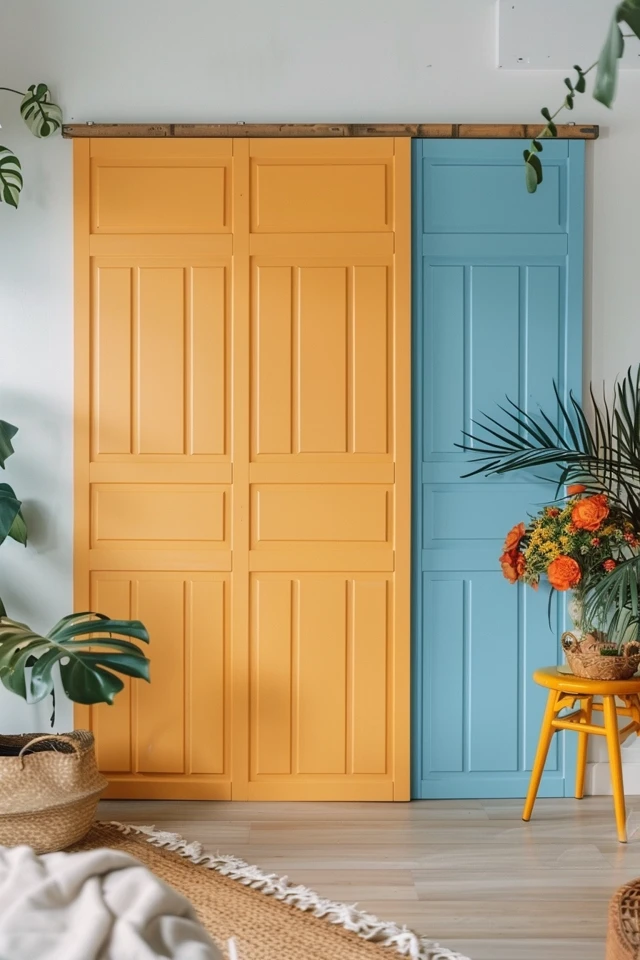
The Camouflage Technique vs. The Feature Accent
When deciding on a color, you generally have two strategic paths: making the doors disappear or making them the star of the show. In small bedrooms or narrow hallways, I almost always recommend the Camouflage Technique.
This involves painting the closet doors the exact same color and finish as the surrounding walls. It tricks the eye into seeing a continuous line, which makes the room feel significantly larger and less cluttered. If your room has low ceilings (8 feet or under), painting the doors and trim the same color as the walls can also make the ceilings feel higher.
On the other hand, the Feature Accent strategy treats the closet doors like a piece of furniture. This works best in larger rooms where you need to anchor a specific wall. A deep charcoal, navy, or forest green on closet doors can add incredible depth. If you choose this route, ensure the color ties into other elements in the room, such as a rug or throw pillows, to keep it cohesive.
Common Mistakes + Fixes
Mistake: Using flat paint on doors to hide imperfections.
Fix: Never use flat or matte paint on doors. It absorbs finger oils and is impossible to clean.
Mistake: Ignoring the “fifth wall” (the ceiling) when choosing a door color.
Fix: If you go dark on the doors, ensure your lighting is adequate, as dark vertical surfaces absorb light.
Mastering the Finish: Sheen and Durability
Choosing the right sheen is just as important as the color. In the design world, we follow a hierarchy of sheen based on durability and cleanability. Closet doors are high-traffic zones, so durability is the priority.
Satin finish is my go-to recommendation for most residential projects. It offers a soft glow that looks sophisticated but is hard enough to withstand scrubbing. It is also forgiving enough to hide minor brush strokes or surface unevenness, which is common in older homes.
Semi-gloss is the traditional standard for trim and doors. It is highly durable and very easy to clean. However, it reflects a lot of light. If your closet doors have dents, dings, or a rough texture, semi-gloss will highlight every single flaw. If your prep work wasn’t perfect, semi-gloss will tell on you.
What I’d do in a real project:
1. Material: I prefer waterborne alkyd paints (often labeled as “cabinet and trim” paint). They level out like oil-based paints (meaning fewer brush marks) but clean up with water.
2. Application: I use a 4-inch mohair or foam roller for the large flat areas and a 1.5-inch angled sash brush for corners or recessed panels.
3. Environment: I always take the doors off the hinges and paint them flat on sawhorses. It prevents drips and gravity-induced sagging.
Transforming Flat Doors with Faux Details
If you have those ubiquitous flat, hollow-core slab doors, paint alone might not be enough to elevate the look. A technique I use frequently in rentals or budget renovations is creating faux dimension using paint or added trim.
The Two-Tone Border:
You can create the illusion of paneling using painter’s tape. Tape off a rectangle about 4 to 5 inches in from the edge of the door. Paint the border a slightly darker shade than the center, or vice versa. This mimics the look of a traditional paneled door for the cost of a roll of tape.
Adding Physical Trim:
For a more permanent upgrade, you can glue and nail thin strips of molding onto a flat door to create a shaker style or geometric patterns.
Use 1/4-inch plywood strips or lattice molding.
Attach them using construction adhesive and a few brad nails.
Caulk the seams seamlessly before painting.
Constraint Check: Sliding Doors
If you have sliding bypass doors, you generally cannot add raised trim. The doors need to pass over one another, and adding even 1/4-inch molding will likely cause them to jam. For sliders, stick to paint-based optical illusions or stencils.
Navigating Slatted (Louvered) Doors
Louvered doors are excellent for ventilation, which is why they are common in laundry areas and linen closets. However, they are notoriously difficult to paint. If you try to brush paint onto louvers, you will inevitably get drips in the corners and bridges of paint between the slats.
For these doors, a paint sprayer is the best tool. If you don’t own one, you can buy handheld airless sprayers relatively cheaply, or simply use high-quality spray paint cans. If you must use a brush, work in light coats. Keep a dry brush handy to immediately catch any drips that pool in the corners of the slats.
Designer’s Note: The “Open” Mistake
When painting louvers, manipulate the slats if they are movable to ensure you get coverage on the hidden top and bottom edges. Nothing ruins a revamp like opening the slats and seeing the old color peeking through.
The Impact of Hardware
You cannot revamp a closet door with paint and put the old, tarnished brass knob back on. Hardware is the jewelry of the room. It dictates the style almost as much as the paint color does.
If you are painting your doors a dark, moody color like charcoal or black, consider unlacquered brass or gold hardware. The contrast is timeless and elegant. If you are going for a fresh, all-white look, matte black hardware provides a modern, graphic pop that feels very current.
For renters who cannot drill new holes, you are limited to the existing center-to-center measurements of the handles. Always remove the old hardware and bring it to the store with you to compare measurements. If you are filling holes to install new hardware sizes, use an automotive body filler (like Bondo) rather than standard wood filler. It dries harder and won’t crack when you drill through it later.
Final Checklist: A Pro’s Workflow
If I were managing your closet door renovation, this is the checklist I would follow to ensure the job is done right and holds up for years.
Phase 1: Removal and Prep
Remove doors from hinges and place on sawhorses or drop cloths.
Remove all hardware (knobs, hinges, latches). Do not tape over them.
Clean surfaces with a degreaser (like TSP or a TSP substitute) to remove hand oils.
Fill any deep scratches or old hardware holes with wood filler.
Sand all surfaces with 120-grit then 220-grit sandpaper.
Wipe away all dust with a tack cloth or damp microfiber rag.
Phase 2: Priming
Apply a high-quality bonding primer if the door is laminate, glossy, or raw wood.
Allow primer to dry completely according to the can’s instructions.
Lightly sand the primer with 220-grit paper to smooth out any texture.
Phase 3: Painting
Stir the paint thoroughly.
Paint the edges of the door first.
If using a roller, apply paint in a “W” pattern to distribute it, then roll vertically to smooth it.
Apply the first coat. Do not overwork the paint; let it self-level.
Let dry for the full recoat time (usually 4–6 hours).
Apply the second coat.
Phase 4: Reassembly
Allow paint to cure for at least 24 hours (ideally 48) before flipping doors or handling heavily.
Install new hardware.
Re-hang doors.
Adjust hinges to ensure the gap (reveal) around the door is even.
FAQs
Can I paint plastic or vinyl folding doors?
Yes, but standard wall paint will flake off. You must use a primer specifically labeled for plastics (adhesion primer). Once primed properly, you can topcoat with standard high-quality acrylic latex or enamel. Flexible paints are best for these accordion-style doors to prevent cracking at the folds.
How do I paint the inside of the closet door?
In high-end design, we finish the inside of the door to match the outside. However, if you are on a budget or short on time, it is acceptable to leave the inside white or the original color. Just be sure to paint the hinged edge the same color as the front face of the door so it looks cohesive when the door is slightly ajar.
Why is my paint peeling off immediately?
This is almost always due to cleaning failures. If the door had furniture polish (like Pledge) or heavy skin oil buildup, paint cannot bond to it. You must wash the door with a degreaser and sand it before painting.
Should I use a brush or a roller?
Use both. Use a brush for any recessed panels or detailed molding. Use a high-density foam roller or a 1/4-inch nap woven roller for the flat surfaces. This combination gives you the smoothest, most “factory-like” finish.
Conclusion
Refinishing your closet doors is more than just a maintenance task; it is a genuine design opportunity. By moving away from the standard builder-grade finishes, you can alter the perceived size of your room, improve the lighting, and add a layer of custom sophistication that usually costs thousands of dollars to achieve with new millwork.
Remember that patience is your best friend in this process. Allowing proper drying time and focusing on the prep work will save you from having to redo the project in six months. Whether you choose a bold, moody charcoal or a crisp, clean white, the power of paint can turn a utilitarian necessity into a beautiful focal point.
Picture Gallery


