
River Rock Fountain Ideas for Tranquil Gardens
There is something inherently soothing about the sound of moving water. In my years of designing outdoor spaces, I have found that a water feature is often the missing element that transforms a backyard from a simple patio into a true retreat. It provides white noise that masks the sounds of traffic or neighbors, creating an immediate sense of privacy.
River rock fountains, specifically those using a “vanishing” or recirculating design, are among my favorite features to install. They offer a naturalistic look that blends seamlessly with existing landscaping, unlike formal concrete tiers that can sometimes feel out of place. Whether you are looking for a bubbling basalt column or a low-profile pebble stream, the options are surprisingly versatile.
I have gathered my best tips, installation advice, and styling secrets to help you bring this feature to your own home. I have curated a full collection of inspiring designs, so be sure to check out the Picture Gallery at the end of this blog post.
Understanding the Basics: How Vanishing Fountains Work
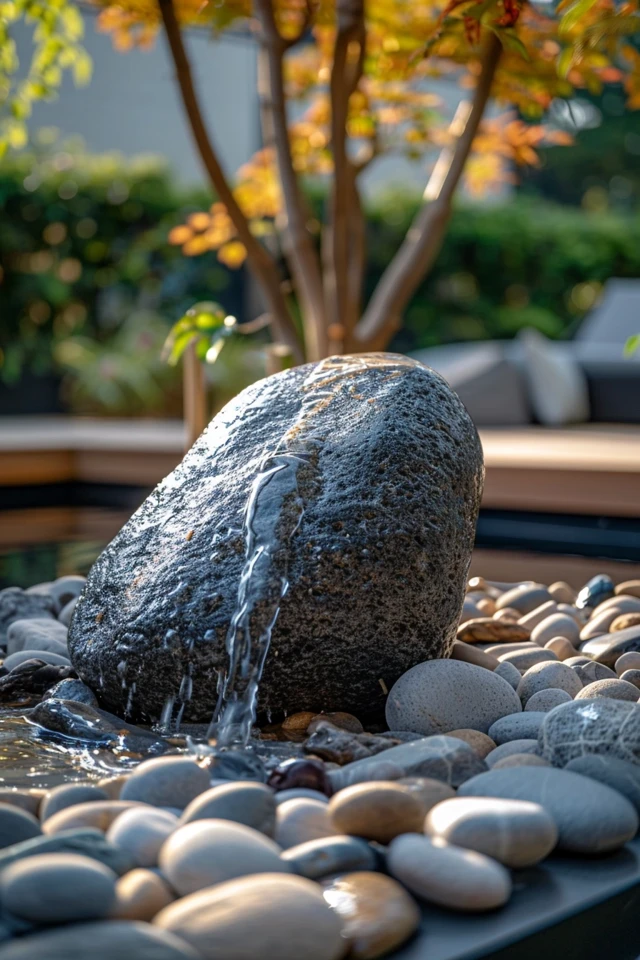
Before diving into aesthetics, it is crucial to understand the mechanics. A river rock fountain usually consists of a drilled rock sitting on top of a hidden underground reservoir.
The water is pumped up through the rock, cascades over the sides, and disappears into the rocks below. It then filters back into the reservoir to be recirculated.
This design is safer for families with small children because there is no open pool of standing water. It also keeps the water cooler and inhibits algae growth since the water is stored underground away from sunlight.
The Core Components:
- The Basin: This is the underground tub or lined pit that holds the water.
- The Grate: A heavy-duty grid that sits on top of the basin to support the weight of the decorative rocks.
- The Pump: A submersible pump that pushes water up through the tubing.
- The Plumbing: Usually kink-free flexible tubing and a flow control valve.
Selecting the Right Stone: Scale and Material
The “hero” of your fountain is the drilled rock itself. When I source materials for client projects, I look for stones that look good both dry and wet.
Basalt Columns:
These are geometric, hexagonal columns that offer a modern yet natural look. They often turn a deep, rich black when wet. They work exceptionally well in clusters of three, with varying heights to create visual interest.
Glacial Boulders:
For a more rustic or cottage-style garden, rounded glacial boulders are ideal. They have irregular shapes and varied colors, ranging from greys to pinks and tans. These look like they have been in the landscape for centuries.
Designer’s Note: The Rule of Scale
A common mistake I see is choosing a rock that is too small for the space. Outdoor environments swallow up furniture and features. If you think a 12-inch rock looks big in the store, it will look like a pebble in your yard.
- Guideline: For a standard patio corner, aim for a rock that is at least 18 to 24 inches tall.
- Grouping: If using multiple rocks, vary the heights by at least 6 inches to avoid a static look.
Designing the Layout and Location
Placement is everything. You want the fountain to be visible from your main seating areas and, ideally, from a window inside the house.
Distance and Sound:
The closer the fountain is to your seating area, the softer the flow can be. If the fountain is 20 feet away, you will need a more vigorous splash to hear it, which increases water loss through evaporation.
I usually place bubbling rocks within 8 to 10 feet of the primary conversation area. This allows for a gentle murmur that encourages conversation rather than overpowering it.
Power Access:
You will need a GFCI-protected outlet nearby. Extension cords are not a permanent solution and are a safety hazard. When planning the location, factor in the cost of having an electrician run a dedicated line if one does not exist.
Common Mistakes and How to Fix Them
Even experienced DIYers can run into trouble with water features. Here are the issues I encounter most often when called in to fix a homeowner’s project.
Mistake 1: The “Splash” Radius is Too Small
If your underground basin is exactly the same width as your decorative rock, you will lose water rapidly. As water hits the rock, it splashes outward.
The Fix: The underground liner or basin should extend at least 6 to 12 inches beyond the edge of the fountain stone in all directions. If your rock is 24 inches wide, your basin area needs to be at least 36 to 48 inches wide to catch the droplets.
Mistake 2: Forgetting the Flow Control Valve
Pumps usually run at one speed. Without a valve, you might end up with a geyser rather than a bubble.
The Fix: Install a ball valve on the tubing between the pump and the rock. This allows you to dial in the perfect water height and sound.
Mistake 3: Inaccessible Pump
Pumps eventually fail or get clogged. If you bury the pump under 500 pounds of river rock, you will regret it.
The Fix: Always install a “pump vault” or create a dedicated access hatch in the grate. This lets you reach in and pull the pump without dismantling the entire feature.
Installation: A Step-by-Step Overview
While every kit varies, the general process for installing a river rock fountain remains consistent. This is a labor-intensive project, so plan for a full weekend if you are doing it yourself.
1. Excavation
Dig the hole for your basin. It needs to be deep enough that the grate sits flush with or slightly below the surrounding grade. Save the soil; you can use it to build up a berm behind the fountain later.
2. Leveling
The bottom of the hole must be firmly tamped and level. Add an inch of sand to protect the liner from sharp roots or rocks. If the basin isn’t level, the water level will look uneven, and the pump may not function efficiently.
3. Plumbing the Rock
Thread the tubing up through the drilled hole in the stone. Use spray foam or silicone specifically designed for ponds to seal the gap around the tube at the top of the stone. This forces the water to bubble over the top rather than leaking back down the hole.
4. The “Dry” Run
Before filling the hole with decorative gravel, fill the basin with water and turn it on. Check for leaks and adjust the flow. It is much easier to fix plumbing issues now than after you have added the finishing stones.
Styling the Surroundings: Plants and Lighting
A river rock fountain should not look like it was dropped from the sky. It needs to be anchored into the landscape.
Hardscaping:
Surround the base of the main boulder with smaller river stones ranging from 1 to 3 inches in diameter. This hides the grate and creates a transition zone. I often mix “Mexican Beach Pebbles” (smooth, dark grey) with local gravel for a textured, high-end look.
Softscaping (Planting):
Water features create a microclimate that is slightly more humid. Use this to your advantage.
- Ferns: Japanese Painted Ferns provide beautiful color contrast.
- Hostas: Broad leaves contrast nicely with the texture of the stone.
- Creeping Jenny: This bright green groundcover will spill over the edges of the rocks, softening the harsh lines.
Lighting:
Do not let your fountain disappear at night. I recommend two types of lighting.
- Uplighting: Place a small spot light at the base of the rock, aimed upward to catch the ripples.
- Well Lights: Install these in the surrounding gravel to illuminate the splash zone.
Real-World Project: What I Would Do
If I were designing a river rock fountain for a client today, here is the exact checklist I would use to ensure success.
The Setup:
- Reservoir: I would use a 4×4 foot EPDM rubber liner rather than a pre-formed plastic tub. It offers more flexibility in shape.
- Support: I would use “Aquablox” or structural milk crates to create the water void, covered by a layer of sturdy grating.
- Pump: I would specify a pump ranging from 500 to 1,000 GPH (Gallons Per Hour). It is better to have too much power and dial it down than too little.
The Aesthetics:
- Stone: I would source a trio of Mongoli basalt columns.
- Top Dressing: I would use 2-inch polished black pebbles to cover the grate.
- Sound Tuning: I would place a few flat slate chips where the water falls. The water hitting the slate creates a sharper, more pleasing “plinking” sound than water hitting water.
Maintenance and Winterization
River rock fountains are relatively low maintenance, but they are not “no maintenance.”
Algae Control:
Algae is inevitable. I recommend using a pet-safe algaecide or an ionizer. Add a small capful once a week to keep the water crystal clear. Avoid chlorine, as it can damage the pump seals and discolor natural stone.
Water Levels:
Evaporation happens faster than you think, especially in summer. If the pump runs dry, it will burn out in minutes.
- Manual: Check the water level weekly.
- Automatic: Install an auto-fill valve connected to your irrigation system. This is a game-changer for my clients.
Winter Care:
If you live in a freeze-thaw climate (zones 6 and below), you must winterize.
- Drain: You don’t need to empty the basin completely, but the pump must be removed.
- Store: Keep the pump in a bucket of water in a heated garage or basement. This keeps the seals from drying out and cracking.
- Cover: I suggest covering the fountain with a canvas tarp to prevent water from entering the drilled holes, freezing, and cracking the stone.
Renters and Small Spaces
If you cannot dig a hole in the ground, you can still enjoy a river rock fountain. Container water gardens are an excellent alternative.
Use a large, watertight ceramic or resin planter as your basin. Place a small pump inside, cover it with a mesh stand, and place your stones on top. The concept is identical to the in-ground version, just contained.
Weight Warning:
Rocks are heavy. Ensure your balcony or deck is rated for the weight of the pot, the water (8 pounds per gallon), and the stones. Resin “faux” rocks are a great alternative here; they look realistic but weigh a fraction of real stone.
Final Checklist for Your Project
Before you head to the landscape supply store, run through this list to ensure you have everything covered.
Planning Phase:
- Location selected with access to power.
- “Call Before You Dig” service contacted to mark utility lines.
- Budget set (don’t forget the cost of the electrician).
Materials Phase:
- Basin or Liner (45 mil EPDM recommended).
- Underlayment (protective fabric for the liner).
- Pump (sized correctly for your head height).
- Tubing and Flow Valve.
- The “Hero” Stone (drilled).
- Support Grate/Grid.
- Decorative River Rock.
Installation Phase:
- Level tool (crucial).
- Shovel and Tamper.
- Pond Foam/Sealant.
FAQs
How much does a river rock fountain cost to install?
A DIY project can range from $300 to $800 depending on the stone. A professional installation typically starts at $2,500 and can go up to $5,000 for complex, multi-stone features with lighting.
Does the water attract mosquitoes?
Generally, no. Mosquitoes prefer stagnant water. As long as the pump is running, the water is moving too fast for them to lay eggs. If you turn the pump off frequently, however, it can become a breeding ground.
How loud will the fountain be?
The sound depends on the “head height” (how far the water falls). A rock that bubbles just 1 inch over the surface will be a whisper. A water stream falling 6 inches into the rocks will be a noticeable splash. You can tune this with your flow valve.
Can I use tap water?
Yes, standard garden hose water is fine. However, if you have very hard water, you may notice white calcium deposits building up on the rocks over time. A specialized descaler product can help remove these.
How often do I need to clean the basin?
I recommend a full clean-out once a year, usually in the spring. Pump out the old, murky water, vacuum out any sludge or decaying leaves from the bottom, and refill with fresh water.
Conclusion
Adding a river rock fountain to your garden is an investment in your peace of mind. The visual of water shimmering over stone, combined with the auditory masking of neighborhood noise, creates a sanctuary right outside your door.
Whether you choose a sleek basalt column or a rustic bubbling boulder, the key is to respect the scale of your yard and ensure the mechanical setup is solid. Don’t cut corners on the basin size or the pump access.
With the right planning and a bit of effort, you can build a feature that not only increases your property value but also enhances your daily life. I hope these ideas inspire you to break ground this weekend.
Picture Gallery


