
Rock Front Yard Landscaping Ideas for Curb Appeal
Your front yard is the first impression your home makes on the world. While lush green lawns have long been the standard, more homeowners are turning to rock landscaping to create a sophisticated, low-maintenance, and weather-resistant aesthetic that stands out from the neighborhood.
As a designer, I see rock landscaping as more than just a substitute for grass; it is a structural element that provides texture, color, and permanent form. Whether you are dealing with a recurring drought, a steep slope, or simply a lack of time for weekend mowing, rocks offer a permanent solution that increases curb appeal while decreasing your outdoor chores.
At-a-Glance: Key Takeaways
- Sustainability: Rock landscaping reduces water consumption and eliminates the need for fertilizers or pesticides.
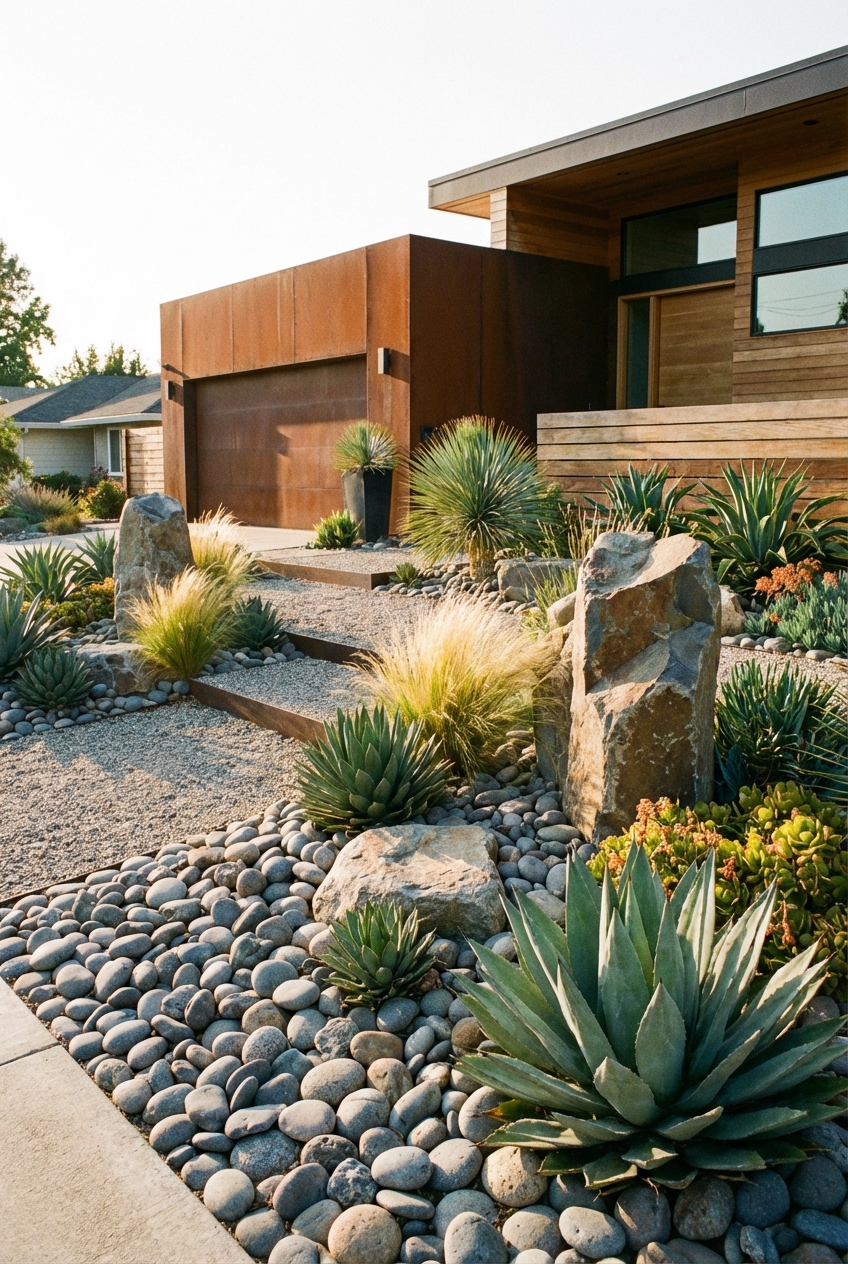
- Texture and Contrast: Using a variety of stone sizes—from pea gravel to large boulders—creates visual depth that plants alone cannot achieve.
- Longevity: Unlike wood mulch, stone does not decompose, blow away, or lose its color over time, making it a one-time investment.
- Drainage Solutions: Strategic rock placement can manage rainwater runoff and prevent erosion on uneven terrain.
- Design Versatility: Rocks fit every architectural style, from sleek Mid-Century Modern to rugged Desert Southwest and cozy English Cottage.
What This Style Means (and Who It is For)
Rock landscaping, often categorized under “xeriscaping” or “hardscaping,” is the intentional use of stone as the primary ground cover and structural focal point. It is not about simply dumping gravel over dirt; it is a curated arrangement that balances inorganic minerals with organic life.
This style is ideal for homeowners who live in arid climates where water conservation is a priority. However, it is equally beneficial for those in rainy climates who need to solve drainage issues or for busy professionals who want a “set it and forget it” yard that looks pristine year-round.
If you have a small front yard, rocks can make the space feel larger by defining clear boundaries and pathways. For those with pets, rocks (specifically smooth river stones) provide a durable surface that does not turn into a mud pit after a rainstorm. It is also a godsend for renters or landlords who want a high-end look without the risk of a dying lawn due to neglect.
The Signature Look: Ingredients That Make It Work
To achieve a professional-grade rock landscape, you need to understand your materials. Not all stones are created equal, and the “signature look” relies on a thoughtful mix of the following ingredients:
1. River Rocks and Cobblestones: These are smooth, rounded stones shaped by water. They come in varying shades of grey, tan, and blue-grey. They are perfect for “dry creek beds” or as a border around flower beds.
2. Crushed Granite and Decomposed Granite (DG): This material has a fine, gritty texture. It is excellent for pathways and as a base layer. DG is particularly popular because it packs down to create a stable walking surface that still allows water to permeate.
3. Lava Rocks (Scoria): These are lightweight, porous, and usually come in deep reds or blacks. Because they are bold, I recommend using them sparingly as accents rather than the primary ground cover to avoid a dated 1970s look.
4. Feature Boulders: Think of boulders as the “furniture” of your yard. A single, well-placed boulder acts as a focal point. I look for stones with natural character, such as moss growth, unique veining, or interesting shapes.
5. Complementary Greenery: Rock yards need life. Ornamental grasses like Blue Fescue or Mexican Feather Grass provide movement. Succulents provide structure, and perennial shrubs like Lavender or Rosemary provide scent and color contrast against the grey and tan stones.
Layout and Proportions (Designer Rules of Thumb)
When I design a landscape, I follow specific mathematical and visual rules to ensure the yard looks intentional rather than accidental. Here are the standards I use:
The Rule of Thirds for Boulders: Never place a single boulder alone in the middle of a flat area. Instead, group boulders in odd numbers (three is the magic number). Place the largest stone slightly off-center and flank it with two smaller stones of different heights to create a natural, asymmetrical look.
Depth of Material: For ground cover like pea gravel or river rock, you need a minimum depth of 2 to 3 inches. Any thinner, and the landscape fabric underneath will start to show through. If you are using rocks for a driveway or high-traffic path, increase this to 4 inches over a compacted sub-base.
The 60-30-10 Color Rule: Apply interior design color theory to your yard. Use a neutral stone for 60 percent of the area (usually a tan or grey gravel). Use 30 percent of the space for a secondary texture or color (like larger cobblestones or dark slate). Reserve the final 10 percent for “pops” of color through plants, flowers, or a decorative glazed urn.
Scale and Proximity: Keep larger rocks closer to the house or the back of the bed, and taper down to smaller gravel near the sidewalk or driveway. This creates a sense of perspective and keeps the entry feeling open and welcoming.
Designer Note: A common mistake I see is people choosing “white marble chips.” In a front yard, white stone reflects intense heat back onto your plants and your home’s siding. It also shows every speck of dirt and fallen leaf. Stick to “earth tones” like buff, tan, charcoal, or variegated river stone for a more high-end, forgiving look.
Step-by-Step: How to Recreate This Look
- Clear the Canvas: Remove all existing grass, weeds, and debris. You must dig down about 3 inches to account for the thickness of the stone you will be adding, ensuring the finished rock level is flush with your sidewalk.
- Address Drainage: Before laying stones, observe how water moves across your yard. If you have puddling, grade the soil so it slopes away from your foundation (at least 1 inch of drop for every 10 feet).
- Install Commercial-Grade Weed Barrier: Do not use cheap plastic liners. Use a heavy-duty, non-woven geotextile fabric. This allows water to drain into the soil while preventing weeds from taking root in the dirt below.
- Secure the Edging: Rocks will “migrate” without a border. Use heavy-duty steel, aluminum, or composite edging to keep the stones contained. I prefer steel edging because it creates a crisp, nearly invisible line that looks very modern.
- Place Anchor Boulders: Set your large boulders first. Dig a shallow “nest” for each boulder so it looks like it is emerging from the ground rather than just sitting on top of it. This makes the landscape look settled and aged.
- Plant Your Greenery: Cut “X” shapes into your fabric to plant your shrubs and grasses. Once the plants are in, pull the fabric back around the base of the plant.
- Spread the Infill Stone: Pour your primary rock cover across the fabric. Use a rake to level it out. Use a hose to rinse the stones after installation; most bulk rock arrives covered in “crush dust” and won’t show its true color until it’s washed.
Budget Breakdown: Low / Mid / Splurge
Low Budget ($500 – $1,500): Focus on DIY labor. Use “crushed pea gravel” or “decomposed granite” which are the most affordable bulk materials. Use plastic edging and smaller 1-gallon plants. Focus on one high-impact area, like the bed immediately surrounding the front door.
Mid-Range ($2,000 – $5,000): This allows for professional delivery of bulk stone. You can incorporate “river rock” accents and larger “specimen boulders” (200-500 lbs each). Upgrade to steel edging and 5-gallon shrubs for an “instant” garden look. You might also add low-voltage LED path lighting.
Splurge ($7,000 – $15,000+): At this level, you are likely hiring a crew for excavation. You can use premium materials like “Mexican Beach Pebbles” (which are hand-sorted and uniform) or “Flagstone” slabs for custom walkways. This budget includes large, mature trees (like a Japanese Maple or Olive tree) and a professional smart-irrigation system for the plants nestled among the rocks.
Common Mistakes (and How to Fix Them)
Mistake: Using rocks that are all the same size. This makes the yard look flat and artificial, like a parking lot.
Fix: Create a “gradation.” Use 1/2-inch gravel for the main area, 2-to-4-inch cobbles for borders, and 12-to-24-inch boulders for height. Variation is the key to a natural look.
Mistake: Forgetting about autumn. If you have large deciduous trees, leaves will fall into the rocks and rot, creating soil where weeds will eventually grow.
Fix: Use a leaf blower on a low setting regularly. Alternatively, choose larger stones (3 inches or bigger) in areas under trees so you can rake or blow leaves away without moving the rocks.
Mistake: Over-planting. Rocks retain heat, and if you crowd plants too closely, they can overheat or compete for the limited moisture trapped beneath the stones.
Fix: Give each plant “breathing room.” In a rock landscape, the space between plants is just as important as the plants themselves. Use the “Negative Space” to highlight the texture of the stone.
Area-by-Area Variations
The Foundation Bed: This is the 3-foot strip of land directly against your house. Rocks are superior to mulch here because they don’t hold moisture against your siding or attract termites. Use a medium-sized river rock (1-3 inches) to prevent splash-back of mud onto your house during heavy rain.
The Dry Creek Bed: If your yard has a natural dip, lean into it. Line the “path” with large, smooth river stones and tuck ornamental grasses along the edges. This serves a dual purpose: it looks like a beautiful natural feature when dry, and it safely funnels water away from your home during a storm.
The Parkway (Hellstrip): That narrow strip between the sidewalk and the street is notoriously hard to grow grass in. Replace it with decomposed granite and a few hardy, salt-tolerant plants. It creates a clean, intentional border for your property that can withstand the heat of the pavement.
The Sloped Entryway: On a hill, small gravel will wash away. Use “Rip-Rap” or large, angular stones that lock together. You can also “step” the slope using large flat flagstones to create a tiered rock garden that stops erosion in its tracks.
What I would do in a Real Project: A Checklist
- Order 10 percent more stone than the square footage math suggests; rocks settle, and you will want extra for future touch-ups.
- Always check the “wet color” of the stone before buying; a stone that looks boring grey when dry might turn a beautiful deep charcoal or plum when it rains.
- Place landscape lighting behind boulders to create dramatic silhouettes at night.
- Use a “barrier” between different stone colors (like a metal edge) to prevent them from mixing over time, which looks messy.
- Mix in at least one evergreen plant so the yard doesn’t look “dead” in the winter months.
Finish and Styling Checklist
- Edging: Is it secure and level?
- Fabric: Is any black fabric peeking through the edges? (Cover with more stone).
- Boulders: Are they “buried” 2-3 inches deep so they look natural?
- Plants: Have they been watered in properly?
- Lighting: Are the wires buried at least 6 inches deep to avoid being hit by a rake?
- Cleanliness: Have the rocks been hosed down to remove shipping dust?
FAQs
Do rocks make my yard hotter?
Yes, stone absorbs and radiates heat more than grass does. To offset this, use lighter-colored stones (but not pure white) and incorporate plenty of “soft” elements like heat-hardy shrubs and trees to provide shade and break up the thermal mass.
How do I keep weeds out of the rocks?
The combination of a high-quality weed barrier and a 3-inch depth of stone will stop most weeds. For the occasional “wind-blown” weed that sprouts in the dust between rocks, a quick spray of horticultural vinegar or a propane torch wand is a fast, chemical-free fix.
Can I put rocks directly over my old grass?
I strongly advise against this. The grass will die and rot, creating an unstable, lumpy base. More importantly, the decomposing organic matter will provide the perfect nutrient-rich “soil” for weeds to grow right on top of your weed barrier. Always strip the sod first.
Are rocks a good investment for resale value?
In most modern markets, yes. Buyers today value “low maintenance.” A professionally installed rock landscape suggests that the home is well-maintained and that the new owner won’t have to spend their weekends and hundreds of dollars on lawn care.
What is the best size rock for a walkway?
For comfort and stability, use 3/8-inch or smaller. Anything larger than 1/2-inch feels like walking on marbles and can be a tripping hazard or difficult for people in heels or with mobility aids.
Conclusion
Rock landscaping is a powerful tool for any homeowner looking to elevate their curb appeal. By moving away from the high-maintenance demands of a traditional lawn and embracing the structural beauty of stone, you create a front yard that is both resilient and timeless.
The key to success lies in the details: the variation of stone sizes, the quality of the weed barrier, and the thoughtful placement of “anchor” boulders. When done correctly, a rock-based front yard isn’t just a garden—it’s a curated extension of your home’s architecture that looks just as good in the middle of a winter snowstorm as it does in the height of a summer heatwave. Start small, plan your layout, and watch as your front yard becomes the envy of the block.


