
Beautiful Rock Front Yard Landscape Inspiration for Curb Appeal
Curb appeal is often the first thing people notice about your home, but maintaining a lush green lawn can feel like a full-time job. Between the constant mowing, the high water bills, and the battle against weeds, traditional landscaping can be exhausting.
Rock landscaping offers a sophisticated, low-maintenance alternative that provides year-round beauty. Whether you are looking to create a modern desert oasis or a classic cottage entry, using stone adds texture, permanent structure, and an undeniable sense of permanence to your property.
At-a-Glance: Key Takeaways
- Variety is Essential: Use at least three different sizes of rock to create visual depth and a natural look.
- Drainage First: Always grade your soil away from the foundation before laying stone to prevent basement flooding.
- The 1/3 Rule for Boulders: Bury boulders about one-third of their height into the ground so they look like they “grew” there rather than just being dropped on top.
- Texture Over Color: While color is important, the contrast between smooth river stones and jagged crushed granite creates the most professional aesthetic.
- Low Maintenance, Not No Maintenance: Rocks still require occasional leaf blowing and weed spot-treatments to stay pristine.
What This Style/Idea Means (and Who It’s For)
Rock landscaping, often categorized under xeriscaping or hardscaping, is the practice of replacing large areas of turf with inorganic mulch like gravel, pebbles, or stones. It is a design philosophy that prioritizes durability and sustainability over the high-thirst requirements of a grass lawn.
This style is perfect for homeowners in drought-prone regions who want to conserve water without sacrificing beauty. It is also an ideal solution for people with busy schedules who would rather spend their weekends enjoying their home than maintaining it.
If your front yard has steep slopes where grass won’t grow, or deep shade where turf dies off, rock is your best friend. It provides a clean, intentional look that works across various architectural styles, from mid-century modern to rustic farmhouses. It’s for the homeowner who values “set it and forget it” solutions that actually increase property value.
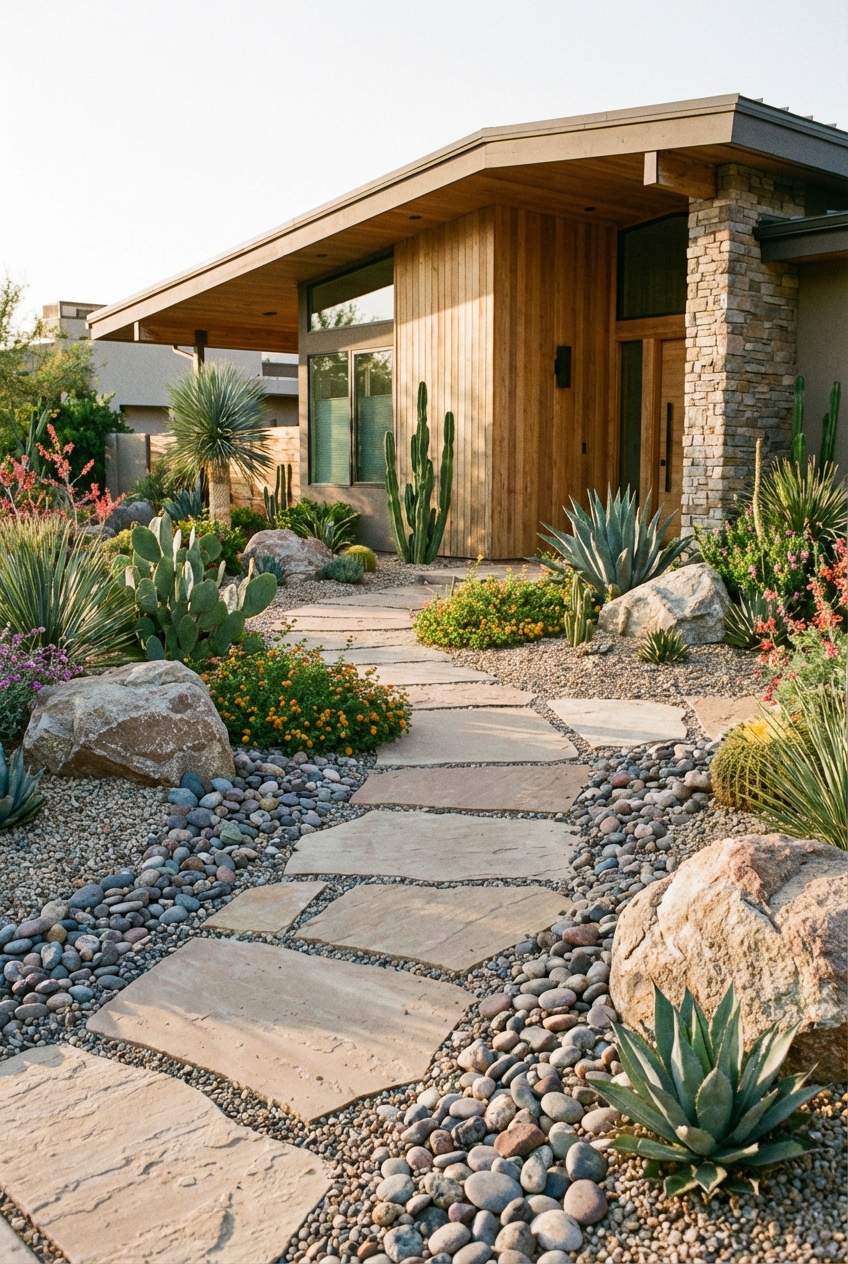
The Signature Look: Ingredients That Make It Work
A professional-looking rock landscape isn’t just a pile of gravel dumped in a yard. It requires a curated selection of materials that work in harmony. Here are the core ingredients I use in my projects:
River Rocks and Pebbles: These are smooth, rounded stones shaped by water. They come in varying shades of gray, tan, and blue. I use these for “dry creek beds” or as a soft transition between planting beds and walkways.
Crushed Granite or Decomposed Granite (DG): This material has a jagged, fine texture that packs down well. It’s the perfect choice for paths or as a base layer. It provides a more contemporary, “neat” appearance than rounded gravel.
Lava Rock: Lightweight and porous, lava rock is excellent for adding deep reds or blacks to a design. However, use it sparingly, as too much can look dated or overly harsh in a small front yard.
Accent Boulders: These are the “furniture” of your landscape. Large granite, limestone, or sandstone boulders provide focal points. I look for rocks with interesting “faces” or moss growth to add character immediately.
Flagstone: Large, flat slabs of stone are essential for creating functional walkways. They provide the stable surface needed to get from the driveway to the front door without twisting an ankle on loose gravel.
Layout & Proportions (Designer Rules of Thumb)
In design, scale is everything. If your rocks are too small, they look like a construction site; if they are too big, they can overwhelm the house. Here are the rules I follow to ensure the proportions are perfect:
The Rule of Threes: Group your boulders in odd numbers, usually three or five. Vary the sizes within the group—one large, one medium, and one small. This mimics how rocks naturally cluster in the wild.
Pathway Widths: Any rock-lined path leading to your front door should be at least 36 to 42 inches wide. This allows two people to walk comfortably side-by-side. If the path is purely decorative, you can shrink it to 24 inches.
Rock-to-Plant Ratio: A yard that is 100% rock can look cold and industrial. I aim for a 60/40 split—60% stone and 40% living greenery. This ensures the yard feels like a garden rather than a parking lot.
Layering Heights: Just as you wouldn’t put all your furniture against one wall, don’t keep your landscape flat. Use mounds of soil (berms) covered in rock to create 12–18 inches of elevation change. This adds immediate “high-end” appeal to a flat lot.
Designer’s Note: One mistake I see constantly is homeowners choosing stone colors that perfectly match their house siding. This creates a “monotone” look that disappears. Instead, choose a stone that is two shades lighter or darker than your home’s primary color. If you have a white house, try charcoal gray stones for a high-contrast, modern look.
Step-by-Step: How to Recreate This Look
1. Clear and Prep: Remove all existing grass and weeds. This is the hardest part but the most critical. You must strip the top 2-3 inches of organic material to ensure a flat, stable base.
2. Grade for Drainage: Ensure the dirt slopes away from your home’s foundation at a rate of at least 1 inch of drop for every 4 feet of distance. You do not want water pooling under your rocks against the house.
3. Lay Heavy-Duty Landscape Fabric: Do not use the cheap, paper-thin stuff from the grocery store. Buy professional-grade woven geotextile fabric. Pin it down with 6-inch landscape staples every 2 feet to prevent it from shifting.
4. Install Edging: You need a “lip” to keep the rocks in place. Steel edging is the gold standard for a clean, invisible line. Use bender board for curved designs or cobblestones for a more traditional look.
5. Place Your Boulders First: Always place your largest elements before pouring your gravel. Dig a small hole for each boulder and “set” it into the ground. Once they are in place, you can pour the smaller stones around them.
6. Install Plants: Cut “X” shapes into your fabric to dig holes for your plants. I recommend drought-tolerant species like lavender, agave, or ornamental grasses. Ensure you install any irrigation lines under the fabric but over the soil before the rocks go down.
7. Spread the Decorative Stone: Aim for a depth of 2 to 3 inches. If the layer is too thin, the fabric will show through. If it’s too thick, it becomes difficult to walk on. Use a metal rake to level the surface.
Budget Breakdown: Low / Mid / Splurge
Low Budget ($500 – $1,500): Focus on “refining” existing beds. Replace old wood mulch with locally sourced pea gravel or crushed limestone. Use recycled plastic edging and DIY the labor. Focus on one high-impact area, like the walkway to the front door.
Mid Budget ($2,000 – $5,000): This allows for professional-grade landscape fabric, a mix of river rock and decorative gravel, and the inclusion of 3-5 medium-sized boulders. You can likely afford a few larger “specimen” plants like a Japanese Maple or large succulents.
Splurge ($7,000+): At this level, you are looking at full-scale excavation and professional installation. This budget includes premium stones like Mexican Beach Pebbles (which are stunning but expensive), custom flagstone masonry, integrated low-voltage LED lighting for the boulders, and large, “mature” boulders that require a crane to place.
Common Mistakes (and How to Fix Them)
Mistake: Using rocks that are too small in high-wind or high-water areas. If you use tiny pea gravel in a spot where the gutters overflow, the rocks will simply wash away.
Fix: Use 2-4 inch river rocks for drainage areas (swales) and save the smaller gravel for flat, protected paths.
Mistake: Forgetting that rocks get hot. Dark stones like lava rock or black basalt absorb heat and can actually cook the roots of sensitive plants.
Fix: Use lighter-colored stones around delicate plants, or choose heat-hardy varieties like cacti and succulents that thrive in the extra warmth.
Mistake: Skipping the weed barrier. Some people think rocks alone will stop weeds. They won’t. Seeds will fly into the gaps and grow in the dirt below.
Fix: Always use a high-quality, woven landscape fabric. If weeds do appear, they will be growing in the dust between the rocks rather than the soil, making them much easier to pull.
Mistake: Making it look like a “moat.” Placing a thin strip of rock exactly around the perimeter of the house can look awkward and “unfinished.”
Fix: Create organic, sweeping curves that extend into the yard. Vary the width of the rock beds to create a more natural, designed flow.
Room-by-Room Variations
While we are talking about a front yard, think of your outdoor space in “zones” or rooms to help organize the design.
The Entryway “Foyer”: This is the area directly in front of your door. Use large, flat flagstones here to create a landing pad. Surround them with small, smooth Mexican beach pebbles for a high-end, tactile experience as guests arrive.
The Foundation “Border”: This is the 3-foot strip against the house. Use medium-sized river rocks here. It’s a functional zone that prevents mud from splashing onto your siding during rain. Avoid planting anything too dense here to allow for airflow against the foundation.
The “Specimen” Island: If you have a large front lawn, create a “rock island” in the center. Use a large boulder as the anchor, surround it with ornamental grasses, and finish with a contrasting color of crushed granite. This breaks up the visual monotony of a large yard.
The Side Yard Path: Side yards are often narrow and “dead” space. This is the perfect place for a 100% rock design. Use a simple light-colored gravel to brighten the narrow corridor and make it feel wider than it actually is.
What I’d Do in a Real Project: A Checklist
- Inspect the site after a heavy rain to see where water naturally flows.
- Order 10% more rock than the square footage calculations suggest (rocks settle and pack down).
- Hand-select the “hero” boulders at the stone yard rather than letting them be delivered sight-unseen.
- Spray the rocks with a hose once they are installed to wash off the “quarry dust” and see their true color.
- Incorporate “uplights” at the base of the largest boulders to create drama at night.
- Check for underground utility lines before digging for boulder placement.
Finish & Styling Checklist
- Edging Check: Is the edging secure and slightly above the rock level to prevent spillover?
- Boulder Depth: Are the boulders buried deep enough to look natural?
- Plant Health: Are the plants positioned so they aren’t touching the hot stones directly at the stem?
- Color Harmony: Do the stones complement the roof and trim colors of the house?
- Walking Surface: Is the gravel on the main path packed down enough that it doesn’t feel like walking through sand?
FAQs
How do I clean leaves out of a rock yard?
The best tool is a leaf blower on a low setting. If you use a rake, you risk pulling up the landscape fabric or displacing the stones. For smaller areas, a shop-vac can actually work wonders for sucking up debris without moving the heavier stones.
Will rocks devalue my home?
In most cases, no. A well-designed rock landscape is considered a premium upgrade, especially in regions where water conservation is a priority. However, avoid “eclectic” looks like bright white marble chips with red lava rock, which can look dated and may turn off some buyers.
Do I need a permit for a rock landscape?
Generally, no. However, some Homeowners Associations (HOAs) have strict rules about the percentage of “hardscape” versus “softscape” allowed in a front yard. Always check your HOA bylaws before removing a lawn.
How much rock do I actually need?
A good rule of thumb is that one cubic yard of rock will cover roughly 100 square feet at a 3-inch depth. Always calculate your square footage and then divide by 100 to get your yardage requirements.
Can I put rocks directly over my existing grass?
I strongly advise against this. The grass will die, rot, and create an uneven, smelly mess under your rocks. The decomposing organic matter will also provide a perfect nutrient base for weeds to grow through your new stone layer.
Conclusion
Transforming your front yard with rock landscaping is one of the most impactful ways to boost curb appeal while simultaneously reducing your weekend workload. By focusing on varied textures, proper proportions, and high-quality materials, you can create an entry that feels both intentional and timeless.
Remember that the best designs are those that work with nature rather than against it. Use the natural slopes of your land, choose stones that reflect the local geology, and don’t be afraid to let a few well-placed plants soften the edges. With a little planning and some heavy lifting, your front yard can become the most sophisticated “room” of your home.


