
Rustic Charm: Live Edge Bar Top Ideas Unveiled
There is something undeniably grounding about bringing a raw piece of nature into a home. In my design practice, I often use live edge wood to disrupt the clean, sometimes sterile lines of modern cabinetry and drywall. It adds instant warmth, texture, and a conversation piece that no manufactured material can replicate. If you are looking for visual inspiration, be sure to check out the curated Picture Gallery at the end of the blog post.
I remember a specific project in a downtown loft where the space felt too industrial and cold. We installed a massive Black Walnut slab as a breakfast bar, and it completely shifted the energy of the room. The organic curve of the wood edge softened the harsh concrete pillars and became the tactile heart of the home.
However, choosing and installing a live edge bar top isn’t as simple as grabbing a piece of lumber and screwing it down. There are critical considerations regarding moisture content, stabilization, support mechanics, and finishing that can make or break the project. This guide dives into the technical details and design nuances you need to know to get it right.
1. Choosing Your Species and Sourcing the Slab
The most critical decision you will make happens before the slab ever enters your home. The species of wood determines not just the color, but the durability and maintenance required.
In my projects, I usually gravitate toward hardwoods like Black Walnut, White Oak, or Maple. Softwoods like Pine or Cedar dent far too easily for a high-traffic bar area, especially if you have kids or entertain often. You want a wood with a decent Janka hardness rating to withstand elbows, keys, and glassware.
When sourcing, you must verify how the wood was dried. Never buy a “green” or air-dried slab for an indoor climate-controlled environment. It will warp, twist, and crack as it acclimates to your HVAC system.
Designer’s Note: The Moisture Rule
I always bring a moisture meter to the lumber yard. For indoor furniture, I look for kiln-dried slabs with a moisture content between 6% and 9%. Anything over 12% is a risk for indoor use. If a seller can’t tell you the moisture content, walk away.
Understanding “Figure” and Character
You will often hear terms like “spalting,” “burl,” or “curly.” These refer to the grain patterns.
- Burl: These are the knotty, swirling growths on trees. They are stunning but fragile and often require epoxy stabilization.
- Spalting: This is coloration caused by fungi, creating black lines or distinct zones. It looks dramatic in maple but can create soft spots in the wood.
- Crotch Grain: Found where a heavy limb meets the trunk. It creates a beautiful “feather” pattern but is prone to cracking as it dries.
2. Sizing, Ergonomics, and Layout Rules
A live edge slab is rarely perfectly straight, which makes planning your layout a bit tricky. You need to balance the wild nature of the edge with the functional requirements of a dining or drinking surface.
The most common mistake I see is insufficient overhang. If you want to sit comfortably at a bar, your knees need somewhere to go.
Standard Clearances and Heights:
- Bar Height: Typically 41 to 43 inches from the floor.
- Counter Height: Typically 35 to 37 inches from the floor.
- Knee Clearance (Overhang): Aim for 12 to 15 inches of clear space from the edge of the bar to the cabinet or wall underneath. Anything less than 10 inches is uncomfortable for an adult.
- Linear Space: Allow 24 to 30 inches of width per person/stool. Since live edge slabs vary, measure this at the narrowest functional point, not the widest.
Dealing with Variable Widths
Live edge slabs taper. One end might be 24 inches wide while the other flares to 32 inches.
When I design a layout, I place the wider end where the most traffic occurs or where visual weight is needed. If the slab narrows significantly (under 12 inches), that area becomes a “dead zone” for seating. I usually utilize that narrow space for a decorative lamp or a designated spot for a wine bucket.
3. Stabilization and Structural Support
Wood moves. It expands in humid summers and contracts in dry winters. A live edge slab is a massive, single entity that wants to cup or twist.
To prevent this, we use “c-channels” on the underside of the slab. These are steel channels recessed into the bottom of the wood that keep it flat while allowing for seasonal expansion perpendicular to the grain. Do not skip this step if your slab is wider than 18 inches.
The Role of Butterfly Keys
You have likely seen bow-tie shaped inlays across cracks in wood slabs. These are called butterfly keys or dutchmen.
While they are aesthetically pleasing, they serve a vital structural purpose. They physically hold a crack together and prevent it from widening. If your chosen slab has a check (crack) at the end, a butterfly key is mandatory, not optional.
Common Mistakes + Fixes:
- Mistake: Screwing the slab directly to the base with no movement allowance.
- Fix: Use slotted holes in your mounting brackets. The screw should be able to slide slightly left and right as the wood expands.
- Mistake: Using insufficient brackets for the overhang.
- Fix: For heavy hardwood, use steel support brackets spaced every 32 inches. The bracket should come within 4 inches of the edge of the overhang.
4. Finish Options: Epoxy vs. Oil
The finish defines how the wood feels to the touch and how it handles spills. There are two main camps here: the “encased in glass” look (Epoxy) and the “natural matte” look (Hardwax Oil).
The Case for Hardwax Oil (My Preference)
In 90% of my residential projects, I use finishes like Rubio Monocoat or Osmo Polyx.
Pros:
- It keeps the wood feeling like wood, not plastic.
- It has a matte or satin sheen that hides dust and fingerprints.
- It is spot-repairable. If you scratch it, you can sand just that spot and re-apply oil.
Cons:
- It requires maintenance. You may need to add a maintenance coat every 1-2 years depending on use.
- It is not waterproof (though it is water-resistant). Red wine needs to be wiped up relatively quickly.
The Case for Bar-Top Epoxy
This is the thick, glossy coating often seen in commercial restaurants.
Pros:
- It is incredibly durable and waterproof.
- It fills all voids, cracks, and uneven texture, creating a perfectly flat serving surface.
Cons:
- It looks and feels like plastic.
- It scratches easily, and once scratched, the entire top must be sanded and recoated to fix it.
- It can yellow over time if exposed to UV light.
5. Designing the Surroundings
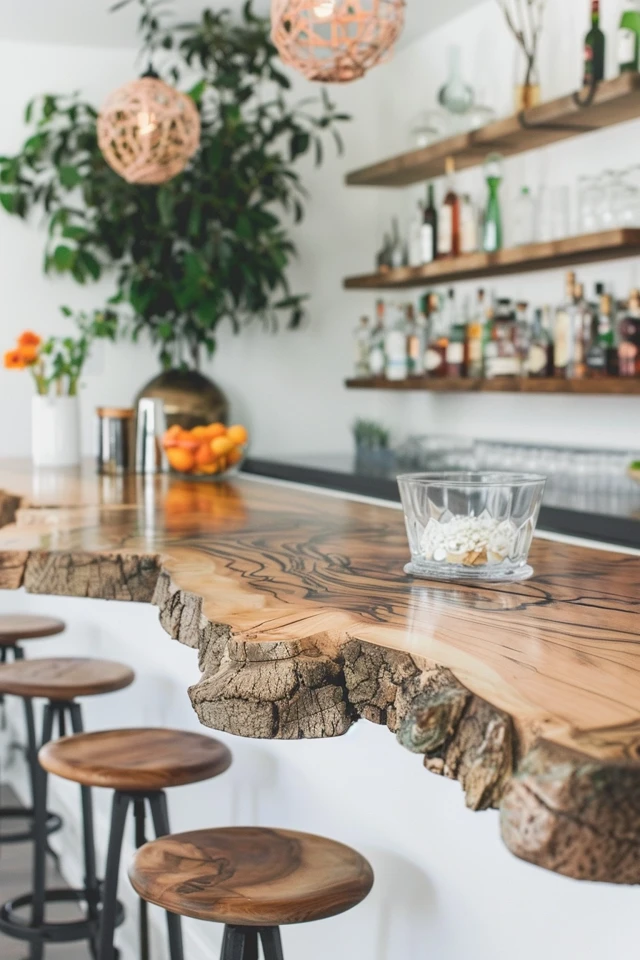
A live edge bar top is a “loud” design element. It has a lot of visual activity. To prevent the room from looking like a hunting lodge (unless that is the goal), you need to balance the rustic nature of the wood with cleaner, quieter elements.
Contrast is Key
If the wood is dark Walnut, consider lighter cabinetry or a clean, white quartz backsplash behind it. If the wood is a light Maple, a dark charcoal base or iron piping creates a striking silhouette.
Lighting the Slab
Lighting brings out the chatoyancy (the 3D shimmer) in the wood grain.
I recommend warm white lighting (2700K to 3000K). Cool white light (4000K+) can make natural wood look gray or washed out.
Hang pendants 30 to 36 inches above the surface of the bar top. Because the edge of the wood is irregular, avoid linear chandeliers that demand perfect symmetry. Individual pendants or a clustered fixture often work better because they are more forgiving of the organic lines below.
Seating Selection
Choose stools that slide fully under the overhang if space is tight.
Avoid wooden stools that match the bar top exactly. It usually looks like a mistake. Instead, go for contrast: leather upholstery, metal frames, or painted wood. The bar top should be the star; the stools are the supporting cast.
Final Checklist: What I’d Do in a Real Project
If I were installing a live edge bar in your home tomorrow, this is the cheat sheet I would follow to ensure success:
1. Verify the Kiln Drying:
I would verify the slab is kiln-dried to under 10% moisture content. I would check for twists or cups by laying it on a flat concrete floor before buying.
2. Plan the Support:
I would order steel C-channels for the underside to prevent warping. I would adhere to the rule of thirds for brackets: The bracket should support at least 2/3 of the depth of the overhang.
3. Prep the Edge:
I would drawknife and sand the live edge so it is smooth to the touch. No one wants to snag a sweater or scratch their arm on a sharp piece of bark. I would remove all bark, as it eventually falls off anyway.
4. Select the Finish:
I would use a two-part hardwax oil (like Rubio Monocoat 2C). It bonds with the wood fibers and cures hard, offering the best balance of natural feel and protection.
5. Install with Expansion in Mind:
I would attach the slab using washers and elongated holes in the base to allow the wood to breathe without cracking.
FAQs
Can I leave the bark on a live edge slab?
Technically yes, but I strongly advise against it. Over time, the cambium layer dries out and the bark separates from the wood. It will eventually crumble, catch clothing, and collect dust. For a lasting finish, remove the bark and sand the live edge smooth.
How much does a live edge bar top cost?
It varies wildly by species and size. A raw slab can range from $300 to $1,500+. Finished and installed, expect to pay between $150 and $300 per square foot for professional quality. Exotic woods or large single slabs command a premium.
Is live edge wood sanitary for a kitchen bar?
Yes, provided cracks and knots are filled. I recommend filling any open knots or deep voids with clear or black epoxy so food crumbs don’t get stuck. A proper oil or epoxy finish seals the surface against bacteria.
How do I clean a live edge oil-finished top?
Avoid harsh chemical cleaners or degreasers, which strip the oil. Use a damp cloth with water and a pH-neutral soap specifically designed for wood floors or oiled furniture. Wipe up spills immediately.
Conclusion
Installing a live edge bar top is a commitment to craftsmanship and natural beauty. It requires more planning than a standard granite countertop, but the payoff is immense. You get a surface that tells a story—a piece of history in your home that invites people to touch it.
By respecting the movement of the wood, choosing the right finish for your lifestyle, and balancing the rustic aesthetic with modern design principles, you can create a space that feels both timeless and current. Whether it is a morning coffee spot or an evening cocktail bar, a well-executed live edge slab will serve as the anchor of your room for decades.
Picture Gallery


