
Title: Rustic Ranch Fencing Ideas for Authentic Charm
I remember the first time I worked on a sprawling property in the Texas Hill Country. The homeowners wanted to define their perimeter without obstructing the breathtaking sunset views. We struggled to find a balance between a sturdy barrier and something that felt like it grew out of the landscape. That project taught me that fencing is more than just property lines; it is the frame for your home’s exterior design.
Rustic ranch fencing brings a specific warmth and history to a yard, whether you have fifty acres or a quarter-acre suburban lot. It relies on natural materials, rough textures, and simple geometry to create a welcoming boundary. However, achieving that “effortless” look actually requires careful planning regarding material selection and scale.
The goal is to choose a style that complements your architecture rather than competing with it. If you are looking for visual inspiration, make sure to check out the Picture Gallery at the end of the blog post for curated examples. Let’s dive into the practical details of designing a fence that offers both authentic charm and real-world durability.
1. The Classic Split Rail: Timeless and Open
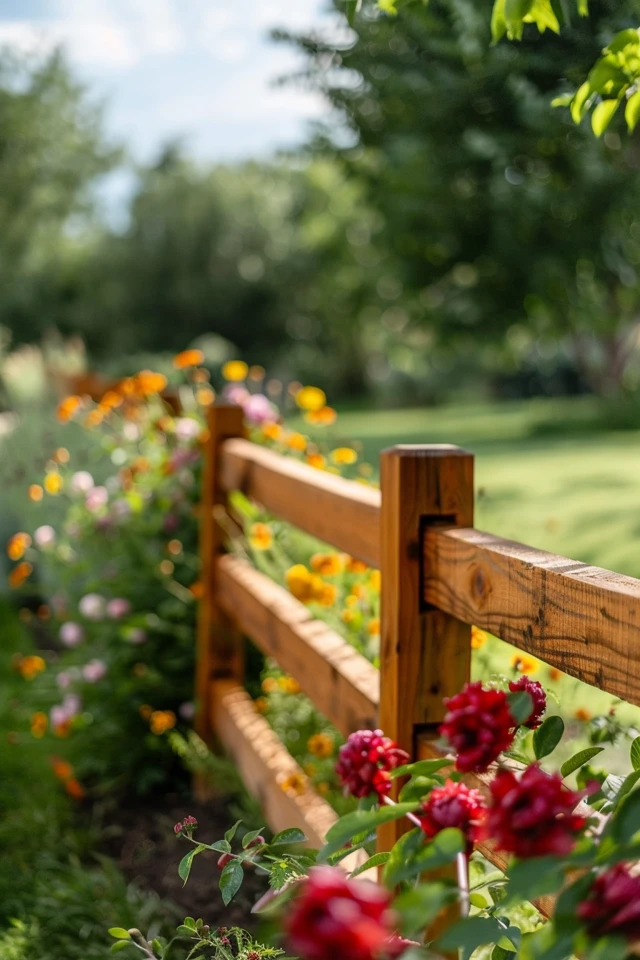
The split rail fence is the quintessential image of ranch design. It consists of rough-hewn rails inserted into holes bored into posts. This design requires no nails or hardware, relying on gravity and friction to hold it together.
From a design perspective, this is your best option for preserving sightlines. Because it creates a visual boundary without a solid wall, it makes small yards feel larger and large yards feel boundless. I often recommend a two-rail design for purely decorative borders and a three-rail design if you need a bit more height and presence.
When planning a split rail layout, scale is critical. A standard rail is usually 11 feet long, but once inserted into the posts, your post-on-center spacing will be roughly 10 feet. If you have a smaller yard, this wide span might look overwhelming. In those cases, I source 8-foot rails to tighten the rhythm and keep the proportions balanced with the house.
Designer’s Note: The “Floating” Fence
A common issue with split rail is that it can look like it is floating if the grass is cut too short underneath. I always advise clients to create a 12-inch wide planting bed beneath the fence line. Fill it with river rock or low-maintenance ornamental grasses. This anchors the fence to the earth visually and prevents your weed whacker from damaging the wooden posts.
2. Adding Function with Wire Mesh
While split rail looks beautiful, it is terrible at keeping things in or out. Small dogs, toddlers, and wildlife can slip right through the rails. This is where modern functionality meets rustic aesthetics.
The solution is installing welded wire mesh on the inside face of the fence. This is often called “2×4 mesh” because of the rectangular grid size. It provides a secure barrier without ruining the rustic look.
I strictly specify black vinyl-coated wire mesh for my projects. Green or galvanized silver wire catches the sunlight and becomes highly visible to the eye. Black vinyl, however, tends to disappear into the background shadows, leaving you with the look of wood but the security of a wall.
Common Mistakes + Fixes
Mistake: Stapling the wire to the outside of the fence.
Fix: Always install wire on the “impact” side or the inside. If you are trying to keep dogs in, install it on the inside so they can’t push it loose. If you are keeping deer out, install it on the outside. For general residential use, the inside installation looks cleaner from the street.
Mistake: Using chicken wire.
Fix: Avoid hexagonal poultry netting. It looks flimsy and cheapens the aesthetic. Stick to 14-gauge or 12.5-gauge welded wire with square or rectangular openings.
3. Buck and Rail (Jackleg) Fencing
If you live in an area with incredibly rocky soil or bedrock near the surface, digging post holes might be impossible. This is where the buck and rail fence, also known as jackleg fencing, saves the day.
This style uses triangular “bucks” (A-frames) that sit on top of the ground to support the rails. It is incredibly sturdy and heavy, meaning it won’t blow over easily, yet it requires zero digging. It creates a zig-zag pattern that is architecturally interesting and deeply rooted in Western heritage.
I love using this in landscape designs that feature heavy native styling or xeriscaping. The heavy timber look pairs beautifully with large boulders and gravel driveways. Because the footprint of the fence is wider (due to the triangle base), you need to account for losing about 3 to 4 feet of depth along your property line.
What I’d do in a real project:
- Material: I would use Lodgepole Pine pressure-treated with an eco-friendly preservative. It weathers to a nice silver-gray.
- Height: I aim for a top rail height of 48 to 50 inches. Anything taller starts to look like a barricade; anything shorter looks like a toy.
- Spacing: I place the bucks roughly 10 to 12 feet apart depending on the length of the timber available.
4. The Modern Ranch: Hog Wire and Cedar Frames
For a cleaner, more contemporary take on rustic design, the “hog wire” fence is a top contender. This style frames heavy-gauge welded wire panels inside substantial cedar or redwood lumber.
This is a step up from the split rail with mesh. Here, the wood is milled smooth or rough-sawn into square posts and rails (usually 4×4 posts and 2×4 rails). The wire panel is sandwiched between the wood, creating a picture-frame effect.
This style works exceptionally well for defining outdoor living spaces, like a patio or a pool area, because it feels like furniture. It is rigid, secure, and has a high-end finish. The grid pattern of the wire adds a geometric element that bridges the gap between a rustic farmhouse and a modern industrial home.
Construction Tip:
Do not just staple the panel to the back of the wood. Use a “stop” system. Nail a 1×1 strip of wood to your frame, insert the wire panel, and then nail another 1×1 strip to lock it in. This hides the sharp edges of the cut wire and prevents snagging on clothing or pet fur.
5. Selecting the Right Wood and Finish
The soul of a rustic fence lies in the material. You cannot achieve an authentic ranch look with shiny white PVC plastic. You need real timber, but you also need it to last more than five years.
Western Red Cedar:
This is my gold standard. It contains natural oils that resist rot and insects. It is stable, meaning it is less likely to twist or warp than pine. You can let it weather naturally to a silver-gray, which requires zero maintenance and looks incredibly high-end.
Pressure-Treated Pine:
This is the budget-friendly option. It will last a long time, but it is prone to twisting and cracking as it dries. If you use pine, you must commit to staining or sealing it after it has dried out (usually 3-6 months after installation) to keep it looking good.
Hemlock or Spruce:
These are often sold as budget rails. I generally avoid them for posts because they rot quickly in contact with soil. If you use them for rails, ensure they are treated or stained regularly.
Designer’s Note on Staining:
I rarely recommend painting a ranch fence. Paint peels and requires scraping. Instead, use a penetrating oil-based stain. If you want a dark look, choose a “black walnut” or “charcoal” stain. As it fades over the years, it simply looks more rustic, whereas peeling paint just looks neglected.
6. Designing the Entryway and Gates
The gate is the handshake of your home. It is the first thing people interact with, so it needs to feel substantial. A flimsy gate on a rustic fence ruins the illusion of strength.
For a driveway entrance, I recommend a minimum width of 12 feet to allow delivery trucks and emergency vehicles to enter comfortably. For a pedestrian gate, 4 feet is the ideal width. Standard 3-foot gates can feel tight if you are carrying groceries or moving lawn equipment.
Hardware Selection:
The hardware is the “jewelry” of the fence. For a ranch aesthetic, avoid shiny stainless steel or brass. Go for heavy-duty, matte black iron hardware. Look for long strap hinges—at least one-third the width of the gate. This isn’t just for looks; the long strap distributes the weight of the heavy wood gate, preventing it from sagging over time.
Authentic Details:
Consider adding a “coyote roller” or a simple header beam over your pedestrian gate. A header beam ties the two gate posts together, preventing them from leaning inward over time due to the weight of the gate. It also provides a perfect spot to mount a lantern or a house number.
Final Checklist: Planning Your Rustic Fence
Before you dig your first post hole or order lumber, run through this checklist to ensure your project runs smoothly.
1. Verify Property Lines
Do not guess. Find the metal survey pins buried in the corners of your lot. If you can’t find them, hire a surveyor. Moving a fence six inches after it is built is an expensive nightmare.
2. Check Zoning and HOAs
Many municipalities have height restrictions (often 6 feet for backyards and 4 feet for front yards). Homeowner Associations often have strict lists of approved materials.
3. Call Before You Dig
Call 811 (in the US) to have underground utilities marked. Hitting a gas line or fiber optic cable is dangerous and costly.
4. Plan Your Gate Swings
Walk the perimeter. Ensure that where you place a gate, the ground is level enough for it to swing open. Gates should generally swing into your property, not out onto the sidewalk or street.
5. Calculate Materials with 10% Waste
Wood is a natural product. Some rails will be warped; some posts will have bad knots. Order 10% more material than you strictly need so you can cull the bad pieces.
FAQs
What is the most durable wood for rustic fencing?
Cedar and Redwood are the most naturally durable options. Black Locust is also incredibly rot-resistant but can be harder to source and harder to work with due to its density. For posts that go into the ground, pressure-treated pine rated for “ground contact” is the most economical durable choice.
How deep should fence posts be buried?
A general rule of thumb is to bury one-third of the post’s total length. For a 6-foot tall fence, you need an 8 or 9-foot post, burying 2.5 to 3 feet deep. You must also get below the frost line in your area to prevent the posts from heaving out of the ground in winter.
Can I install a rustic fence on a slope?
Yes. You have two options: “racking” or “stepping.” Racking follows the contour of the ground, which looks best for split rail and wire fences. Stepping keeps the rails level like stairs, which leaves gaps at the bottom. For a ranch aesthetic, racking is almost always the better choice visually.
How do I maintain a rustic wood fence?
If you want the silver-gray look, maintenance is minimal—just check for loose posts or rot near the ground annually. If you stain the fence, expect to re-apply a clear coat or stain every 3 to 5 years to maintain the color and water resistance.
Conclusion
Choosing a rustic ranch fence is a commitment to a specific lifestyle and aesthetic. It signals an appreciation for natural materials and a desire to work with the land rather than against it. Whether you choose the open airiness of a split rail or the structured charm of hog wire with cedar, the key is consistency in scale and quality of materials.
Remember that a fence is a significant investment. Taking the time to grade the land properly, choosing the right wire mesh for your pets, and selecting hardware that won’t rust will pay off for decades. Your fence should stand as a silent, sturdy guardian of your home, growing more beautiful as the seasons weather the wood.
Picture Gallery


