
Screened in Pool Ideas for Your Backyard Oasis
Living in a region where the weather is beautiful but the bugs are relentless creates a unique design challenge. A screened pool enclosure, often called a pool cage or lanai, bridges the gap between the outdoors and the comfort of your home. It allows you to enjoy the water without skimming leaves every morning or swatting away mosquitoes at dusk.
However, many homeowners treat the screen enclosure as a purely utilitarian structure, forgetting that it defines the architectural volume of their backyard. When I design these spaces, I treat the area inside the screen exactly like an interior room. We need to consider floor plans, lighting layers, and material durability just as we would for a living room.
Whether you are building new or renovating an existing cage, the goal is to make the screen disappear visually while maximizing the livable square footage. If you are looking for visual inspiration, you can scroll down to the Picture Gallery at the end of the blog post.
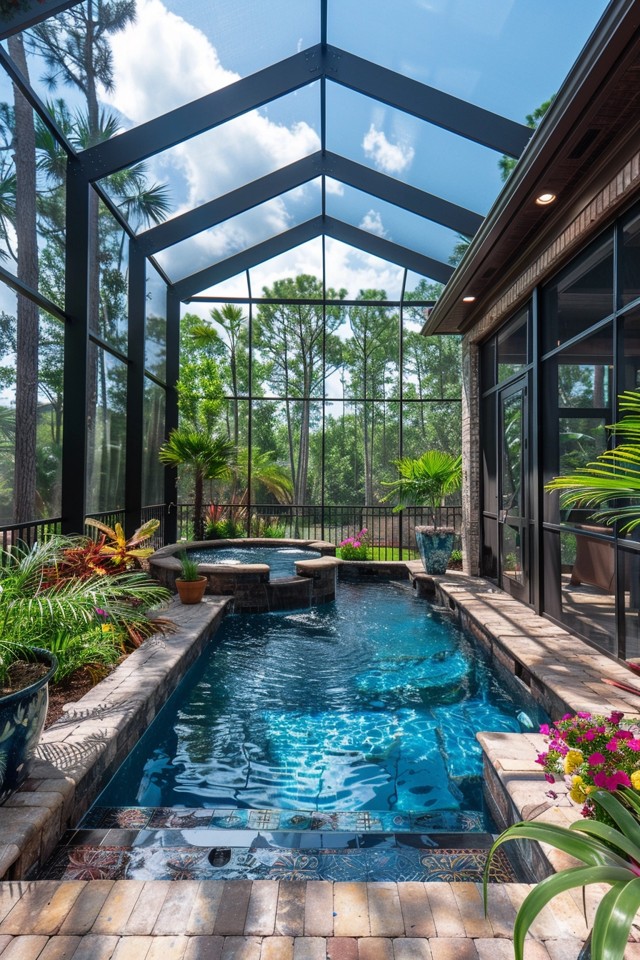
1. Architectural Structure and Roof Lines
The shape of your enclosure dictates how spacious the area feels. Standard builder-grade enclosures often use a flat or low-shed roof, which can make the pool deck feel cramped and claustrophobic.
If your budget allows, opt for a Mansard or gable roofline. A Mansard roof rises up on all sides before flattening out, creating a high, cathedral-like ceiling. This extra vertical space helps dissipate heat and makes the entire footprint feel significantly larger.
Pay attention to the color of the aluminum frame. While white frames were popular in the 90s, I almost exclusively recommend bronze or black frames for modern projects. Darker colors are actually easier for the human eye to look past, making the structure blend better with the landscape beyond.
2. Layout Zones and Traffic Flow
One of the biggest errors I see in DIY pool planning is placing furniture without measuring for circulation paths. In a screened environment, you are working with hard boundaries; you cannot simply scoot a chair back onto the grass.
I always designate specific zones: a wet zone for the pool, a lounging zone for sunbathing, and a dry zone for dining. You need to maintain a clear walking path of at least 30 to 36 inches between these zones. If you place a dining table too close to the pool edge, you create a tripping hazard and block the flow of traffic.
For the dining area, ensure there is at least 24 inches of clearance behind each chair so guests can slide out easily. If your covered lanai space is tight, consider a round table rather than a rectangular one to improve flow around the corners.
3. Hardscaping and Flooring Selections
The flooring inside your enclosure is the most dominant visual element aside from the pool itself. Because the screen filters some sunlight, the deck can stay wet longer than an open-air patio, so slip resistance is a non-negotiable safety factor.
Travertine pavers are my top choice for screened enclosures. They stay cool underfoot even in direct heat and have a natural texture that prevents slipping. Avoid polished finishes; look for “tumbled” travertine, which provides the necessary grip.
If you are working with an existing concrete slab, you don’t necessarily have to demolish it. We often use thin pavers or porcelain tiles specifically designed to overlay concrete. Just ensure the new height doesn’t interfere with your door thresholds or weep holes.
4. Lighting Design and Ambiance
Lighting a screened pool is tricky because the screen mesh can catch glare from floodlights, creating a “wall of light” that ruins your view of the night sky. The key is to keep lighting soft, directional, and situated inside the enclosure.
I recommend using wall sconces on the house exterior to provide general ambient light. For the pool deck, avoid high-intensity spotlights. Instead, mount downward-facing, low-voltage lights on the vertical beams of the enclosure itself.
String lights are a fantastic, budget-friendly way to add atmosphere. We often drape them in a zig-zag pattern across the upper beams of the cage. Ensure you buy commercial-grade, weatherproof strands, as changing bulbs 15 feet in the air is difficult.
5. Curating Furniture for High Humidity
Furniture inside a screen enclosure is protected from rain to an extent, but it is still exposed to high humidity and chlorine vapors. You need materials that resist rust and mildew.
Powder-coated aluminum is the gold standard for structural furniture frames because it is rust-proof and lightweight. If you prefer the look of wood, stick to high-quality teak. However, be aware that teak requires oiling every 6 months to maintain its golden color, or it will weather to a silvery gray.
For cushions, I only specify solution-dyed acrylic fabrics like Sunbrella. These fabrics are dyed all the way through the fiber, not just on the surface, making them resistant to fading and bleach cleanable.
6. Landscaping Inside the Cage
Many homeowners think landscaping stops at the screen door. Bringing greenery inside the enclosure is the best way to soften the harsh lines of the aluminum structure and create that “oasis” vibe.
The rule here is “low shedding.” You do not want plants that drop tiny leaves or flowers into the pool daily. Avoid Bougainvillea or Crape Myrtles inside the screen.
Instead, opt for architectural plants like Bromeliads, Bird of Paradise, or slow-growing Palms. I prefer using oversized glazed pots for these plants. Pots allow you to move the greenery if you need to rearrange the layout and prevent root systems from damaging the pool shell or deck.
Designer’s Note: The “Invisible” Screen Trick
Here is a lesson I learned early in my career: standard screen mesh is functional, but it obstructs the view more than you think. When clients spend thousands on a waterfront or golf course view, the standard mesh creates a hazy gray filter.
I now almost always suggest upgrading to “Panoramic” or “Picture Window” configurations for the wall facing the view. This involves using heavier-gauge aluminum posts that can span 20 to 30 feet without vertical interruptions.
Combined with a finer mesh often called “Hi-Vis” or “BetterVue,” the screen virtually disappears. It creates a seamless visual connection between your pool and the landscape. It costs more structurally, but it creates the single biggest impact on the final aesthetic.
Common Mistakes + Fixes
Mistake 1: Forgetting the Service Door
Homeowners often place a single, standard-width door on the side of the enclosure.
The Fix: Install a “double door” or a grand entry door on at least one side. You will eventually need to bring in large furniture, a heater replacement, or pool equipment. A 3-foot door is often too small for large sofas or construction equipment.
Mistake 2: Ignoring Drainage
Screens trap debris at the base, and the bottom rail can block water from flowing off the deck. This leads to algae buildup and standing water.
The Fix: Ensure your contractor installs “deck drains” or a slight elevation gap under the bottom rail to allow water to escape during heavy rains and cleaning.
Mistake 3: Overcrowding the Pool Edge
Placing loungers right up to the water’s edge looks great in photos but functions poorly in real life.
The Fix: Follow the “splash zone” rule. Keep upholstered furniture at least 4 to 5 feet away from the water. Use resin or mesh loungers for the wet deck, and keep the expensive cushions in the covered, dry areas.
What I’d Do: The Real Project Checklist
If I were building a screened pool oasis for my own home today, here is the exact specification list I would give the contractor:
- Structure Color: Bronze or Matte Black (never white).
- Roof Shape: Mansard roof for maximum interior volume.
- Screen Type: Polyester “Super Screen” on the roof (for durability against falling branches) and Hi-Vis mesh on the walls.
- Beam Span: A 24-foot panoramic opening on the main view wall.
- Flooring: Ivory tumbled travertine in a French Pattern layout.
- Lighting: Dimmable LED sconces on the house and color-changing LED pool lights. No floodlights.
- Fan: A wet-rated, oversized ceiling fan (72 inches+) in the covered lanai area to keep air moving.
Final Checklist for Your Project
Before you sign a contract or buy furniture, run through this summary to ensure you haven’t missed a critical step.
- Check HOA Rules: Confirm if there are restrictions on cage height or color.
- Measure Twice: Map out your furniture on the floor using painter’s tape to verify traffic flow.
- Plan Electrical: Ensure you have outlets inside the cage for charging phones or plugging in a robot cleaner.
- Review Gutter Integration: Make sure the “Super Gutter” (the structural gutter connecting the house to the cage) is sized correctly for your roof’s runoff.
- Select Pet Options: If you have dogs, ask for a “pet guard” or reinforced screen on the lower panels.
FAQs
Does a screen enclosure block the sun?
Yes, but only slightly. Standard screen mesh blocks about 30% to 40% of UV rays. This is actually a benefit, as it reduces the risk of sunburn and keeps the area slightly cooler than an open deck, but you can definitely still get a tan.
How do I clean the screen mesh?
A gentle pressure wash is usually sufficient. I recommend using a low-pressure setting (soft wash) with a mixture of water and a small amount of mild dish soap or a dedicated screen cleaner. Avoid high pressure, which can tear the mesh or strip the paint off the aluminum.
Can I grill inside a screened porch?
Technically yes, but you must have proper ventilation. The grill should be placed as far away from the house walls as possible, and you should ensure the smoke creates a draft up and out of the screen. Over time, greasy smoke can leave a residue on the screens above the grill, attracting dirt.
Conclusion
Creating a screened in pool oasis is about balancing protection with openness. It transforms your backyard into a true extension of your home’s square footage, providing a bug-free, cleaner, and safer environment for relaxation.
By focusing on the architectural lines of the cage, choosing the right flooring, and zoning your furniture correctly, you can design a space that feels luxurious rather than confining. Remember that quality materials and thoughtful layout planning are the differences between a simple pool cage and a true backyard retreat.
Picture Gallery


