
Shimmering Crystal Displays Ideas for Your Home
Introduction
I remember walking into a client’s home a few years ago, and she pointed to a cardboard box in the corner filled with stunning raw amethyst and quartz geodes. She kept them hidden because she felt they looked cluttered when she tried to set them out on a table. This is a common dilemma; beautiful geological specimens often end up looking like a messy science project rather than a sophisticated design element.
Crystals are actually a designer’s secret weapon for adding organic texture and light manipulation to a rigid space. When displayed correctly, they act less like clutter and more like sculptural art that changes with the time of day. Be sure to browse the Picture Gallery at the end of this article to see real-life examples of these styling concepts.
In this guide, I will walk you through the exact methods I use to style mineral collections for clients. We will cover lighting specifications, shelf composition, and practical safety measures to ensure your shimmering display is both beautiful and secure.
Selecting the Right Vessel: Cabinetry and Shelving
The first step in displaying crystals is defining the boundary. If you place small stones across a large surface without a container or defined zone, they get lost visually.
Built-ins and Curio Cabinets
For larger collections, glass-front cabinetry is the gold standard. It protects the stones from dust while allowing you to control the lighting environment completely. When designing built-ins for clients, I always specify glass shelving rather than wood.
Glass shelves allow light to travel down through the display, illuminating the crystals from multiple angles. If you must use wood shelves, you will need to install lighting on the underside of every single shelf level to prevent heavy shadows.
Floating Shelves and Wall Mounts
If you are working with floating shelves, pay attention to depth. Standard floating shelves are often 10 to 12 inches deep. This works for large geodes, but smaller crystals will look insignificant.
For smaller specimens, look for “picture ledges” which are usually 3 to 4 inches deep. This narrower profile forces the crystals into a linear arrangement that looks intentional and clean.
Designer’s Note: The Weight Factor
I learned this the hard way early in my career: crystals are deceptively heavy. A single large quartz cluster can easily weigh 20 to 30 pounds.
Always anchor shelving into wall studs, not just drywall. If you are using a glass curio cabinet, check the manufacturer’s weight rating for each individual glass shelf. Standard tempered glass shelves often max out at 25 pounds.
Lighting Your Crystals: The Most Important Factor
You can have a museum-quality amethyst, but if it is sitting in a dark corner, it will look like a gray rock. Lighting is the single most critical element in making a crystal display “shimmer.”
Color Temperature Matters
When selecting LED lights for minerals, pay attention to the Kelvin (K) temperature. Standard warm white bulbs (2700K) cast a yellow hue that can make clear quartz look dirty or muddy.
I recommend using LEDs in the 3500K to 4000K range. This is a neutral-to-cool white light that mimics daylight. It enhances the natural brilliance and distinct colors of the stones without altering them.
Lighting Direction and Angle
Top-down lighting is standard, but it often creates glare on polished surfaces. For the best result, try to light the crystals from slightly behind or below.
If you have transparent stones like selenite or clear quartz, “uplighting” is magical. You can achieve this by using LED light bases or routing a channel in a wood shelf to tuck an LED strip facing upward.
Common Mistakes + Fixes
- Mistake: Using exposed LED strips where you can see the individual “dots” of light reflect on the crystals.
- Fix: Always use a diffuser channel (an aluminum track with a frosted plastic cover). This blurs the dots into a seamless bar of light, creating a soft, professional glow.
Styling Composition: The Art of Arrangement
Once you have the shelf and the light, you have to arrange the stones. The goal is to create a visual journey for the eye, rather than a flat lineup.
The Rule of Triangles
Arrange your pieces in clusters of three. Place the tallest item in the back, a medium piece to the side, and the smallest piece in the front. This triangular shape creates depth and prevents the “soldier lineup” look.
Elevating Your Display
Varying heights is essential for a professional look. If all your crystals are the same size, the display will feel flat.
I use clear acrylic risers to lift specific pieces in the back row. Because the acrylic is transparent, it disappears visually and lets the crystal hover. You can also stack crystals on top of coffee table books to add height and context.
Mixing Textures
Contrast creates interest. If you have a very smooth, polished crystal sphere, place it next to a rough, raw mineral chunk.
The interplay between the sleek, manufactured finish and the rugged, natural edge highlights the best qualities of both.
Real-World Project Checklist:
- Spacing: Leave at least 2 to 3 inches of negative space between clusters. Crowding makes the display look like inventory storage.
- Color Blocking: Grouping by color (all blues together, all pinks together) can look very high-end and organized.
- Materials: Incorporate organic elements like driftwoods or air plants to soften the hardness of the stones.
Room-Specific Strategies
Different rooms serve different functional purposes, and your crystal displays should reflect that.
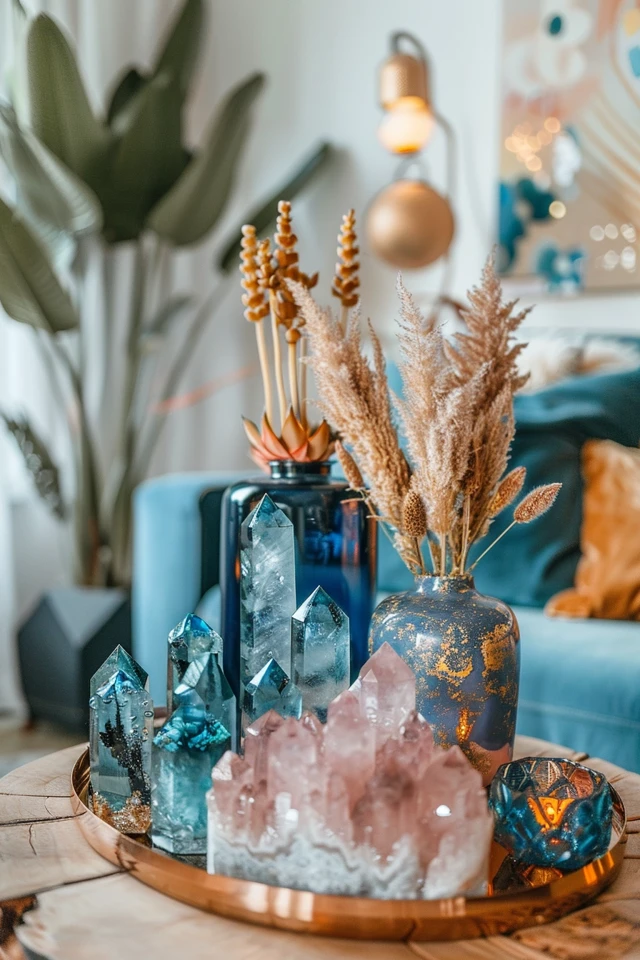
The Living Room (The Coffee Table)
The coffee table is high-risk for knocks and spills, but it is prime real estate for display. The rule here is “containment.”
Always place crystals on a tray. This grounds the collection and makes it easy to move the whole display if you need the table space for board games or snacks. Stick to larger, heavier pieces here that won’t be easily swallowed by a vacuum or knocked over by a dog’s tail.
The Bedroom (Calm and Soft)
In bedrooms, I lean toward softer, smoother stones. Avoid sharp, jagged geodes on nightstands where you might fumble for a glass of water in the dark.
Styling wise, keep it minimal. One large, polished piece on a stack of books is often more effective here than a cluttered collection. It promotes a sense of rest.
The Entryway (The Statement)
This is the place for your “wow” factor. If you have a large cathedral geode or a tall sculpture, place it on a console table in the entry.
Use a dedicated accent lamp or a picture light mounted above the console to highlight this piece. It sets a tone of elegance and nature as soon as guests walk in.
Maintenance, Safety, and Durability
Crystals are durable, but they are not indestructible. Proper care ensures they remain a permanent part of your home design.
Securing Your Collection
If you live in an earthquake zone, or if you have cats or children, you must secure your crystals. I use a product called Museum Wax (or Quake Hold).
Take a small pea-sized amount, roll it into a ball, and press it onto the bottom of the crystal. Press the crystal firmly onto the shelf. It holds incredibly well but pops off cleanly when you twist the object to remove it.
Sunlight Warnings
Not all crystals love the sun. Amethyst, Citrine, and Rose Quartz will fade significantly if left in direct sunlight for long periods.
If you are styling a window sill, stick to clear quartz or agate slices, which are generally color-stable. Move colored stones to interior shelves away from harsh UV rays.
Cleaning Protocols
Dust is the enemy of sparkle. However, you cannot just spray Windex on minerals. Some stones, like Selenite or Calcite, are soft and porous; liquid can damage them.
My Cleaning Kit:
- Compressed Air: The kind used for computer keyboards. This is the safest way to blow dust out of the crevices of raw geodes.
- Microfiber Cloth: Use this dry for polishing smooth surfaces.
- Makeup Brush: A clean, fluffy makeup brush is perfect for dusting delicate clusters without snagging.
Designer’s Final Checklist
Here is the mental checklist I run through before I consider a project “finished.”
1. The Shake Test
Gently bump the furniture piece. Does anything wobble? If yes, apply more museum wax immediately.
2. The Glare Check
Sit in the main seating area of the room. Does the lighting from the display shine directly into your eyes? If so, adjust the angle of the LED strips or add a small lip to the shelf to hide the fixture.
3. The Negative Space Audit
Step back five feet. Does the shelf look “full”? If it looks full to you, remove 20% of the items. Negative space is what makes the remaining items look expensive.
4. The Cord Management
Are any wires from the lights visible? Tape them down or use cord covers painted to match the wall. Visible cords ruin the magic.
FAQs
Can I display crystals in the bathroom?
It depends on the stone. Quartz and Amethyst generally handle humidity fine. However, stones with iron content (like Pyrite or Hematite) can rust in humid environments. Selenite can eventually degrade if the room is constantly steamy.
How do I style small tumbled stones without them looking messy?
Use a vessel. A shallow ceramic bowl, a vintage glass ashtray, or a small brass dish works wonders. Pile them together in the dish rather than scattering them across a shelf.
What is the best background color for crystal shelves?
I prefer dark matte backgrounds. A charcoal or deep navy back panel makes the crystals pop and appear brighter by contrast. White backgrounds are clean but can wash out lighter stones like clear quartz.
Is it okay to mix crystals with regular decor?
Absolutely. In fact, I prefer it. Mix them with books, small sculptures, photo frames, and plants. It makes the home feel curated and personal, rather than looking like a crystal shop.
Conclusion
Bringing crystals into your home design is about more than just collecting pretty rocks. It is about capturing light, adding organic architectural interest, and creating a focal point that feels alive.
By focusing on proper lighting, secure placement, and intentional composition, you elevate these natural wonders from simple specimens to sophisticated decor. Start with one shelf or one tray, apply these rules of scale and lighting, and watch how it transforms the energy of your room.
Picture Gallery


