
Halloween Party – Spooky Bar Ideas to Wow Guests
Hosting a Halloween party is one of the few times a year I allow myself to break the standard rules of interior design and embrace pure theatricality. I remember my first serious attempt at a haunted soiree; I focused so much on the costumes that I neglected the flow of the room, resulting in a bottleneck at the drinks station that lasted all night. A well-designed bar isn’t just about spiderwebs; it is about creating a functional focal point that draws guests in without causing a traffic jam.
To help you visualize the final look, I have curated a comprehensive Picture Gallery at the end of the blog post with high-resolution examples of these concepts.
Whether you are working with a sprawling kitchen island or a compact bar cart in a rental apartment, the principles of scale, lighting, and texture remain the same. We want to create an atmosphere that feels sophisticated and spooky, rather than cheap and chaotic.
1. Lighting the Spirits: creating Atmosphere and Depth
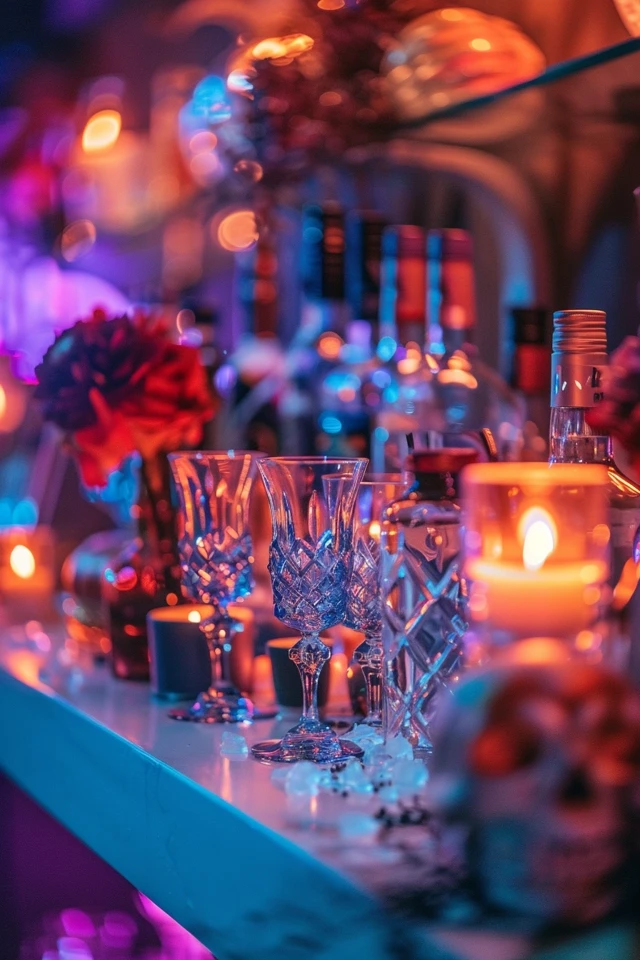
Lighting is the single most important element in interior design, and for a Halloween bar, it makes or breaks the “spook factor.” If your overhead lights are on full blast, no amount of decor will make the space feel haunted. We need to lower the ambient light and focus on accent lighting.
I always advise clients to aim for a color temperature of 2200K to 2700K (very warm white) for intimate gatherings. For Halloween, however, we can play with shadows. Avoid using the main ceiling grid. instead, rely on table lamps and portable lighting sources.
Designer’s Note: The Safety Balance
One lesson I learned the hard way is that “moody” often translates to “I can’t see what I’m pouring.” If the bar is too dark, guests will spill red wine on your rug. Always ensure there is at least 300 to 400 lumens of task lighting directed specifically at the surface where drinks are being poured.
The Lighting Layering Technique
To achieve that professional look, layer your light sources using the following hierarchy:
- The Backlight: Place a small uplight or LED strip behind the bottles. This makes the liquid inside glass bottles glow, which looks fantastic with amber bourbons or green absinthes.
- The Flicker: Use battery-operated LED taper candles. Real flames are dangerous in a high-traffic bar area where guests are reaching over items with loose costume sleeves.
- The Wash: If you have a wall behind your bar, use a colored bulb (purple or deep green) in a floor can light to wash the wall in color. This creates depth without blinding your guests.
Common Mistakes + Fixes
Mistake: Using strobing or flashing lights near the food and drink.
Correction: Keep dynamic lighting on the dance floor. The bar requires steady, consistent light so guests can mix drinks safely and read labels.
2. Verticality and Scale: The Apothecary Aesthetic
In interior design, flat surfaces are boring surfaces. If you line up all your bottles and bowls on the counter at the same height, the display will look cluttered and uninspired. We need to utilize vertical space to guide the eye.
Think of an old-world apothecary or a mad scientist’s lab. The visual interest comes from shelves, risers, and varying heights. This is also a great trick for small spaces; when you can’t build out, you build up.
What I’d Do in a Real Project
- Use Risers: I use cake stands, stacked vintage books, or overturned wooden crates to elevate the back row of spirits. This creates a stadium-seating effect for your bottles.
- Vary the Vessels: Decant standard liquor into interesting glass bottles. I look for different silhouettes—tall and thin, short and stout, or faceted glass.
- The Rule of Three: Group decor items (like skulls, crows, or candles) in odd numbers. A cluster of three creates a natural center of interest that is pleasing to the human eye.
Measurements for Success
When styling vertical elements, keep the “reach zone” in mind. Do not place essential items (like ice or cups) behind a tall centerpiece.
- Reach Depth: Keep frequently used items within 15 to 20 inches of the counter edge.
- Visual Obstruction: If the bar is on a kitchen island between two rooms, keep the decor under 12 inches high or over 24 inches high so it does not block eye contact between guests.
3. Textures and Linens: Spooky but Practical
Texture provides the tactile experience of the room. For a spooky bar, we want to move away from crisp cottons and towards heavy velvets, rough burlaps, or sheer cheesecloths. However, as a designer, I prioritize the protection of your furniture above all else.
Alcohol, citrus juice, and sugary syrups are enemies to natural stone, wood, and marble. You must protect the surface beneath the decor.
Layering for Protection
Never place cheesecloth directly on a wood table if drinks are being served. The liquid will seep through instantly.
Step 1: The Barrier.
Start with a waterproof layer. You can use a clear acrylic sheet cut to size, or even a glass top if you have one. If you want a tablecloth look, use a high-quality vinyl or a thick felt pad underneath your decorative fabric.
Step 2: The Base Fabric.
Use a dark, dense fabric like charcoal velvet or black denim. These absorb light and hide stains well.
Step 3: The Distress Layer.
Drape cheesecloth or “creepy cloth” over the base. Don’t just lay it flat; bunch it up, tear holes in it, and let it pool on the floor (if it’s a console table).
Designer’s Note: Renter-Friendly Tips
If you are renting and worried about staining the landlord’s granite, buy a roll of “blackboard contact paper.” It is low-tack and removable. Adhere it to the countertop for the night. It protects the stone, looks matte black and spooky, and you can write the names of the “potions” directly on the counter with chalk.
4. The Hardware: Styling the Drinkware and Garnishes
The hardware—meaning the tools, glassware, and serving vessels—acts as the jewelry of the room. In a standard design, I usually coordinate metals (all brass or all chrome). For Halloween, mixing metals adds to the chaotic, collected feel of an abandoned mansion.
Tarnished silver is the gold standard for spooky decor. It reflects light dimly and looks historic. If you don’t have real silver, you can find silver-plated trays at thrift stores for very cheap.
Glassware Selection
Ditch the red plastic cups. They ruin the aesthetic instantly. If you are worried about breakage, there are excellent high-end acrylic options available now that mimic cut crystal.
- The Goblet: Use heavy, stemmed glassware. It forces guests to slow down and feels regal.
- The Beaker: Laboratory beakers are heat-resistant and food-safe. They make excellent vessels for punches or wine.
- The Syringe: For a pop of color, fill plastic food-safe syringes with grenadine or raspberry puree and place them inside the glasses. It adds an interactive element.
Common Mistakes + Fixes
Mistake: Using dry ice incorrectly.
Correction: Dry ice creates amazing fog, but it is dangerous if swallowed. Never put dry ice directly into a guest’s glass unless it is enclosed in a specific dry ice swizzle stick cage. Instead, put the dry ice in a larger punch bowl, and float a smaller bowl containing the actual punch inside it. You get the fog effect without the safety risk.
5. Flow and Layout: Traffic Control Mechanics
The layout is where interior design expertise really counts. A beautiful bar that creates a bottleneck is a failure. You need to calculate the flow of human traffic to prevent congestion.
In a professional floor plan, we look for “pinch points.” These are narrow areas where traffic stops. The bar is the biggest pinch point at any party.
Separation of Powers
Do not put the food, the booze, and the ice in the same three-foot section. This ensures disaster.
- Station 1 (Glassware & Ice): Place this on the left (or the start of the line).
- Station 2 (Spirits & Mixers): Place this in the middle.
- Station 3 (Garnishes & Napkins): Place this at the end.
By spreading these out over 4 to 6 feet, you allow multiple people to service their drinks simultaneously.
Spacing Rules of Thumb
- Walkway Width: Ensure there is at least 36 inches of clearance behind the person making a drink so others can walk past.
- Table Height: A standard bar height is 42 inches. A standard counter is 36 inches. If you are using a low coffee table or side table (30 inches), guests will have to stoop. This is uncomfortable. Try to stick to surfaces 36 inches or higher for serving.
Final Checklist: The “Hour Before” Walkthrough
Before the first doorbell rings, run through this quick designer checklist to ensure your bar is ready for action.
- Lighting Check: Dim the overheads and turn on your accent lights. Can you read a label without squinting?
- Temperature Check: Is the room cool? Crowds generate heat. Lower your thermostat by 3-5 degrees before guests arrive.
- Surface Check: Is your waterproof barrier in place under the tablecloth?
- Stability Check: Shake the table gently. Do the tall bottles wobble? If so, move them or use museum putty to secure them.
- Supply Check: Do you have a trash bin visible and accessible near the bar? This prevents guests from leaving napkins on your styled vignettes.
FAQs
How can I style a bar in a small apartment?
If you lack floor space for a cart, clear off a bookshelf shelf or the top of a media console. Use a tray to define the “bar area.” This contains spills and visually separates the drink station from your TV or books. Verticality is key here—use the wall space above the console for temporary peel-and-stick spooky decals or a hanging wreath to draw the eye up.
Is it worth renting glassware for a house party?
If you are hosting more than 20 people, yes. Renting wine glasses is surprisingly affordable (often less than $1 per stem). The rental company delivers them and, best of all, you usually put them back in the crate dirty. This saves you hours of dishwashing at 2 AM.
How do I make the bar look “expensive” on a budget?
Focus on the ice and the garnish. Clear, large ice cubes (made in silicone molds) look infinitely more premium than cloudy freezer ice. Fresh herbs, dehydrated citrus wheels, and quality olives elevate the look immediately. In design, the smallest details often carry the most weight.
Conclusion
Designing a spooky bar for Halloween is the perfect intersection of functional interior planning and creative set dressing. By focusing on the quality of light, the hierarchy of heights, and the practical flow of traffic, you create an experience that feels immersive rather than cluttered.
Remember that the goal is to facilitate connection. A well-designed space makes guests feel taken care of. When they can easily find a glass, see what they are pouring, and move through the room comfortably, they can focus on the fun. Happy haunting!
Picture Gallery


