
Halloween Decor – Spooky-Fun 1st Birthday Party Ideas
Planning a first birthday is a milestone that is as much for the parents as it is for the child. When that birthday falls near October 31st, you have the perfect excuse to blend adorable milestones with the festive atmosphere of Halloween. However, walking the line between “festive” and “frightening” is a delicate design challenge when your guest of honor is only one year old.
The goal is to create a “Spooky One” or “First Boo-day” theme that feels curated and architectural, rather than chaotic. As an interior designer, I approach party styling the same way I approach a room renovation: by prioritizing floor plan flow, lighting temperatures, and cohesive color stories. You want the photos to look timeless, not like a snapshot from a haunted house attraction.
Make sure to scroll all the way down because we have curated a massive Picture Gallery at the end of this blog post to help you visualize these concepts.
1. Establishing the “Spooky One” Color Palette and Theme
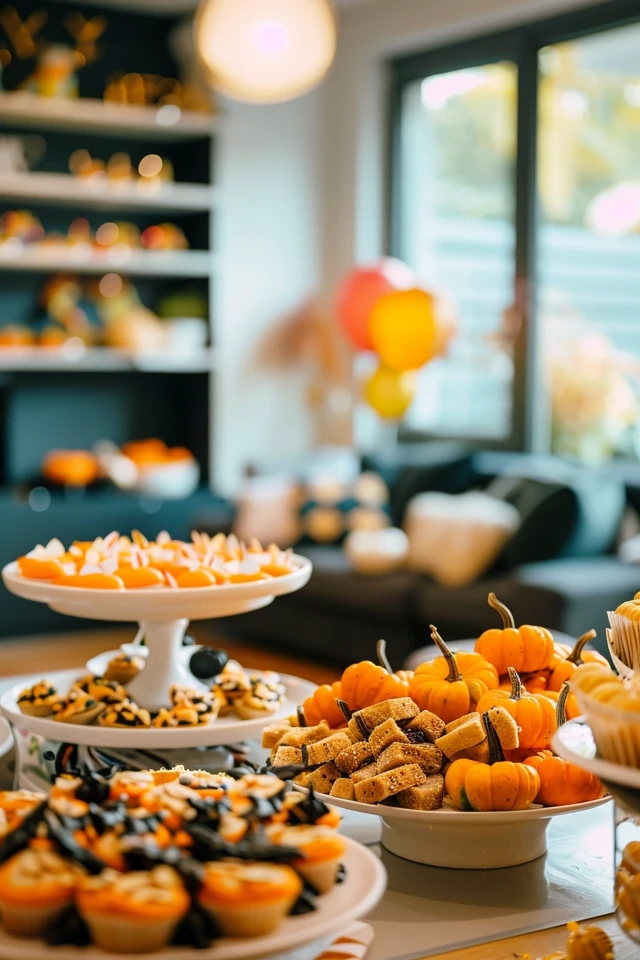
The biggest mistake parents make with Halloween birthdays is relying strictly on construction-cone orange and jet black. While classic, this high-contrast combination can look harsh in photos and often feels visually cluttered. For a first birthday, we want to soften the aesthetic to create a whimsical, welcoming environment.
I recommend shifting toward a “Soft Spook” or “Vintage Halloween” palette. Think sage greens, muted terracottas, cream, and touches of matte black or charcoal. This allows you to incorporate existing home decor without the party supplies clashing with your rug or wall color.
The 60-30-10 Rule in Party Decor
Just like styling a living room, use the 60-30-10 rule to keep the room balanced.
- 60% Dominant Color: Use a neutral base like cream, oatmeal, or soft white. This should be your tablecloths, large backdrops, and room perimeter.
- 30% Secondary Color: This is where your “Halloween” comes in. Use burnt orange, sage green, or a dusty pink for balloons, large pumpkins, and signage.
- 10% Accent Color: Use matte black or metallic gold for the sharp details—cutlery, font on the cake topper, or ribbons.
Designer’s Note: Texture Over Clutter
In high-end design, we create interest through texture rather than just adding more “stuff.” Instead of plastic spiderwebs, use unbleached cheesecloth draped over tables. Instead of bright plastic pumpkins, opt for velvet plush pumpkins or ceramic gourds. These textures absorb light rather than reflecting it, which softens the overall look of the room and makes your photos look significantly more professional.
2. Designing the Layout: Traffic Flow and Baby Zones
A first birthday party has a unique guest list mix: walking adults and crawling babies. Your furniture layout needs to accommodate both safely. If you are hosting this in your living room, you may need to rearrange your furniture to create a clear 36-inch perimeter walkway for adults while preserving a central “safe zone” for the babies.
The “Safe Zone” Rug Placement
Define the play area with a large area rug. If you have hard floors, layer a plush rug (shag or heavy wool) to cushion falls.
- Scale: Avoid small 5×7 rugs that float in the middle of the room. Go for an 8×10 or larger to anchor the play space.
- Anchoring: Ensure the front legs of any nearby sofas or chairs are sitting on the rug. This prevents the rug from sliding and creates a cohesive conversation area for the parents watching the kids.
- Clearance: Keep coffee tables at least 18 inches away from the sofa edge, or remove them entirely for the party to prevent head bumps.
Common Mistakes + Fixes
Mistake: Placing the food table near the entry.
Fix: This causes a “bottleneck” where guests enter, stop to look at food, and block the door. Place the grazing table or dessert bar on the far side of the room to draw guests all the way into the space.
Mistake: ignoring vertical space.
Fix: Floor space is precious with crawling babies. Move decor up. Use wall-mounted balloon garlands or tall floral arrangements (over 24 inches) on sturdy tables so the sightlines remain open but the floor stays clear.
3. The High Chair Photo Moment: Lighting and Backdrops
The “Smash Cake” is the main event of a first birthday. As a designer, I treat the high chair setup like a vignette or a focal point in a foyer. It needs framing, lighting, and hierarchy.
Lighting the Vignette
Lighting makes or breaks your cake smash photos. Avoid relying on your overhead ceiling cans, which cast harsh shadows under the baby’s eyes and nose.
- Positioning: Place the high chair facing a natural light source (a window or sliding door). The light should hit the baby’s face directly, not from behind (backlighting makes them a silhouette).
- Artificial Light: If the party is in the evening, turn off the overhead lights. Use floor lamps with warm bulbs (2700K to 3000K temperature) bounced off white walls to create a soft, diffuse glow.
Backdrop Architecture
A backdrop frames the photo and hides visual noise (like your TV or kitchen counters).
- Height Rules: A common error is hanging banners or arches too low. The backdrop should extend at least 7 feet high. If you are taking photos of adults standing next to the baby, you don’t want the backdrop to end at their neck.
- Material: Use matte vinyl or fabric backdrops. Shiny foil curtains look fun in person but create impossible glare for cameras.
- Stability: If using a backdrop stand, weight the bases with sandbags. One-year-olds will pull on anything within reach.
What I’d do in a real project:
I would place a vintage wooden high chair (rented or borrowed) on a dedicated 4×4 mat or drop cloth that matches the floor color. I would frame the chair with an asymmetrical balloon arch on the left side, balancing it with a “One” script sign on the right. This asymmetry creates a dynamic composition that draws the eye straight to the baby.
4. Tablescapes and Dining: Practicality Meets Style
For the adult tables, you want the “Spooky” vibe to feel sophisticated. We accomplish this through layering and scale. Since this is a kid’s party, disposable tableware is expected, but you can elevate it by mixing high and low elements.
The Centerpiece Logic
Follow the “Elbow Rule” for table decor. Guests need to see each other to converse.
- Low Profile: Keep floral arrangements or pumpkin clusters below 12 inches in height.
- High Profile: If you want drama, use tall candelabras or branches that start branching out above 24 inches. This leaves the sightline clear at eye level.
- Stability: Avoid taper candles if there are toddlers walking around. Opt for battery-operated pillars inside hurricanes or heavy glass vessels.
Material Selection
Linens: Use a floor-length tablecloth to hide the legs of rental tables. A polyester-cotton blend with a matte finish looks more expensive than plastic and hides the inevitable spills better.
Dishware: If using disposables, choose heavy-weight bamboo or palm leaf plates. They fit the natural, rustic Halloween vibe perfectly and don’t get soggy like paper.
Common Mistakes + Fixes
Mistake: Using “fake” spiderwebs on the dining table.
Fix: These get caught in buttons, zippers, and food. Instead, use a black gauze runner. It gives the same spooky texture but stays flat and contained.
5. Safety First: Child-Proofing the Decor
When styling for a one-year-old, safety isn’t just a precaution; it dictates the design. A crawling baby sees the world from 12 inches off the ground, meaning every floor decoration is a potential toy or hazard.
Choking Hazards and Material Safety
- Balloon Safety: Latex balloons are a major choking hazard if they pop. Keep balloons in garlands mounted high on the wall or use foil mylar balloons, which are harder to tear. Never leave loose latex balloons on the floor for the “balloon pit” effect with 1-year-olds.
- Scatter Decor: Avoid “table scatter” like plastic spiders, confetti, or acrylic crystals. These inevitably fall on the floor and are the perfect size for a windpipe.
- Anchoring: If you are using large pumpkins or hay bales for a photo op, ensure they are stable. A heavy pumpkin rolling off a bale onto a toddler’s toe is a party-ending injury.
Designer’s Note: The “Touch Test”
Before the party starts, I always do a “crawl test.” I get down on my hands and knees to see what looks interesting from a baby’s perspective. If I see an electrical cord for the pumpkin lights or a sharp edge on a low table, I tape it down or move it. If it looks accessible, a baby will find it.
6. Exterior styling: Curb Appeal and Entryway
The party experience begins at the curb. For a Halloween birthday, the landscape design sets the mood immediately. You want to signal “party” rather than “scary dungeon.”
The Rule of Odds
When arranging pumpkins on your porch steps, always group them in odd numbers (groups of 3 or 5).
- Triangulation: Arrange pumpkins in a triangle shape—one tall, one medium, one wide/short. This keeps the eye moving.
- Scale: Use large mums in planters to add height. A common mistake is buying small 6-inch nursery pots that disappear next to a front door. Use planters that are at least 14-16 inches in diameter to visually anchor the entry.
Lighting the Path
October evenings get dark early. Safety lighting is essential for guests leaving the party.
- Solar Path Lights: Ensure your walkway is illuminated. If you don’t have hardwired landscape lighting, use temporary solar stakes.
- Lanterns: Place battery-operated lanterns on the steps. Avoid real flames near the entryway where long coats or costumes could brush against them.
Final Checklist for a Spooky One Birthday
Use this checklist 24 hours before the party to ensure your design is functional and safe.
- Check Lighting Temps: Are all bulbs warm white (2700K-3000K)? Mix-matched daylight and warm bulbs ruin photos.
- Clear the Walkways: Is there a clear 36-inch path from the entry to the main party zone?
- Secure the Hazards: Are all tablecloths secure so a baby can’t pull the whole setting down?
- High Chair Prep: Is the high chair positioned facing the light source?
- Floor Sweep: Have you removed all small objects, cords, and breakables from the floor level?
- Bathroom Stock: Is the guest bathroom stocked with extra hand towels and a step stool for older kids?
- Pet Plan: Do you have a safe, quiet room for pets if the noise gets too loud?
FAQs
How do I make the party “Halloween” themed without scaring the babies?
Focus on “Harvest” and “Whimsical” elements rather than “Horror.” Use smiling ghosts, friendly pumpkins, and woodland creatures. Avoid gore, masks, fake blood, or animatronics that make noise or jump. The goal is atmosphere, not adrenaline.
What is the best time of day for a 1st birthday party?
This is dictated by the nap schedule. Usually, the “sweet spot” is immediately after the first nap of the day, typically between 10:30 AM and 12:30 PM. This ensures the birthday baby is well-rested and happy. Alternatively, a late afternoon party (3:00 PM – 5:00 PM) works after the second nap.
Can I use dry ice for a spooky fog effect?
I generally advise against dry ice for a 1st birthday. While it looks cool, it requires careful handling to prevent burns, and the vapor can be heavy in a room with small children on the floor. If you want atmosphere, use a bubble machine—kids love it, and it provides a similar whimsical movement in photos.
How much seating do I actually need?
You don’t need a seat for every single person if you are serving finger foods, but you need enough for 70% of your adult guests. Grandparents and parents holding babies will need priority seating. Scatter ottomans or floor cushions for a more casual, flexible option.
Conclusion
Designing a “Spooky One” first birthday party is about balancing the fun of the season with the functional needs of your smallest guests. By sticking to a cohesive, muted color palette and prioritizing a safe, open floor plan, you create an event that feels polished and high-end.
Remember that the most beautiful design element is good lighting and a relaxed host. Once the decor is up and the safety checks are done, put away the “designer” hat and put on the “parent” hat. These moments go by fast, and the best accessory you can wear is a genuine smile as you celebrate your little one’s big milestone.
Picture Gallery


